Recipe 5.19. Using Group Policy Editor to Alter the Interface
ProblemAs you've seen in the recipes in this chapter, there are many different ways to change the XP interface using a variety of different tools, including the Registry, menus and dialog boxes, and downloadable software. But it can be confusing to have to keep switching among all those different tools. You want a central way to alter many interface settings. SolutionUsing a graphical user interfaceThe Group Policy Editor, available only in Windows XP Professional, gives you literally dozens of ways to customize the interface. To run it, type gpedit.msc and press Enter. Once Group Policy Editor is running, go to User Configuration\Administrative Templates. Beneath it, you'll find a number of folders with different XP features you can change, including:
Each of those folders may have subfolders beneath it for example, Windows Components lists a number of components, including Internet Explorer, Windows Explorer, and NetMeeting. The Start menu and Taskbar folder alone lets you change nearly four dozen separate settings, such as removing the Pinned Programs List from the Start menu, removing the My Documents icon from the Start menu, hiding the Notification Area (also called the System Tray) on the Taskbar, not showing the My Pictures icon, the Run menu, and the My Music icon on the Start menu, locking the Taskbar so that it can't be customized, and many others. To use the Group Policy Editor, first make sure that you click on the Extended tab at the bottom of the screen. When you do, you'll be shown a description of the setting, what the setting will change, and information about what changes you can make with the setting, as you can see in Figure 5-18. Figure 5-18. The Group Policy Editor lets you customize many aspects of the XP interface, including the Taskbar, Start menu, and Control Panel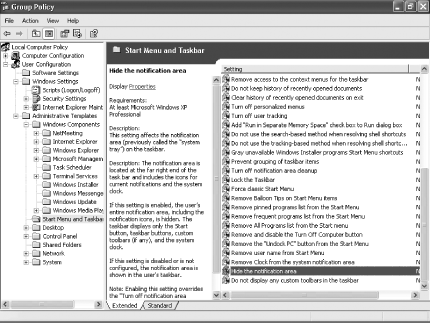 To change a setting, double-click on it. As you can see in Figure 5-19, you'll have three choices: Not Configured, Enabled, or Disabled. Not Configured means that you aren't using the settings you're letting XP handle it using XP's defaults, or using any changes to the defaults that you've made with the Registry, user interface, or other tool. To turn on the setting, choose Enabled; to turn off the setting, choose Disabled. Then click on OK and exit the Group Policy Editor. Figure 5-19. You can enable or disable settings from this screen; for more information about the settings, click on Explain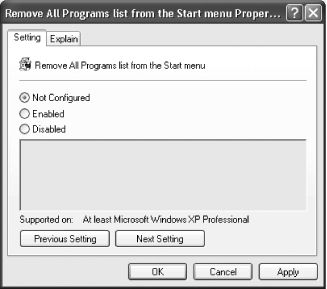 DiscussionThere are so many settings in the Group Policy Editor that it would literally take an entire book to cover them all. The settings are generally self-explanatory, and for those that aren't, when you get to the screen to change the setting, click on the Explain tab and it will give you more details. The real power of the Group Policy Editor comes in not when you make changes for an individual user, but rather when you make them for everyone who uses the same computer, or you apply them to someone on the network, no matter what computer they use. There are two major branches to the Group Policy Editor: Computer Configuration and User Configuration. When you make changes to the Computer Configuration, the changes will be applied to everyone who uses the particular computer. When you make changes to User Configuration , the changes will be made to that particular user, no matter which computer on the network he uses. See AlsoMS KB 307882, "How To Use the Group Policy Editor to Manage Local Computer Policy in Windows XP" |
EAN: 2147483647
Pages: 408