Refining Form Properties
As with tables, you can work with forms in multiple views. The two most common views are Form view, which you use to view or enter data, and Design view, which you use to add controls to the form or change the form s properties or layout.
When you use the Form Wizard to create a form in a column format, every field you select from the underlying table is represented by a text box control and its associated label control. A form like this one, which is used to enter or view the information stored in a specific table, is linked, or bound , to that table. Each text box ”the box where data is entered or viewed ”is bound to a specific field in the table. The table is the record source , and the field is the control source . Each control has a number of properties, such as font, font size , alignment, fill color , and border. The wizard assigns default values for these properties, but you can change them to improve the form s appearance.
In this exercise, you will edit the properties of the Customers form so that it suits the needs of the people who will be using it on a daily basis.
USE the GardenCo database and the tgc_bkgrnd graphic in the practice file folder for this topic. These practice files are located in the ![]() My Documents\Microsoft Press\Office 2003 SBS\Forms\Properties folder and can also be accessed by clicking Start/All Programs/Microsoft Press/Microsoft Office System 2003 Step by Step .
My Documents\Microsoft Press\Office 2003 SBS\Forms\Properties folder and can also be accessed by clicking Start/All Programs/Microsoft Press/Microsoft Office System 2003 Step by Step .
OPEN the GardenCo database and acknowledge the safety warning, if necessary.
-
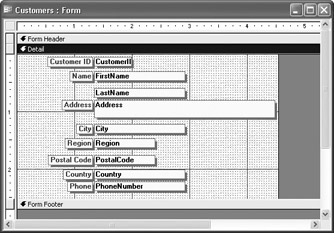
With Forms selected on the Objects bar, click Customers in the list of forms,and click the Design button to open the form in Design view.
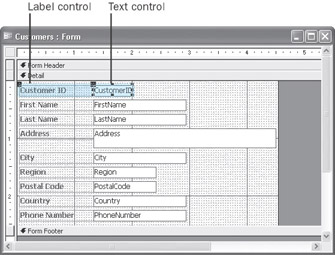
When a form is created, some of its properties are inherited from the table on which it is based. In this example, the names assigned to the text boxes ( FirstName , LastName , and so on) are the field names from the Customers table, and the labels to the left of each text box reflect the Caption property of each field. The size of each text box is determined by the Field Size property.
Tip After a form has been created, its properties are not bound to their source. In previous versions of Access, changing the table s field properties had no impact on the corresponding form property, and vice versa. Now in Access 2003, when you modify an inherited field property in Table Design view, you can choose to update the property in all or some controls that are bound to the field.
-
Click the Customer ID label (not its text box). Then on the Formatting toolbar, click the down arrow to the right of the Font button, and click Microsoft Sans Serif . (If you don t see Microsoft Sans Serif, click MS Sans Serif .)
-
With the label still selected, click the down arrow to the right of the Font Size box, and click 8 to make the font slightly smaller.
-
Right-click the CustomerID text box (not its label), and click Properties on the shortcut menu to display the Properties dialog box for the CustomerID text box.
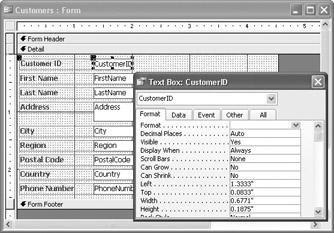
All the settings available on the toolbar (plus a few more) are also available in a Properties dialog box that is associated with each control. You can use this dialog box to display the properties of any object in the form, including the form itself: simply click the down arrow to the right of the box at the top of the dialog box, and click the object whose properties you want to display.
You can display related types of properties by clicking the appropriate tab: Format, Data, Event, or Other. You can also display all properties by clicking the All tab.
-
Click the Format tab, scroll to the Font Name property, and change it to Microsoft Sans Serif (or MS Sans Serif ). Then set Font Size to 8 , and set Font Weight to Bold .
On the form behind the dialog box, you can see how these changes affect the CustomerID text in the text box (you might have to move the dialog box).
Tip When you are working in Design view with the Properties dialog box open, you can drag the dialog box by its title bar to the side of the screen so that you can see the changes you re making to the form.
-
Click the down arrow to the right of the box at the top of the Properties dialogbox , and click FirstName_Label box to select the label to the left of the FirstName text box.
-
Repeat step 5 to change the font settings for this control.
These different ways of selecting a control and changing its properties provide some flexibility and convenience, but you can see that it would be a bit tediousto apply any of them to a few dozen controls in a form. The next two steps providea faster method.
-
Click anywhere in the form, and then press [CONTROL]+[A] to select all the controls in the Detail section of the form.
Tip You can also select all the controls in a form by opening the Edit menu and clicking Select All, or by dragging a rectangle over some portion of all the controls.
Small black handles appear around all the controls to indicate that they are selected. The title bar of the Properties dialog box now displays Multiple selection , and the Objects list is blank. Only the Format settings that have the same settings for all the selected controls are displayed. Because the changes you made in the previous steps are not shared by all the selected controls, the Font Name, Font Size, and Font Weight settings are now blank.
-
To apply the settings to all the selected controls, set the Font Name , Font Size , and Font Weight properties as you did in step 5.
-
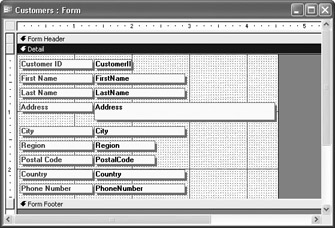
With all controls still selected, on the Format tab, click Back Style , and set it to Normal .
The background of the labels will no longer be transparent.
-
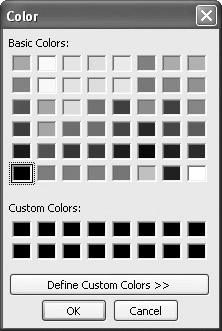
Click Back Color , and then click the button at the right end of the box to display the Color dialog box.
-
Click pale yellow (the second option in the top row), click OK , and then press [ENTER] to accept the change.
The background of all the controls changes to pale yellow.
Tip If you don t see a color you want to use, click Define Custom Colors, work with the various settings until you have specified the desired color, and then click Add to Custom Colors.
-
Set Special Effect to Shadowed , and set Border Color to a shade of green.
You can either click the button and make a selection, or type a color value such as 32768 in the Border Color box.
-
Click the Detail section in the form to deselect all the controls.
-
Click the label to the left of FirstName , and in the Properties dialog box, scroll up to the Caption box and change First Name to Name .
-
Repeat step 15 to change Phone Number to Phone .
Tip You can edit the Caption property of a label or the Control Source property of a text box by selecting it, clicking its text, and then editing the text as you would in any other Windows program. However, take care when editing the Control Source property, which defines where the content of the text box comes from.
-
Remove the label to the left of LastName by clicking it and then pressing the [DEL] key.
-
Select all the labels, but not their corresponding text boxes, by holding down the [SHIFT] key as you click each of them. Then in the Properties dialog box, scroll down and set the Text Align property to Right .
-
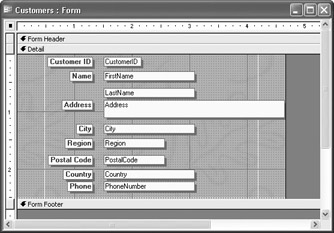
On the Format menu, point to Size , click To Fit to size the labels to fit their contents, and then click anywhere in the form, but outside the controls, to deselect them.
Tip The order in which you make formatting changes, such as the ones youjust made, can have an impact on the results. If you don t see the expected results, click the Undo button or press [CONTROL]+[Z] to step back through your changes, and then try again.
-
Hold down the [SHIFT] key while clicking each text box to select all the text boxes but not their corresponding labels, and in the Properties dialog box, change the Left setting to 1.5" to insert a little space between the labels and the text boxes.
-
Change the Font Weight property to Normal , and then click anywhere in the form, but outside the controls, to deselect them.
-
To change the background to one that better represents The Garden Company, click the down arrow to the right of the box at the top of the Properties dialog box, click Form , click the Picture property ”which shows (bitmap) ” and then clickthe button to open the Insert Picture dialog box.
-
Navigate to the My Documents\Microsoft Press\Office System 2003 SBS\Forms\Properties folder, and double-click tgc_bkgrnd . (If you don t see this file listed, change the Files of type setting to Graphics Files .)
The form s background changes, and the path to the graphic used for the new background is displayed in the Picture property box.
-
Click the Save button to save the design of your Customers form.
-
Close the form. (The Properties dialog box closes when you close the form.)
CLOSE the GardenCo database.
EAN: 2147483647
Pages: 350