Refining Form Layout
The forms created by a wizard are functional, not fancy. However, it s fairly easy to customize the layout to suit your needs. You can add and delete labels, move both labels and text controls around the form, add logos and other graphics, and otherwise improve the layout of the form to make it attractive and easy to use.
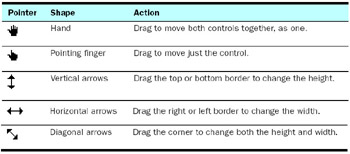
As you work with a form s layout, it is important to pay attention to the shape of the pointer, which changes to indicate the manner in which you can change the selected item. Because a text box and its label sometimes act as a unit, you have to be careful to notice the pointer s shape before making any change. This table explains what action each shape indicates:
In this exercise, you will rearrange the label and text box controls in the Customers form to make them more closely fit the way people will work with them.
USE the GardenCo database in the practice file folder for this topic. This practice file is located in the ![]() My Documents\Microsoft Press\Office 2003 SBS\Forms\Layout folder and can also be accessed by clicking Start/All Programs/Microsoft Press/Microsoft Office System 2003 Step by Step .
My Documents\Microsoft Press\Office 2003 SBS\Forms\Layout folder and can also be accessed by clicking Start/All Programs/Microsoft Press/Microsoft Office System 2003 Step by Step .
OPEN the GardenCo database and acknowledge the safety warning, if necessary.
-
Open the Customers form in Design view.
-
If necessary, drag the lower-right corner of the Form window down and to the right until you can see the form footer at the bottom of the form and have an inch orso of blank area to the right of the background.
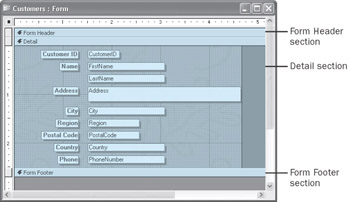
The form is divided into three sections: Form Header, Detail, and Form Footer. Only the Detail section currently has anything in it.
-
Point to the right edge of the Detail background, and when the pointer changesto a two-way arrow, drag the edge of the background to the right until you can see about five full grid sections.
-
Click the LastName text box, and then slowly move the pointer around its border, from black handle to black handle, noticing how it changes shape.
-
Move the pointer over the LastName text box and when it changes to a hand,drag it up and to the right of the FirstName text box.
-
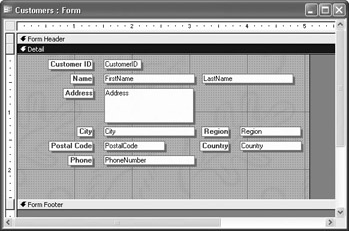
One by one, select each control, resize it, and move it to the location shown in the following graphic. (Don t worry if you don t get everything aligned exactly as shown here.)
Tip To fine-tune the position of a control, click it and then hold down the [CONTROL] key while pressing the appropriate arrow key ”[ ], [ “], [ ‘], or [ ’] ”to move the control in small increments . To fine-tune the size of a control, use the same process but hold down the [SHIFT] key.
-
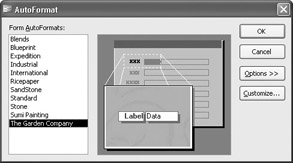
On the Format menu, click AutoFormat to display the AutoFormat dialog box.
-
Click the Customize button to display the Customize AutoFormat dialog box.
-
Click Create a new AutoFormat based on the Form ˜Customers , and then click OK .
Tip New In Office 2003 ”Support for Windows XP Theming Form controls inherit whatever theme is set in the operating system. To change the theme, open the Control Panel, click Display, click the Themes tab, select a new theme, and then click OK.
-
In the New Style Name dialog box, type The Garden Company as the name of the new style, and then click OK .
Back in the AutoFormat database, the new style appears in the Form AutoFormats list. From now on, this style will be available in any database you open on this computer.
-
Click OK to close the AutoFormat dialog box.
Tip Access saves data automatically as you enter it, but layout changes to any object must be manually saved.
-
Click the Save button.
-
Close the form.
CLOSE the GardenCo database.
EAN: 2147483647
Pages: 350