Camera Raw, Photoshop, and Bridge
| If you're used to the old Camera Raw/File Browser combination in Photoshop CS, you'll notice that things have changed in several ways, all for the better. If you're new to Camera Raw, this section explains why the screenshots in this chapter may look different from your copy of Camera Raw when you launch it. As we mentioned earlier, unlike the old Photoshop File Browser, Adobe Bridge is a standalone application. One of the many advantages that its standalone status confers is that it's capable of hosting Camera Raw when Photoshop is either not running, ormore likelyis busy doing something else. You can open Camera Raw in Bridge or Photoshop, whichever is the more efficient for the task at hand. For example, if you want to edit the Camera Raw settings for one or more images, but don't plan on opening them in Photoshop, you can open Camera Raw in Bridge while Photoshop is busy (such as when it's running a batch process). Or you could edit an image in Camera Raw in Photoshop while Bridge is busy caching a folder full of images. You can even open one Camera Raw window in Bridge and another in Photoshop, though doing so has the potential to make you a very confused puppy! The subtle clue as to which application is currently hosting Camera Raw appears in one button: When Camera Raw is hosted by Bridge, the default button is labeled Done (clicking it closes Camera Raw, applies the settings to the raw file, and returns you to Bridge). When in Photoshop, the button is labeled Open (clicking it closes Camera Raw, applies the settings to the raw file, and opens the converted image in Photoshop). A second important workflow enhancement is the "filmstrip" mode of Camera Raw. Now you can open and edit multiple images in Camera Raw, transferring settings from one image to another inside the Camera Raw interface (see Figure 11-2 and "Filmstrip Mode," later in this chapter). Figure 11-2. Camera Raw in filmstrip mode Turn off default auto-correctionCamera Raw now auto-corrects images by default. Some people seem to love this feature, while others (those who want to see the effects of exposure bracketing) hate it. Fortunately, the behavior is easily changed: Press Command-U to turn off the Auto checkboxes, make sure that White Balance is set to As Shot, then choose Save New Camera Raw Defaults from the Camera Raw menu. Note that the defaults are per camera model, so you'll need to do this for each camera model you use. You can still get an auto-correction for an individual image by pressing Command-U to toggle the Auto checkboxes on again. See "Use Auto Adjustments," later in this chapter, for more detail. Camera Raw AnatomyThe Camera Raw dialog box offers two sets of controls; one static set that is "sticky" (the settings remain unchanged until you change them) and another dynamic, image-specific set that changes depending on which tab is currently selected (see Figure 11-3). Figure 11-3. Camera Raw controls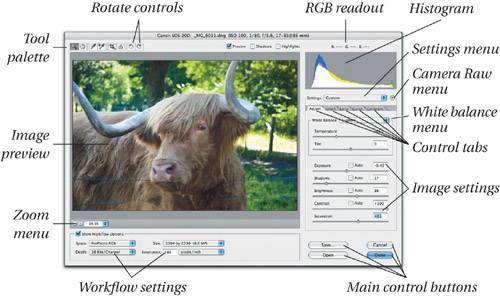 |
EAN: N/A
Pages: 220
- Chapter VI Web Site Quality and Usability in E-Commerce
- Chapter X Converting Browsers to Buyers: Key Considerations in Designing Business-to-Consumer Web Sites
- Chapter XII Web Design and E-Commerce
- Chapter XIII Shopping Agent Web Sites: A Comparative Shopping Environment
- Chapter XVII Internet Markets and E-Loyalty