| You're now going to build a project that uses the skills you've learned to draw to a form. In this project, you'll use the technique of drawing to a memory bitmap to persist the graphics each time the form paints itself. By the Way The project you're about to build is perhaps the most difficult yet. I'll explain each step of the process of creating this project, but I won't spend any time explaining the objects and methods that I've already discussed.
To make things interesting, I've used random numbers to determine font size as well as the X, Y coordinate of the text you're going to draw to the form. The Random class and its Next() method will be used to generate pseudo-random numbers. To generate a random number within a specific range (such as a random number between 1 and 10), you use the following: randomGenerator.Next(1,10);
Start by creating a new Windows Application titled Persisting Graphics and then follow these steps to build the project: 1. | Right-click Form1.cs in the Solution Explorer, choose Rename, and then change the name of the default form to frmMain.cs. Next, set the form's Text property to Persisting Graphics Example.
| 2. | The interface of your form will consist of a text box and a button. When the user clicks the button, the contents of the text box will be drawn on the form in a random location and with a random font size. Add a new text box to your form and set its properties as follows:
Property | Value |
|---|
Name | txtInput | Location | 56,184 | Size | 100,20 |
| 3. | Add a new button to the form and set its properties as follows:
Property | Value |
|---|
Name | btnDrawText | Location | 160,184 | Text | Draw Text |
Time for the code to fly!
As mentioned earlier, all drawing will be performed using a memory bitmap, which will then be copied to the form. You'll reference this bitmap in multiple places, so you're going to make it a module-level variable.
| 4. | Double-click the form to access its Load event.
| 5. | Locate the statement public partial class frmMain : Form and position your cursor immediately after the left bracket ({) on the next line.
| 6. | Enter the following statement:
private Bitmap m_objDrawingSurface;
| | | 7. | For the bitmap variable to be used, it must reference a Bitmap object. A good place to initialize things is in the form's Load event, so put your cursor back in the Load event now and enter the following code:
// Create a drawing surface with the same dimensions as the client // area of the form. m_objDrawingSurface = new Bitmap(this.ClientRectangle.Width, this.ClientRectangle.Height, System.Drawing.Imaging.PixelFormat.Format24bppRgb); InitializeSurface();
Your procedure should now look like the one shown in Figure 18.5.
Figure 18.5. Make sure that your code appears exactly as it does here. 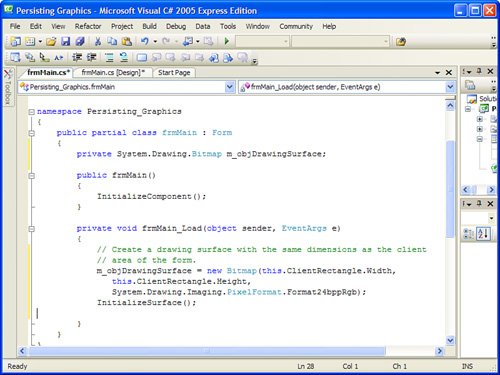
The first statement creates a new bitmap in memory. Because the contents of the bitmap are to be sent to the form, it makes sense to use the dimensions of the client area of the form as the size of the new bitmapwhich is exactly what you've done. The final statement calls a procedure that you haven't yet created.
| | | 8. | Position the cursor after the closing bracket (}) of the frmMain_Load event, and press Enter to create a new line. You're now going to write code to initialize the bitmap. The code will clear the bitmap to the system color named Control and then draw an ellipse that has the dimensions of the bitmap. (I've added comments to the code so that you can follow along with what's happening; all the concepts in this code have been discussed already.) Enter the following in its entirety:
private void InitializeSurface() { Graphics objGraphics; Rectangle rectBounds; // Create a Graphics object that references the bitmap and clear it. objGraphics = Graphics.FromImage(m_objDrawingSurface); objGraphics.Clear(SystemColors.Control); //Create a rectangle the same size as the bitmap. rectBounds = new Rectangle(0, 0, m_objDrawingSurface.Width,m_objDrawingSurface.Height); //Reduce the rectangle slightly so the ellipse won't appear on the border. rectBounds.Inflate(-1, -1); // Draw an ellipse that fills the form. objGraphics.DrawEllipse(Pens.Orange, rectBounds); // Free up resources. objGraphics.Dispose(); }
Your procedure should now look like the one shown in Figure 18.6.
Figure 18.6. Verify that your code is entered correctly. 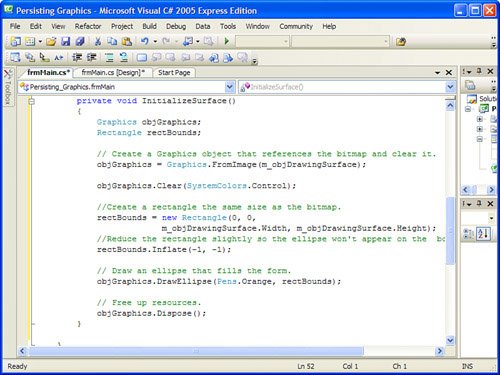
If you run your project now, you'll find that nothing is drawn to the form. This is because the drawing is being done to a bitmap in memory, and you haven't yet added the code to copy the bitmap to the form. The place to do this is in the form's Paint event so that the contents of the bitmap are sent to the form every time the form paints itself. This ensures that the items you draw always appear on the form.
| 9. | Create an event handler for the form's Paint event by first returning to the form designer and selecting the form. Click the Event icon in the Properties window and then double-click Paint to create a new Paint event procedure. Add the following code to the Paint event:
// Draw the contents of the bitmap on the form. e.Graphics.DrawImage(m_objDrawingSurface, 0, 0, m_objDrawingSurface.Width, m_objDrawingSurface.Height); e.Graphics.Dispose();
The e parameter of the Paint event has a property that references the Graphics object of the form. The method DrawImage() draws the image in a bitmap to the surface of a Graphics object, so the last statement is simply sending the contents of the bitmap that exists in memory to the form.
If you run the project now, you'll find that the ellipse appears on the form. Furthermore, you can cover the form with another window, or even minimize it, and the ellipse will always appear on the form when it's displayed againthe graphics persist.
| | | 10. | The last thing you're going to do is write code that draws the contents entered into the text box on the form. The text will be drawn with a random size and location. Return to the Form Designer and double-click the button to access its Click event. Add the following code:
Graphics objGraphics; Font objFont; int intFontSize, intTextX, intTextY; Random randomGenerator = new Random(); // If no text has been entered, get out. if (txtInput.Text == "") return; // Create a graphics object using the memory bitmap. objGraphics = Graphics.FromImage(m_objDrawingSurface); // Create a random number for the font size. Keep it between 8 and 48. intFontSize = randomGenerator.Next(8,48); // Create a random number for the X coordinate of the text. intTextX = randomGenerator.Next(0,this.ClientRectangle.Width); // Create a random number for the Y coordinate of the text. intTextY = randomGenerator.Next(0,this.ClientRectangle.Height); // Create a new font object. objFont = new System.Drawing.Font("Arial", intFontSize, FontStyle.Bold); // Draw the user's text. objGraphics.DrawString(txtInput.Text, objFont, System.Drawing.Brushes.Red, intTextX, intTextY); // Clean up. objGraphics.Dispose(); // Force the form to paint itself. This triggers the Paint event. this.Invalidate();
|
The comments I've included should make the code self-explanatory. However, the last statement bears discussing. The Invalidate() method of a form invalidates the client rectangle. This operation tells Windows that the appearance of the form is no longer accurate and that the form needs to be repainted. This, in turn, triggers the Paint event of the form. Because the Paint event contains the code that copies the contents of the memory bitmap to the form, invalidating the form causes the text to appear. If you don't call Invalidate() here, the text won't appear on the form (but it is still drawn on the memory bitmap). By the Way If you draw elements that are based on the size of the form, you'll need to call Invalidate()in the Resize event of the form; resizing a form doesn't trigger the form's Paint event.
The last thing you need to do is make sure you free up the resources used by your module-level Graphics object. Using the Properties window, add an event handler for the FormClosed event of the form now, and enter the following statement: m_objDrawingSurface.Dispose();
Your project is now complete! Click Save All on the toolbar to save your work, and then press F5 to run the project. You'll notice immediately that the ellipse is drawn on the form. Type something into the text box and click the button. Click it again. Each time you click the button, the text is drawn on the form using the same brush, but with a different size and location (see Figure 18.7). Figure 18.7. Text is drawn on a form, much like ordinary shapes. 
|