Understanding Collections
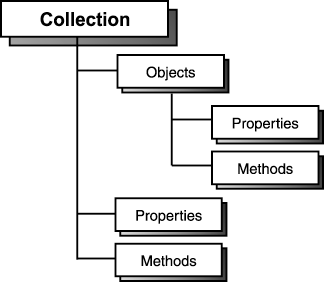
A collection is just what its name implies: a collection of objects. Collections make it easy to work with large numbers of similar objects by enabling you to create code that performs iterative processing on items within the collection. Iterative processing is an operation that uses a loop to perform actions on multiple objects, rather than writing the operative code for each object. In addition to containing an indexed set of objects, collections also have properties and may have methods . Figure 3.8 illustrates the structure of a collection.
Figure 3.8. Collections contain sets of like objects, and they have their own properties and methods.

Continuing with the Dog/Pet object metaphor, think about what an Animals collection might look like. The Animals collection could contain one or more Pet objects, or it could be empty (containing no objects). All collections have a Count property that returns the total count of objects contained within the collection. Collections may also have methods, such as a Delete method used to remove objects from the collection or an Add method used to add a new object to the collection.
To better understand collections, you're going to create a small C# project that cycles through the Controls collection of a form, telling you the value of the Name property of every control on the form.
To create your sample project, follow these steps:
-
Start C# now (if it's not already loaded) and create a new Windows Application project titled Collections Example.
-
Change the text of the form to Collections Example by using the Properties window.
-
Add a new button to the form by double-clicking the Button tool in the toolbox. Set the button's properties as follows :
Property Value Name btnShowNames Location 88,112 Size 120,23 Text Show Control Names -
Next, add some text box and label controls to the form. As you add the controls to the form, be sure to give each control a unique name. Feel free to use any name you like, but you can't use spaces in a control name. You may want to drag the controls to different locations on the form so that they don't overlap.
-
When you are finished adding controls to your form, double-click the Show Control Names button to add code to its Click event. Enter the following code:
for (int intIndex=0; intIndex < this.Controls.Count; intIndex++) { MessageBox.Show ("Control # " + intIndex.ToString() + " has the name " + this.Controls[intIndex].Name); }
Every form has a Controls collection, which may or may not contain any controls. Even if no controls are on the form, the form still has a Controls collection.
The first statement (the one that begins with for) accomplishes a few tasks . First, it initializes the variable intIndex to 0, and then tests the variable. It also starts a loop executing the statement block ( loops are discussed in Hour 15, "Looping for Efficiency"), incrementing intIndex by one until intIndex equals the number of controls on the form, less one. The reason that intIndex must always be less than the Count property is that when referencing items in a collection, the first item is always item zerocollections are zero based. Thus, the first item is in location zero, the second item is in location one, and so forth. If you tried to reference an item of a collection in the location of the value of the Count property, an error would occur because you would be referencing an index that is one higher than the actual locations within the collection.
The MessageBox.Show() method (discussed in detail in Hour 18, "Interacting with Users ") is a class available in the .NET Framework that is used to display a simple dialog box with text. The text that you are providing, which the MessageBox.Show() method will display, is a concatenation of multiple strings of text. ( Concatenation is the process of adding strings together; it is discussed in Hour 13, "Performing Arithmetic, String Manipulation, and Date/Time Adjustments.")
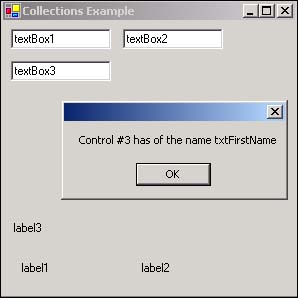
Run the project by pressing F5 or by clicking Start on the toolbar. Ignore the additional controls that you placed on the form and click the Show Control Names button. Your program will then display a message box similar to the one shown in Figure 3.9 for each control on your form (because of the loop). When the program is finished displaying the names of the controls, choose Stop Debugging from the Debug toolbar to stop the program, and then save the project.
Figure 3.9. The Controls collection enables you to get to each and every control on a form.

Because everything in C# is an object, you can expect to use numerous collections as you create your programs. Collections are powerful, and the quicker you become comfortable using them, the more productive you'll become.
| Top |
EAN: 2147483647
Pages: 253