Section 4.3. Transfer the Management Pack to Production
4.3. Transfer the Management Pack to ProductionThe management pack is now in the MP.1.1 state in the management pack workflow diagram (Figure 4-1). Some rule groups have been disabled and some rules have been copied and modified. Operations data has returned from the pilot agents that are multi-homed between LKFPreProdMG and the LKFProdMG management groups. Max can now export the management pack (point 3 in Figure 4-1) to an .akm file that can be imported into the production environment. 4.3.1. Export from PreproductionThe export process is relatively straightforward and accomplished through the Import/Export Management Pack tool. The main thing you need to know is that not all of the configuration information that is associated with a rule group gets exported. The tool will prompt you for the rule group that you want to export, as well as the views and tasks. The export process also includes computer group definitions, provider definitions, scripts, attributes, and any managed code, in addition to the rule group.
To start the export process, launch the Import/Export Management Pack tool and select "to export a management pack." Then select the rule group that you want to export (Figure 4-20). The best practice is to choose to export the top-level rule group folder, which automatically includes all child rule groups. In Figure 4-20, the top-level rule group folder Microsoft Windows Servers Base Operating System has been selected. This ensures that the management pack has everything needed and it can be redistributed. On the next two pages of the wizard, you are prompted for the views and the tasks that you wish to include in the management pack (Figure 4-21). The folder structure for these is expandable, so you can select down to the individual object level. Figure 4-20. Choosing to export the Base OS rule group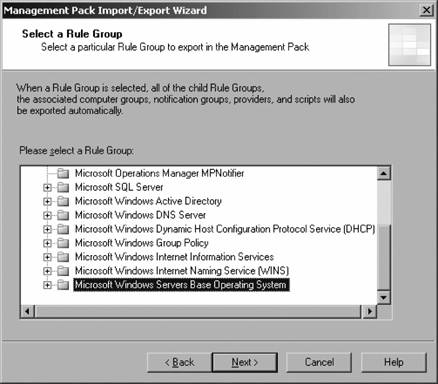 The best practice is to select the top-level object that belongs in the complete management pack. The two pages are pretty much the same thing except that one shows views and the other tasks. On the next to last page, specify the directory and filename of the management pack (see Figure 4-22). This part is critical to your versioning process. Remember when you did the management pack import and specified the management pack backup directory (see Figure 4-4)? You pointed the tool to the OldMP directory in the file transfer folder and created the .akm file in this format: ManagementPackName_MM.DD.YY.HH.MM.SS.akm. In the export portion of the tool, specify the \\MPTransferFolder\CurrentMP directory. To be consistent with the tools naming standard, call the newly created management pack WindowsServerBaseOS_02.28.05.19.35.akm. The seconds portion of the timestamp can be dropped, because specificity to the minute is good enough. Use the 24-hour time format rather than 12-hour time format to ensure uniqueness. Since this is the first time you are exporting a management pack into this directory, there is no concern about earlier versions of the management pack being there. Otherwise, you would have moved the existing .akm file into the OldMP directory before executing the export process. Figure 4-21. Select the views that you want to include in the management pack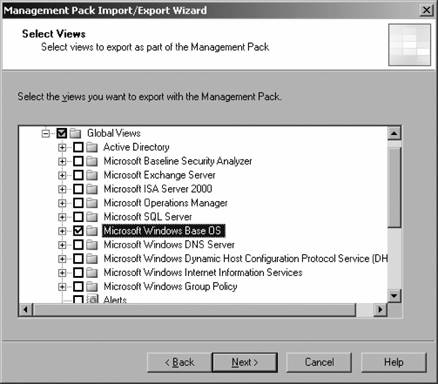 Figure 4-22. Specify the file location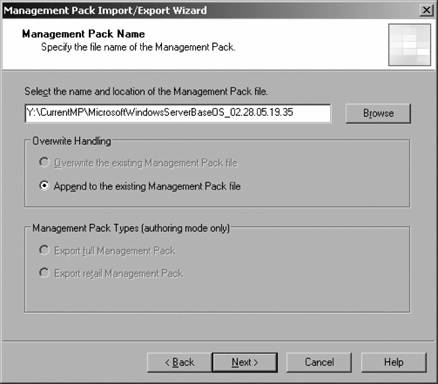 If there had been an existing version of the management pack in the CurrentMP directory and the export had the same name, the overwrite option in the Overwrite Handling box would have been enabled. Otherwise, the tool defaults to the Append option for creating new management packs. Currently, the Management Pack Types controls are disabled because they aren't needed for the authoring mode features to accomplish this export. Briefly, the authoring mode is enabled on the context menu of the Rule Groups node in the Administrator console. When this feature is enabled, you gain edit access to the Vendor Knowledge tab of a created rule, and access to an Advanced Features tab that allows you to modify the relationships between parent and child rule groups. You also gain the ability to mark rule groups as deleted so they do not export and access the management pack's version ID field. Clicking Next leads you to the summary page to confirm selections and finish the export process. Like the import portion of the tool, the export process displays a current status page that shows the progress of the individual steps of the export. When this completes, a logfile of the export process can be created. Unless there is an error during the export and you need the records for troubleshooting, it is not necessary to do this. In the management pack life cycle workflow, the management pack is at point 4 in Figure 4-1. 4.3.2. Import into ProductionImporting the MP.1.1 version of the management pack into the production environment is only slightly different than importing it into the preproduction environment. The main difference between the two processes is that the production management group (LKFProdMG), has reporting services installed, so the management pack report definitions can be imported at the same time as the management packs. Some management packs ship with a matching set of report definitions. They have the same name as the management pack, but end in Reports.xml. These report definitions are still in the \\MPTransferFolder\VendorSupplied folder, so if you want to import them while you're running the Import/Export Wizard, you'll need to copy them to the \\MPTransferFolder\CurrentMP folder, because the wizard can only browse files one directory at a time. Otherwise, the reports can be imported from their current location by running the import process again. Figure 4-23 shows the choices page of the import process. The next page has the update/replace/backup options (Figure 4-24) and is treated the same as importing the Windows Server Base Operating System management pack into the preproduction environment. Select the Replace option because this is the first time that this management pack is being imported. The Replace option completely overwrites the existing management pack, so all customizations and company knowledge will be lost. If this management pack already existed in the production management group, the Update option would preserve any modifications. Figure 4-23. Importing a management pack into the production environment for the first time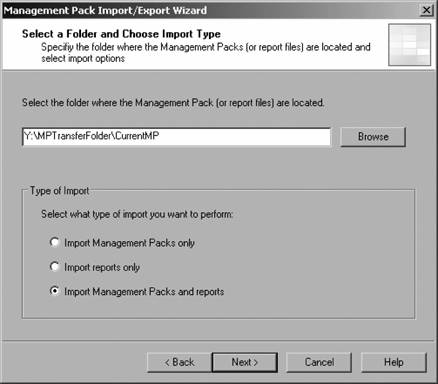 There might be situations where you need to completely overwrite the existing management pack. For example, if the existing management pack is no longer functioning correctly you may need to replace it with the last known good backup to return to a functional state. When a vendor-authored management pack is imported, MOM compares the vendor version numbers of the rule groups. MOM will prompt you if you are about to overwrite a management pack with an older version, as shown in Figure 4-25. The version checking does not use your company's version numbers for comparison, so it won't warn you if there is a conflict between two management packs that are based on the same vendor version number but have different company modifications embedded in them. The next page has not been encountered in previous runs of the wizard; it simply allows you to select which report definition file to import (Figure 4-26). You can select multiple files if they are in the directory you are browsing. You should always import the matched management pack and report definitions file at the same time. The management pack contains event and performance rules that collect data that feed into the reports. You will see evidence of this about a day after you import a management pack. MOM 2005 will raise an informational alert telling you that data was collected for the reports and that the reports are ready to be viewed. Basically, the management pack and the matching report definition are made to work together, so let them. Figure 4-24. Choose the Replace option for the first-time import of a management pack into production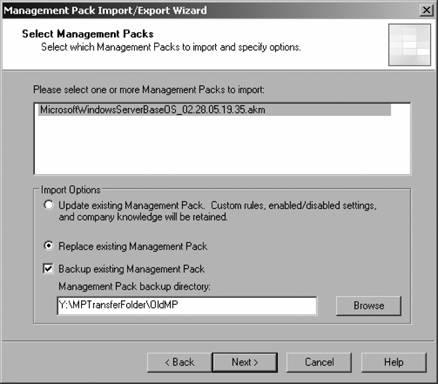 Figure 4-25. The import process automatically protects you from overwriting newer versions of rule groups based on the vendor version property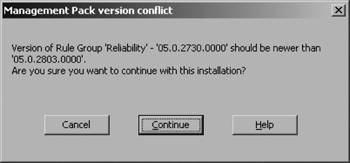 If the reporting services web site is not SSL-secured, and you have the "Always warn me about insecure connections" option enabled, you will receive a warning page. Since you are on the same network as the data warehouse/reporting server, a secure connection is not really necessary. You can safely continue through the warning. After reviewing the summary page, allow the import process to finish. You will be presented with the now-familiar Status Update page as the import process executes. Figure 4-26. Select the reports that you want to import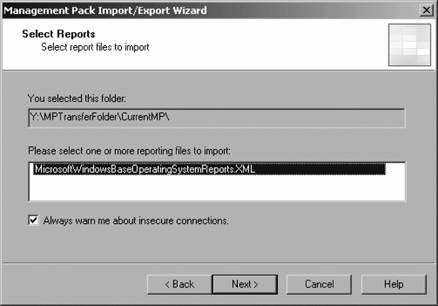 The management pack is now active in the production environment. The registry key attribute discovery will occur and the managed computers will be sorted into computer groups. On the next agent configuration request refresh cycle, the appropriate processing rules will be returned to the agents and monitoring will begin. The management pack is now at point 5 in the life cycle workflow (refer back to Figure 4-1). 4.3.3. Evolution of the Management Pack in ProductionOnce a management pack is brought into production, it will be changed by further tuning and capturing company troubleshooting knowledge. The longer it is in production, the more it will become specific to your environment and less like the vendor-authored original. Tuning production management packs helps eliminate noise alertsthose alerts that give incorrect, unusable, or undesired information. This is accomplished with all the same techniques used for tuning the preproduction environment, with the addition of more extensive use of overrides. You can't perform all of the necessary management pack tuning in the preproduction environment simply because the two environmentsincluding network, applications, and loadare not identical. So, you will see issues in production that you didn't see in preproduction and you have to respond to them there. You can perform minor tweaks to rules to make changes, such as in the fields that are included in the description or by adding a notification group. These minor tweaks don't change the core parameters of a rule (provider, criteria, response, and vendor knowledge); they are, for the most part, cosmetic. If you need to change any of the core parameters of a rule, then you are no longer tweaking a rule but creating a new rule by modifying an existing one. When a new management pack is first imported, it will start returning data and raising alerts. Expect to see the highest volume of alerts in the first 24 hours after a management pack has been installed. MOM 2005 will look through everything in your environment and tell you about issues that you weren't aware of. As you go through and troubleshoot the issues that caused the alerts, capturing the troubleshooting steps in the alert's Company Knowledge tab, and resolving the alerts as outlined in Chapter 1, the volume of alerts will begin to decrease. A few weeks into the production deployment of the management pack, certain alerts will keep cropping up that don't provide any useful or actionable information. You may not want to be alerted about an event, or there may be nothing that can be done to resolve the issue in the immediate future. For example, you may not be interested in knowing about every time a user maps a printer, or having the baseline security analyzer tell you that your domain's NTLM security setting is too low when it has to be that way to accommodate Windows 95 machines. These types of alerts are "noise alerts" for your environment, and you will need to further tune the rules and rule groups to reduce them. Be on the lookout for false positive alerts and false negative alerts. For example, a false positive alert (an alert is generated) would be if MOM indicates that a server is down when it is not. A false negative (no state change) would be if in the State view a service health indicator remains in the success state when the service has actually failed. The easiest way to eliminate a noise alert is either to disable or delete the rule that generated it. In cases where you really don't want the information, this is probably the best choice of action. Another way to reduce noise alerts is to configure overrides for a rule.
4.3.4. OverridesOverrides provide additional flexibility by controlling how a rule is applied to target computers. Without overrides, a rule can only be enabled or disabled for all the computer groups it is applied to. Further, it can only have a single criterion by which to judge if matching data is found. There are four types of overrides: rule disable, performance threshold, script parameter, and state alert severity. Overrides direct MOM to apply the rule this way to these machines, but apply it a different way to those machines.
4.3.4.1. Rule Disable OverrideThe Rule Disable Override is available on each of the 10 types of rules. It allows you to selectively disable a rule that is enabled by default. You can also create an exception to the disablement override. The override criterion is simply the pairing of a target (a computer or a computer group) and a value. Multiple target and value pairs can be defined for a particular override rule. These criteria are placed in an ordered list and evaluated from the top down. This way, a pair that is lower in the list will supersede all pairs that precede it in the list. For example, in Figure 4-27 the "Enable rule-disable overrides for this rule" option has been enabled for the "LKF software update installation failed" rule. All this means is, "Do you want to allow the creation of override criteria for this rule?" This is an event rule in the Microsoft Windows Servers Base Operating System\Windows 2003\Core System Components and Services rule group. This rule group is bound to the Microsoft Windows 2003 Servers computer group. That computer group contains all Windows servers running the Server 2003 OS regardless of the role (domain controller, cluster server, member server, and so on). Figure 4-27. Rule-disable overrides are enabled for this rule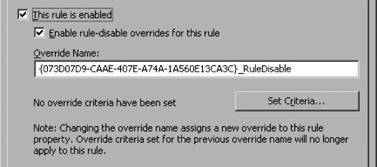 Once you've allowed disabling overrides, click on Set Criteria to bring up the page shown in Figure 4-28. The target + value pairs for the override are defined here. Here is how this rule will be applied. First, because the rule is enabled, it will be distributed to the agents on all the computers in the associated computer groups. Then, if that server is a member of the Windows 2003 Servers computer group, the rule is disabled (the 0 value). If it is also a member of the Windows Server 2003 Domain Controllers computer group, then it is enabled (the 1 value). If the server is not in the Windows 2003 Server computer group, the rule will be applied. Figure 4-28. Overlapping override criteria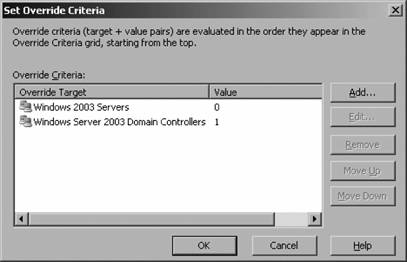 4.3.4.2. Performance threshold overrideIn addition to the enable/disable override, performance fsthreshold rules have another type of override that can be configured. Performance threshold rules generate an alert when a performance monitor counter value crosses a configured threshold, for example, when the actual processor utilization exceeds a certain percentage utilization over a number of samples, or actual free disk space for a logical drive drops below 10 percent. These default threshold values can be overridden for computers or computer groups that are defined in a target + value pair in the Threshold Override Set Criteria page. Figure 4-29 shows a performance threshold rule that generates an alert when the measured value exceeds 50 percent. For the sake of this example, it is not important what value is being tracked here. The "Enable threshold overrides for this rule" checkbox has been selected. The Override Name field is automatically populated with a machine-generated name In the Set Override Criteria dialog box, a value of 25 has been specified for homesrv02 (see Figure 4-30). Figure 4-29. Threshold override enabled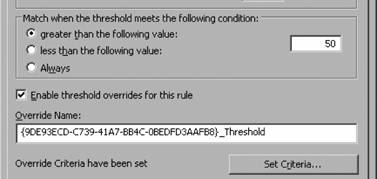 Figure 4-30. The threshold override criteria for a performance threshold processing rule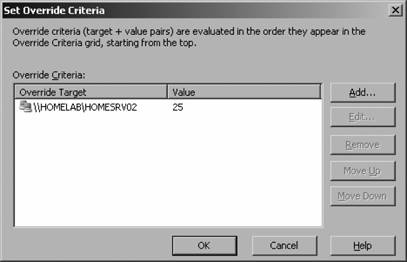 4.3.4.3. Script parameter overrideIf a script is run from a command prompt, parameters could be passed to the script when it is called if the script was written to accept them. This is the same concept as passing parameters (variables) to an executable called from a command prompt. A simple example can be seen in the ping command. When ping is run, you must provide the NetBIOS or FQDN name of the device that you want the tool to run against. C:\ping avalon.homelab.lab The event and performance rules that use scripts often pass parameters to the script. A script parameter override allows you to define multiple parameters to pass to a script from a single rule. For example, the Microsoft Windows Servers Base OperatingSystem\Windows2003\State Monitoring and Service Discovery\Performance Threshold:Processor\%Processor Time threshold exceeded rule calls (Microsoft Windows Base OS CPU Overload Script) as you can see on the Responses tab in the Rule Properties (shown in Figure 4-31). If you select the script name and click Edit, the Launch a Script dialog box appears and you can modify how the rule interacts with the script (see Figure 4-32). In the lower box, select the script parameter that you wish to enable and click Edit Parameter. Here the CpuPercentage parameter is selected. The Edit Script Parameter page has the now-familiar Enable Overrides checkbox and the Set Criteria button. The Set Criteria button takes you to the Set Override Criteria page, which is identical to that shown in Figure 4-28. In this case, you would enter the target and value criterion of \\HOMELAB\HOMESRV02 and 75, and save the changes. The Launch a Script page updates the CpuPercentage variable with an icon (shown in Figure 4-33) to indicate that an override criterion has been specified for that parameter. Figure 4-31. A performance threshold rule calls a script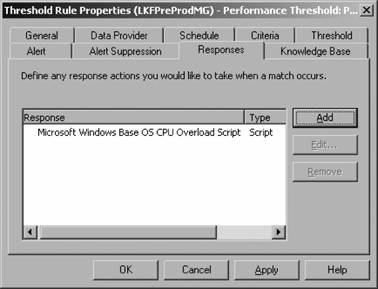 Figure 4-32. This rule generates an alert if the CPU utilization exceeds 95 percent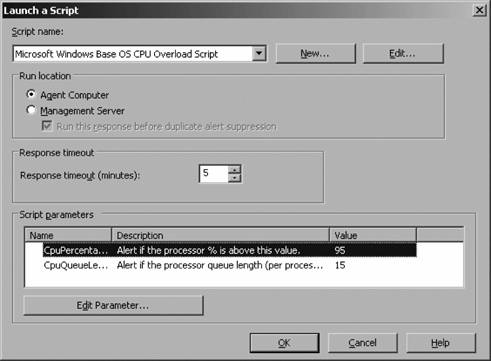 So now when the script runs, if the homesrv02 %CpuUtilization counter exceeds 75 percent, an alert will fire. For all other machines, the alert will fire off when the CpuUtilization counter exceeds 95 percent. Figure 4-33. Note the icon that indicates an override has been configured; it is the same icon for all overrides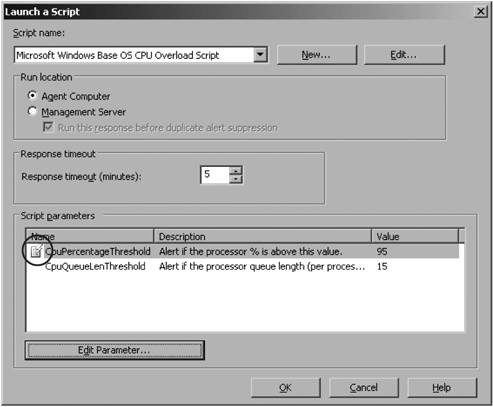 4.3.4.4. State alert severity overrideSome rules contribute to the calculation of the health state of the application via the alerts that they generate. This is covered later in the "Health state roll-up" section of this chapter. The health state (as represented by green check marks, yellow warning triangles, and red X symbols) for an application or monitored computer is composed of the health of all its component parts. The best place to see these is in the State view of the Operator console. The state alert severity override allows you to override the default values where a state alert is generated. For example, in the Microsoft Operations Manager By clicking the Edit button (point 2 in Figure 4-34) you can edit the alert severity properties. For this alert, the severity properties (Figure 4-35) show that an alert of severity Error will be generated if the number of channel errors is greater than 10. Figure 4-34. State alert properties enabled on an event rule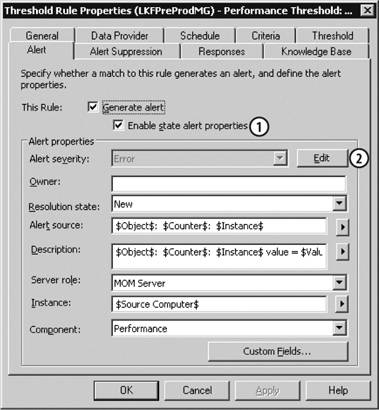 Figure 4-35. The default criteria and values for generating a state alert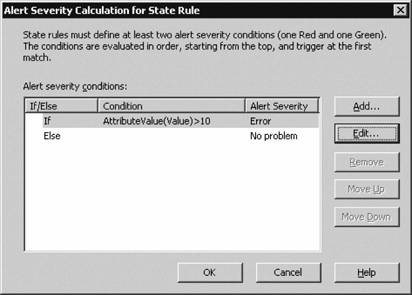 To clarify, the value for (Value) is being collected from the performance counter and it points to the number of MOM channels, which is the number of open communications channels on a management server. If this number exceeds 10, an alert of severity Error will be generated, for example if there are multiple management servers in a management group and one needs to generate an error when the number of open channels exceeds 5, but the rest of the servers should keep the default of 10. To do this, you need to do two things:
In the Administrator console, right-click the Override Criteria folder and launch the Create Override Criteria wizard. On the Override Name page enter the name MOMChannelErrors (see Figure 4-36). Figure 4-36. Creating override criteria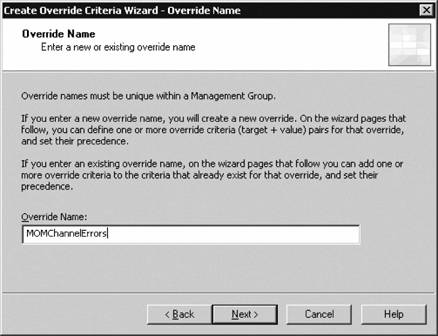 Click Next to bring up the Edit Override Criteria page, then click Add and enter the target + value pair (see Figure 4-37). After entering the target + value pair, the Override Criteria page should look like Figure 4-38. Figure 4-37. Creating the target + value pair for the override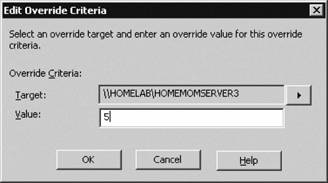 Figure 4-38. The target and value settings for the override criteria page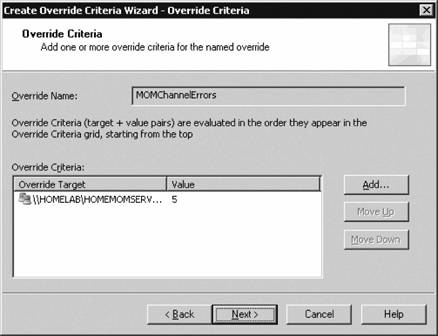 Clicking Next brings up the standard Finish page. Now go back to the Performance Threshold: MOM Server Channel rule to the page shown in Figure 4-35 and click the Edit button. Change the formula to read AttributeValue(Value)>Override(MOMChannelErrors, "10") as shown in Figure 4-39. Because you have already created the override object name MOMChannelErrors, the formula automatically finds the object. Click OK three times to close the rule. Now when this rule executes, if the number of open MOM channels exceeds five on homemomserver3, an error alert will be generated. For all other management servers in the management group, the error alert will not be generated until the number of open channels exceeds 10. Figure 4-39. Including the override object in the state alert severity evaluation formula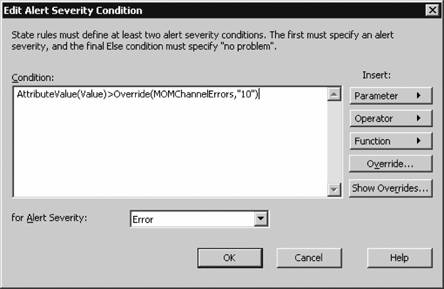 4.3.4.5. Moving overrides from preproduction to productionThe only bad part about using overrides is that while the identifying GUID will export from preproduction and import into production, the criteria will not. This is the workaround. When an override criterion for a rule is created, it is created as an object in the Override Criteria container under the Management Packs node in the Administrator console. Export the list of defined overrides to a tab-delimited text file (right-click the Override Criteria container and select Export List). This captures the target, value, override name (GUID), precedence, last modified date, and last modified by values. For example, the override object data for the performance threshold rule is:
After you import the revised rule group into the production management group, use the Find Rules tool (right-click Rule Groups and select Find Rules) to perform a search for rules that contain the override name/GUID. Copy and paste the GUID from the text file into the search tool. Once you find the rule, open the appropriate Override Criteria dialog box and enter the criteria. Apply the changes and don't forget to commit configuration changes. 4.3.4.6. Health state roll-upThe last bit of fine-tuning for the management packs is to ensure the health state of a computer group is being calculated and represented the way you want it to be. State roll-up itself follows a hierarchy, as shown in Figure 4-40. Starting at the bottom, the health state variable of an individual component can be set by event rules, threshold rules, internal service monitoring, and scripts. In this case, the disk free space state is the component. The health of an instance (in this case the C: drive) then depends on the health of its components. The health of the role disk on this computer is dependent on the health of the instances of disk on the computer (C:, D:, and E:), which then feeds the health of the computer and rolls up to the computer group. Figure 4-40. Health state of each object depends on the health of its individual components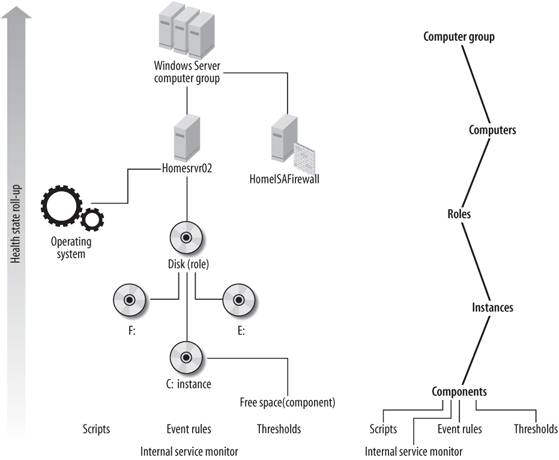 This is a simplified view of health roll-up, as it shows only a single hierarchy and no inter-relationships. Remember that all computers are members of multiple computer groups and a top-level computer group may have nested child computer groups. So, the health of an individual instance (the C: drive in this case) can influence the health state of more than one computer group. For example, consider a computer group that consists of all Exchange servers. This computer group contains other computer groups like mailbox servers, bridgehead servers, public folder servers, and both 2000 and 2003 frontend servers. Now, say that you have a single physical machine that is both a mailbox and public folder server. The health of the C: drive on that one machine will impact the health of both the mailbox and public folder computer groups. Trying to keep the inter-relationships straight between all the objects can be confusing. However, when they are overlaid in a single diagram, an unhealthy object will be apparent. The health state roll-up policy is set at each computer group and regulates how the health state of an application or group of computers is represented in the Operator console (Figure 4-41). Although this doesn't involve tweaking an individual rule or management pack, it is included here because computer groups are created when management packs are imported, and how health state roll-up is configured controls how your environment is represented. Figure 4-41. Health state roll-up policy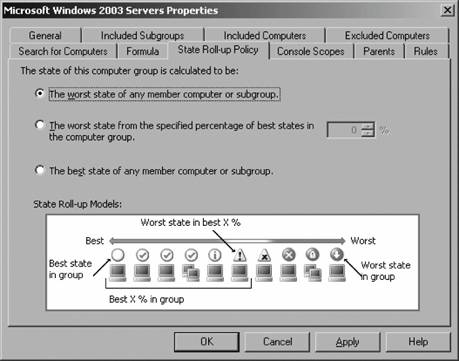 There are three ways to configure this, but the default configuration is the most pessimistic way of viewing the health of the computer or application:
The worst state in the group scenario tells you that if everything is successful at the top level, then all of the components are successful across the board and there are no masked problems that could potentially be overlooked. 4.3.4.7. ToolsTo further assist you in tuning your MOM environment, Microsoft has produced an Alert tuning solution accelerator . All the MOM 2005 solution accelerators are available at http://www.microsoft.com/mom/evaluation/solutions/default.mspx. This tool consists of report definitions that can be imported into the MOM 2005 Reporting Service and a description of how to use them. The reports include AlertCountByDates, AlertCountByDevice, and AlertCountByProcessingRules. The idea behind the alert tuning accelerator is that by displaying alert counts by different parameters you can determine which rules are generating the most alerts and if those alerts are actionable. If an alert is not actionable, that is to say that it doesn't contain the information that is necessary to resolve the issue, then it is a noise alert and should be tuned to be useful, or disabled altogether. The reports that this tool generates can be useful in any size environment to develop a profile of what is going on in your MOM implementation. Referring back to Figure 4-1, the Windows Server Base Operating Systems management pack has evolved into the MP.1.2 state and is tailored for your environment. But now there is a new issue to deal with: the version of the management pack in the production management group is different than the one in preproduction. In addition, a significant amount of work has gone into customizing the management pack and that needs to be protected. 4.3.5. Protecting Management PacksKeeping production and preproduction management pack versions synchronized and backing up management packs can be accomplished with the same straightforward mechanism. You need to synchronize the preproduction environment with production so that when any rule group, view, or task testing is performed, the rule groups in the test environment are identical to those in the production environment (point 7 in Figure 4-1). The Management Module Utility is the command-line version of the Import/Export wizard tool and includes most of the same functionality for importing and exporting management packs. It is in the MOM 2005 installation directory (C:\ProgramFiles\Microsoft Operations Manager 2005 by default) on any MOM management server or computer on which the consoles have been installed. You can perform the export from production and re-import it into preproduction by using the Import/Export wizard, but that requires daily hands-on interaction. By using the Management Module Utility, you can automate this job. The Management Module Utility does not work with MOM 2005 report definition filesfor that, the rptutil.exe tool found in the same directory is used. Obviously, since it runs from a command line it does not provide the ability to browse the directories where the .akm files are. This tool, with minimal batch file or scripting skills, automates the management pack backups and keeps the production and preproduction environments in sync. The sample batch file, ProdToPreProdSynch.bat, does six things:
Not all the tasks and views are included in this example, but you can see what is possible. With a little more work, this type of script could be scheduled to run with no user interaction. The Management Module Utility includes a versioning option (-V) that allows you to place a version number on it. This is the same identifier that is found on the Properties tab of every rule group. It follows the format ##.#.####.####. This is useful if you are exporting management packs for retail sale and you want to manually track and update this parameter, but it is overkill for everyday use. Back up your production environment on a daily basis and pay particular attention to the operations database. Back this up using standard SQL backup procedures as described in Chapter 7. On the management pack life cycle workflow diagram, the Base OS management pack version MP.1.2, (point 9 in Figure 4-1) is synchronized between production and preproduction, as well as backed up for immediate restoration to either environment if necessary. 4.3.6. Integrating Vendor RevisionsA management pack can also change if the vendor releases a new version. When this happens, you may want to integrate your current version with the vendor's new version while still retaining your company knowledge, customized rules, and enabled/disabled rules. In Figure 4-1, the management pack version MP.2.0 represents a new management pack from the vendor. The easy answer to this problem is to import the MP.2.0 version into the preproduction environment, selecting the Update Existing Management Pack option during the import. Ultimately, that's the right way to do it. However, before you do the import and update, take the time to find out what the differences are between the two packs (point 10 in Figure 4-1), rather than just importing and then going through the rules, tasks, views, and scripts in the consoles. There are two tools that help with this: the Convert Management Packs to XML (mp2xml.exe) utility and the Management Pack Differencing tool (MPDiff), which takes the management pack in XML format as its input. Both tools are found in the MOM 2005 resource kit and are not officially supported by Microsoft Support. 4.3.6.1. MP2XMLThe MP2XML tool is run on a MOM 2005 management server from a command prompt, in this case the preproduction homemomserver3. When run, this tool reads the .akm version of the management pack and outputs all of the contents in an XML file. One way of staying organized is to keep the names of the output XML files the same as the folder that the management packs come from. For example, the original management pack output file will be WindowsBaseOSVendorSupplied.xml and the current one will be WindowsBaseOSCurrentMP.xml.
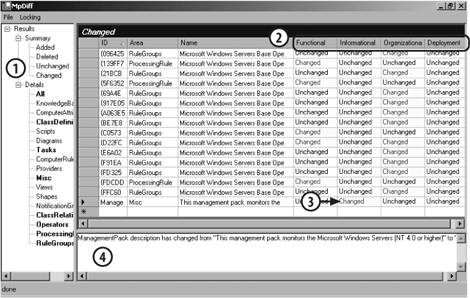
The command syntax follows the format of: C:\MOMRKtools>mp2xml c:\momrktools\currentmp\MicrosoftWindowsServerBaseOperatingSystemMP03.06.2005-14.12. akm c:\momrktools\WindowsBaseOSCurrentMP.xml The same is done for the vendor-supplied version of the management pack. The last step is to copy both XML files to a common directory. Despite what the product documentation says, the MPDiff tool will not work unless both XML files are in the same place. 4.3.6.2. Management Pack Differencing toolThe MPDiff tool compares the contents and settings of the XML versions in the management packs created by the MP2XML tool. It is found in the MOM 2005 Resource Kit. The comparison is performed between two different versions of the same management pack, not between completely different management packs. The MPDiff tool can be launched from two different executable files. The MPDiff.Console.exe is the command-line version of this tool. When this version is used, you must pass a source XML file, a target XML file, and an output file. Using an old and a current version of the XML file generated, the command-line syntax looks like this: C:\MOMRKtools\mpdiff.console.exe /src:WindowsBaseOSOldMP.xml /tgt: WindowsBaseOSCurrentMP.xml /out:WindowsBaseOldToWindowsBaseOSCurrent.xml To view the WindowsBaseOSDiff.xml file, simply open it with Internet Explorer. To view the differences interactively, launch the MPDiff.exe from Windows Explorer; this opens the GUI version of the tool. The GUI tool can also save the differences to an XML file that is identical to what you would get if you had run the command-line version. Be careful the order in which you provide the XML translations to the tool. In the command-line version, you must provide the source file (/src option) first and then the target file (/tgt option). Because this is a confusing way to think about it, compare the old or current file to the new one. Then save the output as <oldmpname>To<newmpname>.xml. For example, Figure 4-42 shows the Summary/Changed view (point 1 in Figure 4-42) of the differences between the WindowsBaseOSVendorSupplied.xml and the WindowsBaseOSCurrentMP.xml. MPDiff classifies changes into four categories (point 2 in Figure 4-42):
If there is any descriptive text that is associated with the change, it will be displayed in the Details pane (point 4 in Figure 4-42). The other three columns contain the GUID (ID) of the object, the object type (area), and the name of the object as they appear in the Administrator console. You can use the values in these columns to look up the individual objects in the Administrator console and examine the details there for objects. 4.3.6.3. Merge the management packsAfter examining the differences between the newly revised vendor management pack (Version MP.2.0) and your current one (Version MP.1.2), perform the import into the preproduction environment and select Update the Existing Management Pack. You will be prompted for a location to save the backup tothis can be local or anywhere, because the real backup is in the CurrentMP directory. This brings the management pack life cycle full circle. From a procedural perspective the MP.2.1 in Figure 4-1 is the same as MP.1.1. In the production to preproduction synchronization process you can only make a change when you are testing and tuning the MP.2.1 version. To prevent the current production version (MP.1.2) from overwriting the MP.2.1 version, you must avoid importing MP.1.2 into preproduction. However, MP.1.2 must be backed up to the CurrentMP directory on a daily basis. To do this, comment out the line in the ProdToPreProdSynch.bat file that performs the impor by entering rem at the beginning of the last line so that it now reads: rem ManagementModuleUtil.exe -I homemomserver3 \\homesrv02\mptransferfolder\currentmp\MicrosoftWindowsServerBaseOperatingSystemMP%var Date%varTime% .akm -R |
 Operations Manager 2005
  Server rule group there is a performance threshold rule called "Performance Threshold: MOM Server Channel errors that generates an error alert. This rule is applied to MOM 2005 management servers. It has the "Enable state alert properties" checkbox selected (point 1 in Figure 4-34).
EAN: 2147483647
Pages: 107
- Assessing Business-IT Alignment Maturity
- A View on Knowledge Management: Utilizing a Balanced Scorecard Methodology for Analyzing Knowledge Metrics
- Technical Issues Related to IT Governance Tactics: Product Metrics, Measurements and Process Control
- Governance in IT Outsourcing Partnerships
- Governance Structures for IT in the Health Care Industry