| Macromedia introduced CAR files with the Archive and Deploy feature of ColdFusion 5 Enterprise. These ColdFusion Administrator (CFAM) tools allow administrators a simple way to quickly back up ColdFusion server configuration settings and application files, for archiving purposes or later deployment. The interface is very flexible, allowing you to create as many CAR files as you want and to choose which settings and files you want to archive. For example, you can choose to archive all of the ColdFusion server settings in one CAR file, or create independent CAR files for each setting (data sources, scheduled tasks, and so forth), or simply back up your application files or custom tags. Although these powerful tools were carried over into ColdFusion , they still remain one of the least-used administration features. TIP ColdFusion will not deploy any CAR files created in previous versions of ColdFusion. Macromedia recommends using the Migration stage of the Configuration Wizard to import settings of earlier ColdFusion versions, and then using the ColdFusion Archive and Deploy tools to create a ColdFusion CAR file.
CAR files have an archive format similar to WAR and/or ZIP files. CARs contain all the files related to the ColdFusion application and server. In each CAR file are two XML property files containing WDDX data structure: archive_properties.xml and server_settings.xml. The archive_properties.xml file holds descriptors for the archive definition, including archive variables that help with deployment on different machines. The server_settings.xml file holds descriptors for each ColdFusion server setting. There are three steps to deploying applications with archives: 1. | Define the archive.
| 2. | Build the archive.
| 3. | Deploy the archive.
|
Defining the Archive You define an archive by giving it a name and then selecting the settings and/or files you want to archive. You will use the archive name when you want to deploy or update the archive. Begin creating your archive definition by accessing the ColdFusion Archives (.car) window in the Packaging and Deployment section of the ColdFusion Administrator. NOTE All ColdFusion wizards require a browser with JavaScript enabled.
NOTE The ColdFusion Archives option is only available for the ColdFusion Enterprise Edition.
1. | Start the Archive Wizard:
Open the ColdFusion Administrator. Expand the Packaging and Deployment section (if necessary) in the left navigation frame, and click the ColdFusion Archives (.car) link (Figure 6.1).
Figure 6.1. The ColdFusion Archives (.car) window. 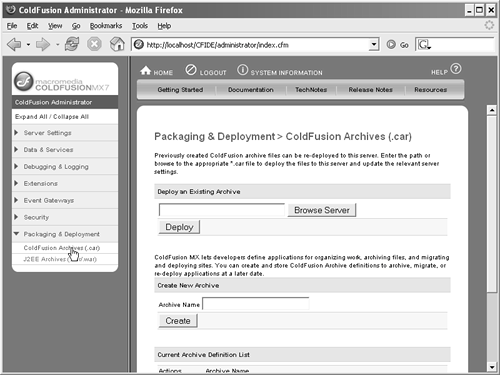
In the ColdFusion Archives (.car) window, enter a name for your archive in the Archive Name text field and click Create. The archive name appears in the Current Archive Definition List, and the Archive Wizard appears (Figure 6.2).
Figure 6.2. The Archive Wizard. 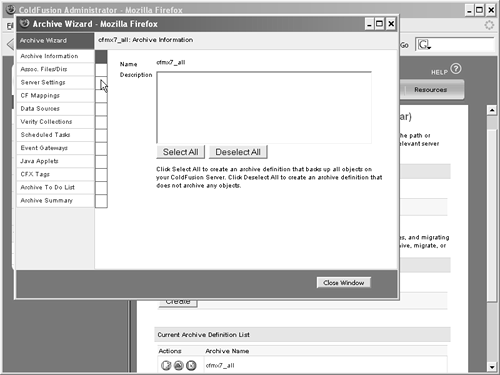
| 2. | In the Archive Wizard, specify the data to archive. Table 6.1 describes the tabs in the Archive Wizard.
Table 6.1. ColdFusion Archive Wizard TabsTAB | DESCRIPTION |
|---|
Archive Information | Provides a text area for adding a description for the archive. Also provides Select All and Deselect All buttons for automatically enabling/disabling all the options available on other Archive Wizard tabs. | Associated Files and Directories | Select the location of directories and files to include and exclude from the archive. | Server Settings | Select general ColdFusion server settings to archive. | CF Mappings | Select the registered ColdFusion mappings to archive. | Data Sources | Select the registered ColdFusion data sources to archive. | Verity Collections | Select the registered Verity collections to archive. | Scheduled Tasks | Select the registered automated tasks to archive. | Event Gateways | Select the registered ColdFusion event gateway instances to archive. | Java Applets | Select the registered applets to archive. | CFX Tags | Select the registered CFX tags to archive. | Archive To Do List | Itemize tasks to perform before/after deploying an archive. | Archive Summary | Provides summary information to help you quickly identify the content of the archive. |
On tabs containing check boxes, your selections are saved after you click the mouse button (onClick JavaScript event).
| 3. | When you have finished selecting the archive options, click Close Window. Your archive definition is now complete.
|
TIP Creating a ColdFusion archive after the initially configuring server settings (e.g. data sources, caching, mappings, etc.) is a good way to create a re-deployable server baseline. Creating or updating archives as settings undergo change is also a good way to create server snapshots.
Modifying the Definition Should you need to modify the archive definition, follow these steps: 1. | Open the ColdFusion Administrator, expand Packaging and Deployment, and open the ColdFusion Archive (.car) window.
| 2. | Find your archive definition name in the Current Archive Definition List.
| 3. | Start the Archive Wizard by clicking either the name of your archive, or the adjacent Edit Archive Definition icon (the one on the far left).
| 4. | In the Archive Wizard, make the desired changes on the tabs containing the options you want to modify (see Table 6.1).
| 5. | When you have finished modifying the options, click Close Window.
|
Deleting the Definition To delete an existing archive definition, do the following: 1. | Open the ColdFusion Administrator, expand Packaging and Deployment, and open the ColdFusion Archives (.car) window.
| 2. | In the Current Archive Definition List, click the Delete Archive icon (the one at the far right) next to the archive name you want to delete.
| 3. | A message window appears asking you to confirm the delete operation (Figure 6.3). Click OK to confirm. The ColdFusion Archives window refreshes and the deleted archive is removed from the Current Archive Definition List. Or click Cancel to cancel the delete operation.
Figure 6.3. Confirming the deletion of the ColdFusion archive definition. 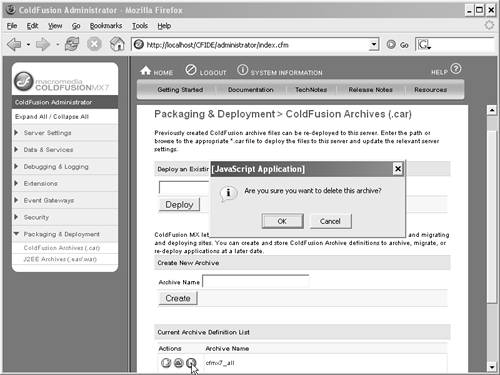
|
Building the Archive An archive's definition identifies the objects to be included in the archive. You use it to build your CAR file for deployment. Follow these steps to build an archive: 1. | Start the Archive Wizard:
Open the ColdFusion Administrator. Expand the Packaging and Deployment section (if necessary) in the left navigation frame, and click the ColdFusion Archives (.car) link.
In the ColdFusion Archives (.car) window's Current Archive Definition List, click the Build Archive icon (the middle one) next to the archive name you want to build. The Archive Wizard appears (Figure 6.4).
Figure 6.4. Building the archive using the Archive Wizard. 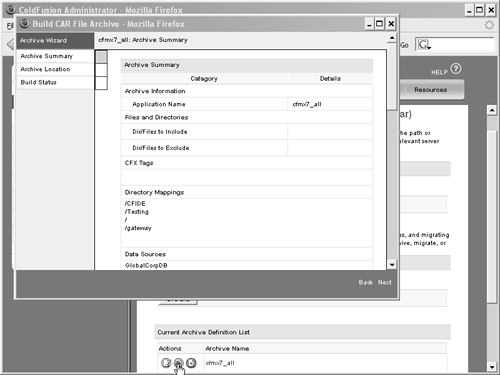
| 2. | Review the summary information in the Archive Wizard and ensure that all of the options that you want included in your CAR file are available. If they are, click Next. If not, go back to the archive definition and add any additional content.
| 3. | When the Choose Archive File Location panel appears, enter a full system path to the location for saving the archive, including the drive, directory, and filename. The filename must have the .car extension (Figure 6.5).
Figure 6.5. Specify a location and filename with a .car extension for the archive file. 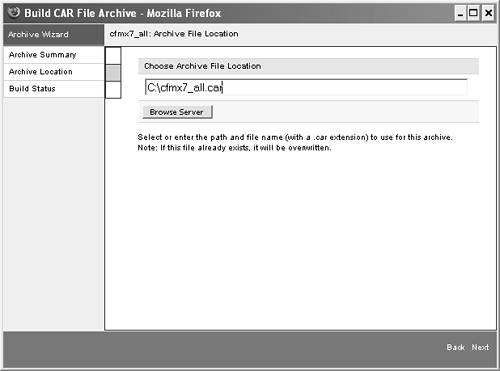
TIP The filename and archive name are not required to be the same; however, consider synchronizing these names for administration ease. | 4. | Click Next to start building the archive. The Archive Wizard will display one of the following messages when the operation completes: "Build Successful" or "Build completed with errors, Please check logs for more information."
| 5. | Click OK to close the message window. If the build had errors, you can browse the status messages in the Build Status panel.
TIP For large or complex archives, the "Build Successful" alert box may actually appear while ColdFusion is still building the physical archive file. You will know that the physical archive file is completely built when the Next button in the Archive Wizard changes to Close. | 6. | Click Close to close the Archive Wizard.
|
Your archive is now built. You should browse the file system and verify that the physical CAR file exists in the location you specified in the Archive Wizard. You can view the contents of the CAR file by using an archive utility such as WinZip. If the build operation completed with errors (and you can not see the error in the Status panel), check the source of the problem in the CAR archive log (cfroot\logs\car_archive_FILENAME.log). Deploying the Archive Now that you have built the physical CAR file, you are ready to deploy it on another ColdFusion server. NOTE To deploy an archive, the physical CAR file must reside on the ColdFusion server. You cannot use mapped drives or UNC paths. If deploying on a separate physical ColdFusion server, you will need to copy the CAR file to that machine.
NOTE Although ColdFusion MX 7 can deploy archives created in ColdFusion 6.x, avoid deploying archives containing ColdFusion 6.x Verity Collections. The Verity version (2.6.1) in ColdFusion 6.x is different from that in ColdFusion MX 7 (Verity 5.5). Do not deploy archives created in ColdFusion MX 7 on ColdFusion 6.x systems.
1. | Access the Archive Wizard:
Open the ColdFusion Administrator. Expand the Packaging and Deployment section (if necessary) in the left navigation frame, and click the ColdFusion Archives (.car) link.
In the Deploy an Existing Archive section, browse for or enter a full system path to the location of the archive (CAR file) in the text field. Click Deploy, and the Deploy Wizard appears (Figure 6.6).
Figure 6.6. Deploying the archive. 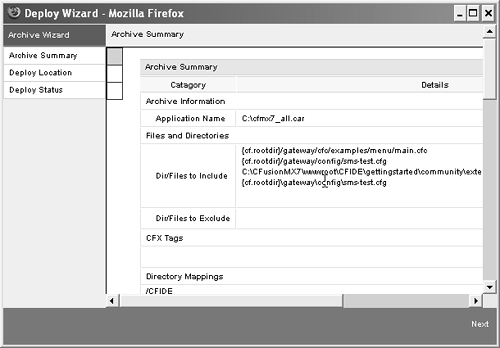
| 2. | Review the summary information in the Deploy Wizard and ensure that the available options in the CAR file are what you want deployed on this ColdFusion server. (The Archive Summary tab may take a while to display for larger/more complex archives.) When you're ready, click Next to continue.
| 3. | On the Deploy Location panel modify the Directory Path Translation entries as necessary. You will only see paths listed if the archive includes files and directories (such as application code, Verity collections, and so on).
| 4. | Click Deploy to restore the archive. The Archive Wizard will display one of the following messages when the operation completes: "Deploy Successful" or "Deploy completed with errors, Please check logs for more information".
| 5. | Click OK to close the message window. If the deployment had errors, you can browse the status messages in the Deploy Status panel.
TIP For large or complex archives, the "Deploy Successful" alert box may actually appear while ColdFusion is still restoring the physical archive file. You will know that the archive is completely restored when the Next button in the Archive Wizard changes to Close. | 6. | Click Close to close the Archive Wizard.
|
The archive has been restored to the ColdFusion server. You should go through the ColdFusion Administrator and file system to verify that the settings were applied and files were added. If the deploy operation completed with errors (and you cannot see them in the Status panel), check the source of the problem in the CAR deploy logs (cfroot\logs\car_deploy_FILENAME.log). |