12.9 Combining Colors with AlphaComposite
| As we've just seen, antialiasing works by drawing with translucent colors at the edges of a shape. But what exactly does it mean to draw with a translucent color? Take another look at Figure 12-9, or, better yet, run the example using the GraphicsExampleFrame program, so you can see the example in full color. When you draw with a translucent color, whatever color is below it "shows through." In Figure 12-9, the background gray colors show through the pure translucent red and blue colors, resulting in reddish and bluish grays. At the hardware level, of course, there is no such thing as a translucent color; drawing with a translucent color is simulated by combining the drawing color with the existing color beneath it. Combining colors in this way is called compositing and is the job of the Composite interface. You can pass a Composite object to the setComposite( ) method of a Graphics2D object to tell it how to combine a drawing color (the source color) with the colors that are already on the drawing surface (the destination colors). Java 2D defines one implementation of the Composite interface, AlphaComposite, that combines colors based on their alpha transparency values. The default AlphaComposite object used by Graphics2D is sufficient for most drawing, so you don't often need to create AlphaComposite objects. Still, there are interesting effects you can achieve with AlphaComposite. Example 12-12 demonstrates these effects (and an unrelated clipping effect), which are shown in Figure 12-10. Figure 12-10. Effects created with AlphaComposite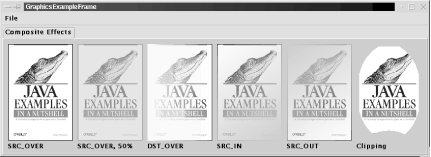 The example does much of its drawing into an off-screen image, then copies the contents of that image onto the screen. This is because many compositing effects can only be achieved when working with a drawing surface (such as an off-screen image) that has an "alpha channel" and supports transparent colors. Be sure to check out how this off-screen BufferedImage is created. Example 12-12 also illustrates the type of effects that are possible when you set a clipping region. Java 2D allows any Shape to be used as a clipping region; graphics are displayed only if they fall within this shape. The example uses the java.awt.geom.Area class to define a complex shape, combining two ellipses and a rectangle, and then uses this shape as a clipping region. Example 12-12. CompositeEffects.javapackage je3.graphics; import java.awt.*; import java.awt.geom.*; import java.awt.image.*; public class CompositeEffects implements GraphicsExample { Image cover; // The image we'll be displaying, and its size static final int COVERWIDTH = 127, COVERHEIGHT = 190; /** This constructor loads the cover image */ public CompositeEffects( ) { java.net.URL imageurl = this.getClass( ).getResource("cover.gif"); cover = new javax.swing.ImageIcon(imageurl).getImage( ); } // These are basic GraphicsExample methods public String getName( ) {return "Composite Effects";} public int getWidth( ) { return 6*COVERWIDTH + 70; } public int getHeight( ) { return COVERHEIGHT + 35; } /** Draw the example */ public void draw(Graphics2D g, Component c) { // fill the background g.setPaint(new Color(175, 175, 175)); g.fillRect(0, 0, getWidth( ), getHeight( )); // Set text attributes g.setColor(Color.black); g.setFont(new Font("SansSerif", Font.BOLD, 12)); // Draw the unmodified image g.translate(10, 10); g.drawImage(cover, 0, 0, c); g.drawString("SRC_OVER", 0, COVERHEIGHT+15); // Draw the cover again, using AlphaComposite to make the opaque // colors of the image 50% translucent g.translate(COVERWIDTH+10, 0); g.setComposite(AlphaComposite.getInstance(AlphaComposite.SRC_OVER, 0.5f)); g.drawImage(cover, 0, 0, c); // Restore the pre-defined default Composite for the screen, so // opaque colors stay opaque. g.setComposite(AlphaComposite.SrcOver); // Label the effect g.drawString("SRC_OVER, 50%", 0, COVERHEIGHT+15); // Now get an offscreen image to work with. In order to achieve // certain compositing effects, the drawing surface must support // transparency. Onscreen drawing surfaces cannot, so we have to do the // compositing in an offscreen image that is specially created to have // an "alpha channel", then copy the final result to the screen. BufferedImage offscreen = new BufferedImage(COVERWIDTH, COVERHEIGHT, BufferedImage.TYPE_INT_ARGB); // First, fill the image with a color gradient background that varies // left-to-right from opaque to transparent yellow Graphics2D osg = offscreen.createGraphics( ); osg.setPaint(new GradientPaint(0, 0, Color.yellow, COVERWIDTH, 0, new Color(255, 255, 0, 0))); osg.fillRect(0,0, COVERWIDTH, COVERHEIGHT); // Now copy the cover image on top of this, but use the DstOver rule // which draws it "underneath" the existing pixels and allows the // image to show depending on the transparency of those pixels. osg.setComposite(AlphaComposite.DstOver); osg.drawImage(cover, 0, 0, c); // And display this composited image on the screen. Note that the // image is opaque and that none of the screen background shows through g.translate(COVERWIDTH+10, 0); g.drawImage(offscreen, 0, 0, c); g.drawString("DST_OVER", 0, COVERHEIGHT+15); // Now start over and do a new effect with the off-screen image. // First, fill the offscreen image with a new color gradient. We // don't care about the colors themselves; we just want the // translucency of the background to vary. We use opaque black to // transparent black. Note that since we've already used this offscreen // image, we set the composite to Src, so we can fill the image and // ignore anything that is already there. osg.setComposite(AlphaComposite.Src); osg.setPaint(new GradientPaint(0, 0, Color.black, COVERWIDTH, COVERHEIGHT, new Color(0, 0, 0, 0))); osg.fillRect(0,0, COVERWIDTH, COVERHEIGHT); // Now set the compositing type to SrcIn, so colors come from the // source, but translucency comes from the destination osg.setComposite(AlphaComposite.SrcIn); // Draw our loaded image into the off-screen image, compositing it. osg.drawImage(cover, 0, 0, c); // And then copy our off-screen image to the screen. Note that the // image is translucent and some of the background shows through. g.translate(COVERWIDTH+10, 0); g.drawImage(offscreen, 0, 0, c); g.drawString("SRC_IN", 0, COVERHEIGHT+15); // If we do the same thing but use SrcOut, then the resulting image // will have the inverted translucency values of the destination osg.setComposite(AlphaComposite.Src); osg.setPaint(new GradientPaint(0, 0, Color.black, COVERWIDTH, COVERHEIGHT, new Color(0, 0, 0, 0))); osg.fillRect(0,0, COVERWIDTH, COVERHEIGHT); osg.setComposite(AlphaComposite.SrcOut); osg.drawImage(cover, 0, 0, c); g.translate(COVERWIDTH+10, 0); g.drawImage(offscreen, 0, 0, c); g.drawString("SRC_OUT", 0, COVERHEIGHT+15); // Here's a cool effect; it has nothing to do with compositing, but // uses an arbitrary shape to clip the image. It uses Area to combine // shapes into more complicated ones. g.translate(COVERWIDTH+10, 0); Shape savedClip = g.getClip( ); // Save current clipping region // Create a shape to use as the new clipping region. // Begin with an ellipse Area clip = new Area(new Ellipse2D.Float(0,0,COVERWIDTH,COVERHEIGHT)); // Intersect with a rectangle, truncating the ellipse. clip.intersect(new Area(new Rectangle(5,5, COVERWIDTH-10,COVERHEIGHT-10))); // Then subtract an ellipse from the bottom of the truncated ellipse. clip.subtract(new Area(new Ellipse2D.Float(COVERWIDTH/2-40, COVERHEIGHT-20, 80, 40))); // Use the resulting shape as the new clipping region g.clip(clip); // Then draw the image through this clipping region g.drawImage(cover, 0, 0, c); // Restore the old clipping region so we can label the effect g.setClip(savedClip); g.drawString("Clipping", 0, COVERHEIGHT+15); } } |
EAN: 2147483647
Pages: 285