Automatic Callback Strategy
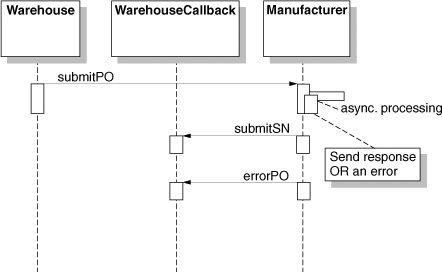
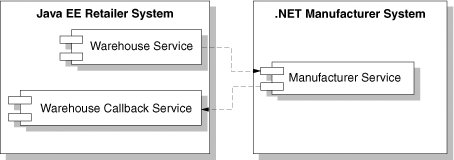
| The automatic callback strategy is fairly straightforward to understand but somewhat tricky to implement, taking into account two sets of technologies, as is seen later in this chapter. The UML diagram in Figure 8-3 highlights the Replenish Stock asynchronous communication scenario using the callback strategy. Figure 8-3. Replenish Stock sequence diagram The Warehouse service submits a purchase order request to the Manufacturer. Once the purchase order request is received, the Manufacturer sends an acknowledgement back to the Warehouse service. The Manufacturer then asynchronously processes the purchase order request, and upon successful completion automatically sends the response, submitSN, to the Warehouse Callback service. In case of an error, the Manufacturer sends an errorPO message to the Warehouse Callback service. A callback is accompanied with an acknowledgement from the receiver. At deployment, the Warehouse and the Warehouse Callback services are deployed as part of the Retailer system, while the Manufacturer service is defined in the scope of the Manufacturing System. Assuming the Retailer system is implemented using Java EE and the Manufacturing system is implemented in .NET, the deployment diagram in Figure 8-4 would look like the following. Figure 8-4. Replenish Stock deployment diagram As can be seen from the diagram, this callback to .NET Web service scenario is composed out of two synchronous calls. The first synchronous invocation is to the Manufacturer Web service and the second to the WarehouseCallback Web service. The following sections show what it takes to implement and deploy this scenario. Implementing Replenish Stock Use CasePractically speaking, there is no particular order of implementing the individual services given that any of the subsystems can always be stubbed out. The Replenish Stock scenario is started by the implementation of the Java WarehouseCallback Web service. Individual components of the entire system are depicted in the deployment diagram, Figure 8-4. Developing the .NET Manufacturer Web service follows the WarehouseCallback Service. The reason is that the .NET Web service has to asynchronously invoke the Java Callback Web service, which has to be up and running. Next is to construct the Java Warehouse client that initiates the .NET Manufacturing Web service call. Implementing this use case demonstrates how to perform asynchronous Web services integration between Java and .NET using the .NET Façade pattern callback strategy. This scenario is a prime example of a Service Oriented Architecture, where the complexity of individual systems is transparent to the system interoperability. Only high-level services communicate across these systems. With the preceding example, one might question why Java EE was picked for the Retailer system and .NET for the Manufacturing system and what would be different if the two systems were swapped around. The reason for mapping the Retailer to Java EE and the Manufacturing system to .NET is because .NET actually integrates the asynchronous callback design, which is demonstrated later in the chapter. Building Java WarehouseCallback Web ServiceCreating Java WarehouseCallback Web ServiceThe callback service either receives a successful response or a fault response from the Manufacturer system. A fault response either indicates an application logic error or a time out on a given action. Therefore, there are two main Web methods defined in the callback interface, WarehouseCallback, submitSN and errorPO. Take a look at the interface in Listing 8-1 Listing 8-1. Retailer Example
In case of a successful purchase order processing, the invoice number and the current status of an order are passed. The return type of a boolean acts as an acknowledgement for the method call. Similarly for the errorPO method, the error type is returned indicating the type of error. Now take a look at the implementation class, WarehouseCallbackImpl, as shown in Listing 8-2: Listing 8-2. Retailer Callback Implementation
The core of the callback implementation class embraces the submitSN and errorPO methods that log corresponding PO processing statuses. To initialize the Java Logger, the code has leveraged the init() method of a Servlet, that allows the developer to perform any housekeeping routines at Servlet initialization time. The Servlet lifecycle methods are available to us via the ServiceLifecycle interface. The logger file remains open for as long as the Web service is running and is closed when the Servlet destroy method is invoked. It's important to stop the Web Server, such as Tomcat, to preview the content of the log file. Otherwise the log file lock prevents opening the log file. To simplify the Java Web services deployment process, an ant build has been leveraged and the Java WarehouseCallback service deployed. Individual ant tasks are described in the next section. Deploying Java WarehouseCallback Web ServiceTo deploy the Java Web service, it's necessary to compile classes using the javac compiler, to generate corresponding server side components with the wscompile tool, to create the initial WAR file with the war utility, to create the final WAR file using wsdeploy, and to deploy the WAR file under Tomcat. Each of these steps is represented as an ant task as follows. If you want to skip individual ant tasks and simply test the deployment of the JavaWarehouseCallback service, simply invoke the build process in the following way: > ant deploy-javacallback-service You can then start Tomcat and test the callback service http://localhost:8080/J2eeDotNet/Chapter8/Retailer/WarehouseCallback. The Web service page displays the link to the WSDL and the model file. Refer to Figure 8-5. Figure 8-5. Deploying a Web service using a WSDL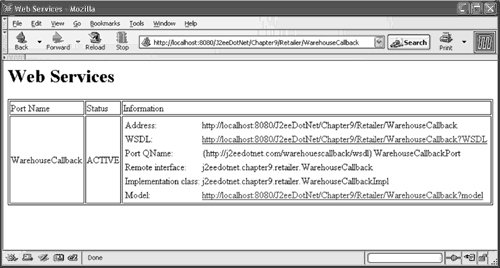 Next is to perform the step-by-step deployment process, which encompasses quite a few operations. You might want to skip the remainder of this section and continue with the next section, Implementing .NET Manufacturing System, if you are not ready to deploy the solution or are deploying using an IDE. Preparing Build DirectoriesThe first step involves creating build directories specified in the prepare task, as in Listing 8-3. Listing 8-3. Creating Build Directories
Each of the directories is defined by the ant properties. Compiling a Web ServiceAfter preparing build directories and implementing the interface and the implementation classes, the next task is to compile classes with the javac compiler. The compile-server task performs that function by referencing classpath to compile.classpath reference id. Refer to Listing 8-4. Listing 8-4. Compiling a Web Service
The compile.classpath incorporates all necessary JAR files, as in Listing 8-5. Listing 8-5. compile.classpath
Generating Server ComponentsNext is to employ the wscompile tool to create necessary server components, for which the Wscompile class is leveraged, available with the JWSDP toolkit, as in Listing 8-6. Listing 8-6. wscompile to Create Server Components
Next is to use the wscompile task to create server ties, the WSDL file, the service model, and other pieces needed for the Java Web service. For that you specify various configuration parameters by passing the config.xml file. Refer to Listing 8-7. Listing 8-7. config.xml
From the classpath standpoint, in addition to the third-party libraries listed in compile.classpath, add the WarehouseCallback byte code generated by the compile-server task (refer to Listing 8-8): Listing 8-8. compile-server Task
For the config.xml interface and the implementation classes of the Web service, refer to Listing 8-9. Listing 8-9. config.xml for the Interfaces and the Implementation
Generating the Initial WAR FileNow it's time to generate the initial WAR file, Warehouse-raw.war, often referred to as a raw WAR. This Web archive file comprises components that have been prepared up until now, such as service model, build classes, and WSDL, and the deployment descriptor, that is, jaxrpc-ri.xml. Refer to Listing 8-10. Listing 8-10. warehouse-raw.war
The content of the deployment descriptor, jaxrpc-ri.xml, provides information on Web service endpoints such as interface, model, and WSDL information as well as the endpoint URL mapping. Refer to Listing 8-11. Listing 8-11. jaxrpc-ri.xml
Creating the Final WAR FileNext is to use the wsdeploy tool to generate the final WAR file, J2eeDotNet.war. The wsdeploy reads the Warehouse-raw.war file and the jaxrpc-ri.xml file to produce the final warehouse.war file, which will be deployed under the Web server. Refer to Listing 8-12. Listing 8-12. Using wsdeploy tool to generate the final WAR file
Deploying the WAR FileThe closing step involves deploying the WAR file under the Web server. This is achieved with the deploy-javacallback-service task. Refer to Listing 8-13. Listing 8-13. deploy-javacallback-service Task
This step results in the war file being deployed under Tomcat by placing the J2eeDotNet.war file under the tomcat-jwsdp-1.4/webapps directory. Developer's Note It's important to point out that invoking this last step will automatically invoke the hierarchy of all dependent calls. Because each of the ant tasks has a specific dependent task, the sequence of individual calls is strictly defined in the build.xml. Previewing Java Callback Web ServiceStart the Tomcat server and then type in the WarehouseCallback URL: http://localhost:8080/J2eeDotNet/Chapter8/Retailer/WarehouseCallback. You should see the same screen as shown earlier. If you want to see details of the Web service, follow the WDSL link. Developer's Note It is useful to create a simple client to validate the correctness of the Web service. Because the next job involves the .NET Framework, it is worth writing a test suite to ensure correctness of the Java service. Testing WarehouseCallback Web ServiceTo guarantee that the Web service works correctly, a simple client application can be created that makes a call to the WarehouseCallback Web service. Refer to Listing 8-14. Listing 8-14. Client to Make a Call to WarehouseCallback Web service
Build this test client and execute it. The final few lines will include the following message indicating the acknowledgement of receiving the request. [echo] --- Running CallbackTest application --- [java] The result from the client is: true If the CallbackTest application runs successfully, there will be an entry in the Tomcat log file similar to this (refer to Listing 8-15): Listing 8-15. Log file entry for CallbackTest
Having small unit testing performed at every step of a process helps to minimize the debugging effort. All that has been done so far is to create the Java WarehouseCallback service as part of the Warehouse system. At this point it is time to build the .NET Manufacturing system. |
EAN: 2147483647
Pages: 170