| To customize the appearance of Table Datasheet view, you can hide the fields you don't want to appear in your datasheet, change the height of the record rows, eliminate the gridlines, and select a different font for your display. The following list describes each option for customizing Table and Query Datasheet views: To hide a field, select it by clicking its header or placing the cursor in the column for the field. Then choose Format, Hide Columns. To show a hidden field, choose Format, Unhide Columns to display the Unhide Columns dialog (see Figure 7.27). A mark next to the field name in the Column list indicates fields appearing in Datasheet view. Click the check box to the left of the field name to toggle between hiding and showing the field. Figure 7.27. The Unhide Columns dialog lets you specify the fields that appear in Table Datasheet view.   To change the font used to display and print the datasheet, use the Font drop-down list on the Formatting toolbar (if it's displayed) or choose Format, Font to display the Font dialog. The appearance of the Font dialog depends on your operating system; Figure 7.28 shows Windows 2000's Font dialog. To change the font used to display and print the datasheet, use the Font drop-down list on the Formatting toolbar (if it's displayed) or choose Format, Font to display the Font dialog. The appearance of the Font dialog depends on your operating system; Figure 7.28 shows Windows 2000's Font dialog.
Figure 7.28. Windows XP's Font dialog identifies new OpenType fonts with an italic letter O and traditional TrueType fonts with two Ts. 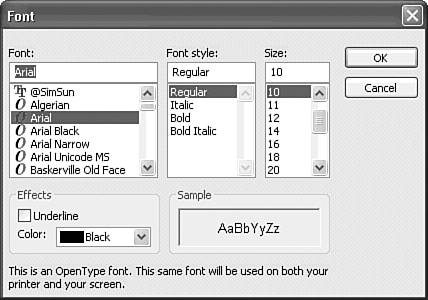  To remove gridlines from the display and printed versions of the datasheet, use the Gridlines drop-down list on the Formatting toolbar or choose Format, Datasheet. If you use the Gridlines drop-down list, Access displays a palette of four gridline display choices: Both, Horizontal, Vertical, and None; click the button corresponding to the gridline display you want. If you use the Format menu, Access displays the Datasheet Formatting dialog, shown in Figure 7.29, which contains check boxes for the horizontal and vertical gridlines. Select or clear the check boxes for the desired gridline display. To remove gridlines from the display and printed versions of the datasheet, use the Gridlines drop-down list on the Formatting toolbar or choose Format, Datasheet. If you use the Gridlines drop-down list, Access displays a palette of four gridline display choices: Both, Horizontal, Vertical, and None; click the button corresponding to the gridline display you want. If you use the Format menu, Access displays the Datasheet Formatting dialog, shown in Figure 7.29, which contains check boxes for the horizontal and vertical gridlines. Select or clear the check boxes for the desired gridline display.
Figure 7.29. The Datasheet Formatting dialog lets you apply special effects, control the appearance of gridlines, and select background and gridline colors.  To change the height of the rows as displayed and printed, position the mouse pointer at the bottom edge of one of the record selector buttons. The pointer turns into a double-headed arrow (see Figure 7.30). Drag the bottom edge of the button to adjust the height of all the rows. Alternatively, choose Format, Row Height and set the height in points in the Row Height dialog. (Multiply the size of your font by about 1.25 to obtain normal row spacing; printers call 10-point type with 12-point spacing "10 on 12.") Figure 7.30. This customized Datasheet View uses a 9-point Verdana type and no gridlines. You adjust line spacing, shown here between the second and third record selection buttons, by dragging the double-headed arrow up or down.  To change the width of the field columns to accommodate a larger font, choose Format, Column Width and then click the Best Fit button to let Access determine the size of your columns. You might need to adjust individual column widths by dragging the right edge of the field header with the mouse.
|