| Filters in Access, as mentioned previously, are queries in disguise, and provide a useful introduction to single-table Access queries, the subject of Chapter 9, "Designing Queries for Jet Databases." Creating an advanced filter/sort is much like creating a query, with some basic differences, as follows: The Show Table dialog doesn't appear. The SQL button is missing from the toolbar, so you can't display the underlying SQL statement. The Show row is missing from the Filter Design grid.
Filters are limited to using one table or query that Access automatically specifies when you enter Filter Design view. You can save a filter you create as a query or load a filter from a query, but Access has no provision for saving a filter as a filter. The following sections describe how to add criteria to filter records and to add a sort order in the Filter Design window. Note SQL Server tables opened in ADP don't support Jet's advanced filter/sort function.
Adding a Multifield Sort and Compound Filter Criteria In its default configuration, the Datasheet toolbar doesn't have an Advanced Filter/Sort button. Instead, you start the advanced filter/sort operation by choosing Records, Filter, Advanced Filter/Sort. To create a filter on the Orders table (which provides more records to filter than the Customers table), follow these steps:  Close and reopen the Orders table in Datasheet view without saving changes to clear filter or sort criteria you applied previously. Close and reopen the Orders table in Datasheet view without saving changes to clear filter or sort criteria you applied previously.
Choose Records, Filter, Advanced Filter/Sort to display the Filter window (see Figure 7.18). The default filter name, Filter1, is concatenated with the table name to create the default name of the first filter, OrdersFilter1. The Field List window for the Orders table appears in the upper pane of the Filter window. Figure 7.18. The Filter window is similar to the Query Design window, but doesn't have Table or Show rows in the lower pane's grid. 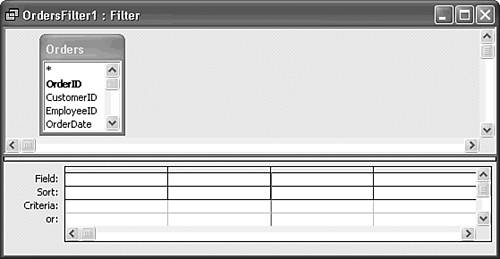 Tip  | The Datasheet toolbar doesn't have an Advanced Filter/Sort command button in its default configuration, but you can customize the Datasheet toolbar to add an Advanced Filter/Sort button. |
 To add the Advanced Filter/Sort button to your toolbar, see "Customizable Toolbars," p. 574. To add the Advanced Filter/Sort button to your toolbar, see "Customizable Toolbars," p. 574.
One field that you might want to use to sort or limit displayed records is OrderID. Click it in the field list in the upper pane and drag it to the first column of the Field row of the Filter Design grid in the lower pane. (When your mouse pointer reaches the lower pane, the pointer turns into a field symbol.) Alternatively, double-click the OrderID field to add it to the grid. Repeat step 3 for other fields on which you want to sort or establish criteria. Candidates are CustomerID, ShipCountry, ShipPostalCode, OrderDate, and ShippedDate. To check the sorting capabilities of your first advanced filter, add an ascending sort to the ShipCountry and ShipPostalCode fields by selecting Ascending from that field's Sort cell. Your Filter Design window appears as shown in Figure 7.19. Figure 7.19. The grid of the Filter Design window has ascending sorts specified for the ShipCountry and ShipPostalCode fields. 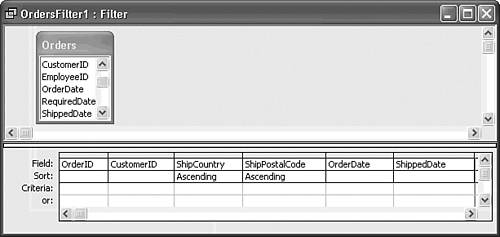  Click the Apply Filter toolbar button or choose Filter, Apply Filter/Sort. Click the Apply Filter toolbar button or choose Filter, Apply Filter/Sort.
Use the horizontal scroll bar of the datasheet to reveal the ShipCountry and ShipPostalCode fields. Your sorted table appears as shown in Figure 7.20. Figure 7.20. The sorted ShipCountry field is to the left of the sorted ShipPostalCode field in Query Design view, so the table is sorted first by country and then by postal code. Applying an Advanced Filter/Sort doesn't require repositioning the fields in Datasheet view. 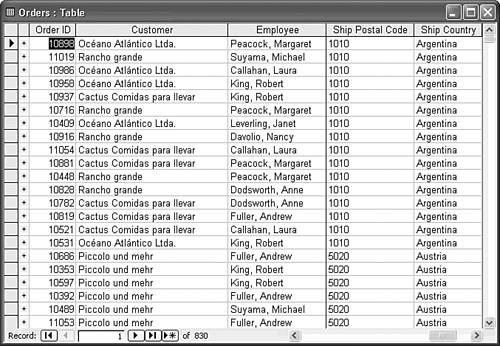 Click the Filter Design window or choose Records, Filter, Advanced Filter/Sort to edit the filter criteria. Type USA in the Criteria row of the ShipCountry field to limit records to those orders shipped to an address in the United States. Access automatically adds quotes around "USA". Click the Apply Filter button on the toolbar and scroll to display the sorted fields. Only records with destinations in the United States appear, as shown in Figure 7.21. Figure 7.21. Adding "USA" in the Criteria row under the ShipCountry field filters the Datasheet view to display orders destined for the United States only. 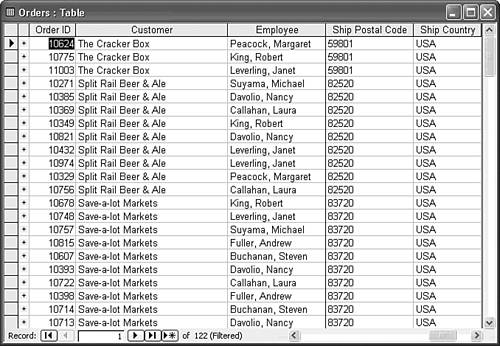
Using Composite Criteria You can apply composite criteria to expand or further limit the records that Access displays. Composite criteria are applied to more than one field. To display all orders from the Orders table that were received on or after 1/1/1997 with destinations in North America, extend the exercise in the preceding section and try the following: Click to display the Filter Design window. Type Canada in the second criteria row of the ShipCountry field and Mexico in the third row; then move the cursor to a different cell. When you add criteria under one another, the effect is to make the criteria alternative that is, combined by a logical Or operator. Open the Sort list for the PostalCode field and select (not sorted) to remove the sort. Open the Sort list for the OrderDate field and select Ascending. Type >=#1/1/1997# in the first criteria line of the OrderDate field. When you add criteria on the same line as another criterion, the criteria is additive (a logical And operator) that is, orders placed on or after 1/1/1997. The # symbols indicate to Jet that the enclosed value is of the Date/Time data type. Press F2 to select the date entry you made in step 3 and then press Ctrl+C to copy the expression to the Clipboard. Position the cursor in the second row of the OrderDate field and press Ctrl+V to add the same expression for Canada. Repeat this process to add the date criterion for Mexican orders. Your Filter Design grid now appears as shown in Figure 7.22. Figure 7.22. The design of this composite filter restricts the display to orders received in 1997 and later destined for North America. 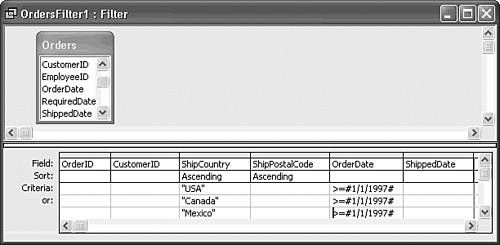 Note You must repeat the date criterion for each country criterion because of a limitation in constructing SQL statements from Jet query grids, which is discussed shortly. Click the Apply Filter button to display your newly filtered datasheet (see Figure 7.23, which has the field sequence rearranged and is scrolled to show the three countries). Figure 7.23. This Datasheet view of the Orders table has the filter of Figure 7.22 applied. The field sequence has been rearranged to permit viewing the OrderDate and ShipCountry fields. 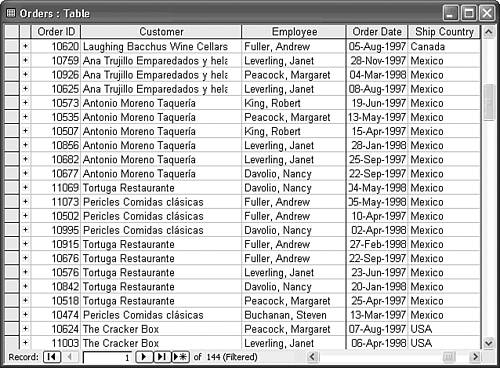
To become more familiar with the power of selecting data with criteria, see "Using the Query Design Window," p. 334.
Saving Your Filter as a Query and Loading a Filter Access doesn't have a persistent Filter object. A persistent database object is one you create that's stored as a component of your database's .mdb file. Persistent database objects appear as items in one of the list views of the Database window. A filter is equivalent to a single-table query, so Access lets you save your filter as a QueryDef (query definition) object. Access saves the names of the filters associated with each table in the system tables of your database when you save a filter as a query. This feature is the principal advantage of using a filter rather than a query when only a single table is involved. To save your filter and remove the filter from the Orders table, follow these steps: Choose Records, Filter, Advanced Filter/Sort to display the Filter Design window if it isn't already displayed or click the toolbar button if you have customized your menu.  Click the Save as Query toolbar button or choose File, Save As Query to display the Save as Query dialog. Click the Save as Query toolbar button or choose File, Save As Query to display the Save as Query dialog.
Enter a descriptive name such as fltOrdersNorthAmerica for your filter in the Query Name text box. Using the flt prefix distinguishes the filters you save from conventional queries (see Figure 7.24). Figure 7.24. Use a descriptive name when saving the filter as a QueryDef object. 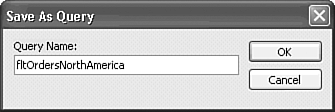 Click OK to save the filter and close the Filter window.  Click the Remove Filter toolbar button to remove the filter from the Orders datasheet. Click the Remove Filter toolbar button to remove the filter from the Orders datasheet.
A filter remains in memory while the table it applies to is open. To close the filter, close the Orders table, without saving changes.
Re-applying a filter from the filter you saved as a query requires the following steps: Reopen the Orders table in Datasheet view. Choose Records, Filter, Advanced Filter/Sort to open the Filter Design window with the default OrdersFilter1 filter.  Click the Load from Query toolbar button or choose File, Load from Query to open the Applicable Filter dialog (see Figure 7.25). You use the Applicable Filter dialog to select the filter you want if you've saved more than one filter for the table. Click the Load from Query toolbar button or choose File, Load from Query to open the Applicable Filter dialog (see Figure 7.25). You use the Applicable Filter dialog to select the filter you want if you've saved more than one filter for the table.
Figure 7.25. Clicking the Load from Query toolbar button opens the Applicable Filter dialog from which you can select the filter to apply to the table. 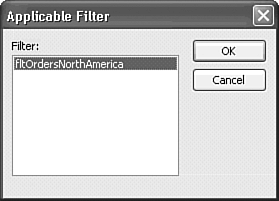 Double-click the fltOrdersNorthAmerica filter to load the saved query into the Filter window. Click the Apply Filter toolbar button to display the resulting filtered set in the Orders datasheet.
Tip To remove a filter saved as a query so it doesn't appear in the Applicable Filters list, delete the query in the Database window's query list.
Applying a Saved Query as a Filter An alternative to the preceding steps is to execute the saved filter as query. You execute a query the same way you open a table: Close the Orders table.  Click the Database window's Queries shortcut to list the saved queries. Click the Database window's Queries shortcut to list the saved queries.
Double-click the fltOrdersNorthAmerica item. The datasheet of the fltOrdersNorthAmerica: Select Query window that appears is similar to the datasheet you created in step 5 of the preceding operation, except that the fields appear in the original order of the table design.  Click the Design view toolbar button to display the query design (see Figure 7.26). Fields in which no selection criteria or sort order are entered don't appear in the Query Design grid. Click the Design view toolbar button to display the query design (see Figure 7.26). Fields in which no selection criteria or sort order are entered don't appear in the Query Design grid.
Figure 7.26. The Query Design view of a filter is similar to the Filter Design view, but adds Table and Show rows to the grid. 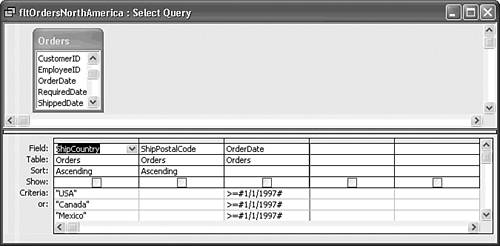
|