| The frmHRActionEntry form needs a subform to display the history of HRActions for the employee displayed in the main part of the form. The HRActions table provides the data source for the subform. Access's Subform/Subreport control offers a Subform Wizard, which lets you quickly add a new subform. The Subform Wizard of prior Access versions added a datasheet-style subform; the Access 2002 Subform Wizard added a columnar subform, despite the image of a tabular subform in the Wizard's first dialog. This change rendered the Access 2002 Subform Wizard useless for all but very specialized applications. Access 2003's Subform Wizard lets you add an existing form as a subform, as described in the following sections. Creating a Modified HRActions Subform If you didn't create the sbfHRActions subform in the preceding chapter, import the sbfHRActions subform from your \Program Files\Seua11\Chaptr14\Forms14.mdb database. Follow this drill to adapt the sbfHRActions subform for use on the History page of the tab control: Select sbfHRActions in the Forms page of the Database window, and press Ctrl+C and Ctrl+V to create a copy of the subform named sbfHRActionsTab and open it in Design view. Delete the HRComments header and text box. Right-click the ActionType combo box, and choose Change To, Text Box.  Shift-click to select the ActionType, InitiatedBy, ApprovedBy, and HRRating text boxes, and click the toolbar's Center button to center the text and labels. Shift-click to select the ActionType, InitiatedBy, ApprovedBy, and HRRating text boxes, and click the toolbar's Center button to center the text and labels.
 To minimize the height of the subform's header select all labels and drag them to the top of the Form header section. Click the Bold button of the Formatting toolbar to apply the bold attribute to all labels. Drag the Detail section bar up to the bottom of the labels. To minimize the height of the subform's header select all labels and drag them to the top of the Form header section. Click the Bold button of the Formatting toolbar to apply the bold attribute to all labels. Drag the Detail section bar up to the bottom of the labels.
Select all text boxes and drag them to the bottom of the Detail bar. Drag the Form Footer bar up to the bottom of the text boxes. Reduce the width of the subform to about 5.75 inches, and save your changes (see Figure 15.53).
Figure 15.53. Form Design and Form views show the changes you make to the layout for the sbfHRActionsTab subform. 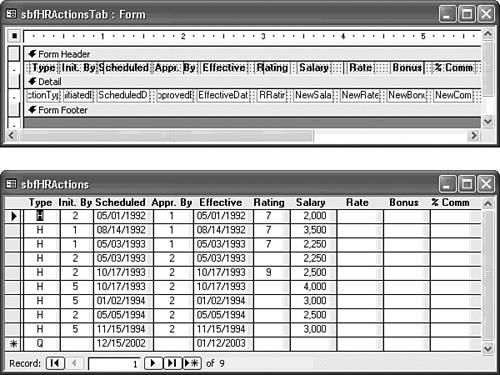 Adding the sbfHRActionsTab Subform with the Wizard To add the sbfActionsTab subform to the History page of the tab control with the Subform Wizard, do the following:   With the Wizards activated, open frmHRActionEntry in Design view, click the History tab of the tab control, and select the Subform/Subreport tool in the toolbox. With the Wizards activated, open frmHRActionEntry in Design view, click the History tab of the tab control, and select the Subform/Subreport tool in the toolbox.
Drag the mouse pointer icon, which assumes the shape of the Subform/Subreport tool, to the History page. The icon changes to a pointer when you reach the active region of the History page, which changes from white to black. Release the mouse to open the Subform Wizard's first dialog. Select the Use an Existing Form option and select sbfHRActionEntryTab in the list (see Figure 15.54). Click Next. Figure 15.54. The Subform Wizard's first dialog lets you select the existing form to use as a subform.  In the second Wizard dialog, accept the Choose from a List option and the Show HRActions for Each Record in qryHRActions Using Employee[ID] (see Figure 15.55). Click Next. Figure 15.55. The second dialog is where you specify values of the LinkChildFields and LinkMasterFields property value, EmployeeID for this example.  Accept sbfHRActionEntryTab as the name of the subform, and click Finish to dismiss the Wizard. Delete the label and adjust the size of the subform to occupy most of the available area of the History page (see Figure 15.56). Figure 15.56. After the Wizard adds the subform, adjust its dimensions to suit the active area of the tab control's page.  Change to Form view, select Buchanan in the Find list, and click the History tab to display the hired entry for Steven Buchanan and a tentative append record (see Figure 15.57). Figure 15.57. Form view with the History page selected displays HRActions record(s) for the employee selected in the Find combo box. 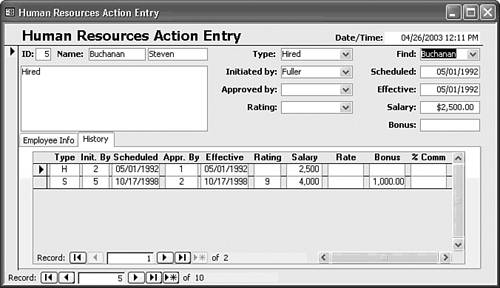
Note  | The frmHRActionEntry and sbfHRActionEntryTab forms, the qryHRActions query, the HRActions table, and the Employees table with the added PhotoOLE field are included in the \Seua11\Chaptr15\Forms15.mdb database on the accompanying CD-ROM. |
Modifying the Design of Continuous Forms The default design of the History page's subform as created by the Subform Wizard lets you edit records of the HRActions table. The term History implies read-only access to the table in the tab control. Therefore, you should alter the properties of the subform to make the form read-only and remove unnecessary controls. For example, the vertical scroll bar lets you display any HRActions record for the employee, so you don't need record navigation buttons, nor do you need record selectors. Access 2003's in-situ subform editing feature lets you change many of the properties of subforms with the main form open in Design view. Unfortunately, you can't change property values, such as Record Selectors and Navigation Buttons, that affect the structure of the subform. Therefore, you must change the design of the subform independently of its main form container. Access 2003 has a command Subform in New Window that provides a shortcut for changing subform properties. To further optimize the design of the sbfHRActionEntryTab subform, follow these steps:  Return to Design view, click the History tab, select and right-click the subform, and choose Subform in New Window to open sbfHRActionEntryTab in Design view, and then click the Properties button to display the properties of the subform. Return to Design view, click the History tab, select and right-click the subform, and choose Subform in New Window to open sbfHRActionEntryTab in Design view, and then click the Properties button to display the properties of the subform. In the Format page of the Properties window, set Scroll Bars to Vertical Only, Record Selectors to No, and Navigation Buttons to No. In the Data page, set the Recordset Type to Snapshot. Doing so has the same effect as setting Allow Edits, Allow Deletions, and Allow Additions to No. Your subform is now read-only because all snapshot-type Recordsets are read-only. Select all text boxes and set the Tab Stop property to No for the group. Close the subform and save your changes. In the now-empty History page, reduce the width of the subform and the tab control by about 1/8-inch to reflect removal of the Record Selector buttons. You can reduce the width of the subform container only when the subform isn't open for in-situ editing. In the main form, select the tab control, and set it's Tab Stop property to No. Do the same for the LastName and FirstName text boxes. Set the tab order by choosing View, Tab Order to open the Tab Order dialog. Click Auto Order to set the tab order of the controls for which the Tab Order property is Yes. The default control tab order is top-right to bottom-left. Click OK to close this dialog.  Return to Form view and click the History tab to verify your changes to the subform (see Figure 15.58). Return to Form view and click the History tab to verify your changes to the subform (see Figure 15.58).
Figure 15.58. Form view reflects subform linking on the EmployeeID field and the changes you made to the design and dimensions of the subform. 
Tip Removing text boxes and other controls from the tab order that you seldom or can't edit speeds data entry. To further optimize data entry, set the Tab Stop property of all controls on both pages of the tab control to No. Labels don't have a tab stop control; if you multi-select all controls on a page, use Shift+Click to deselect the labels to set Tab Stop to No for all other controls.
|