Modifying a Default View
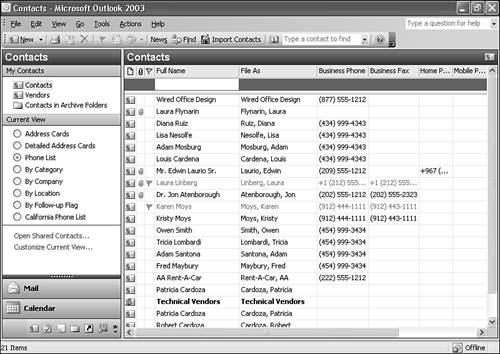
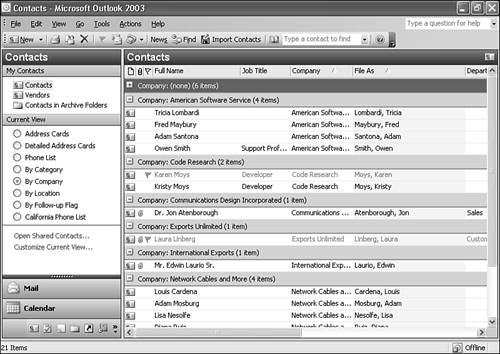
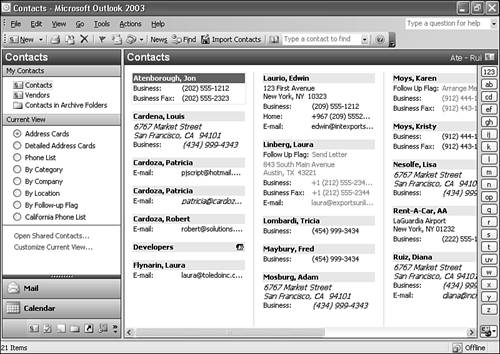
| Any of Outlook's default views can be modified to suit your needs. You can customize the fields displayed, sorting, grouping, filtering, fonts, and other formatting options. The following sections use the Phone List view of the Contacts folder to illustrate how to customize a view. The default Phone List view is displayed in Figure 4.8. Figure 4.8. The Phone List view is a Table view that lists your contacts sorted by the File As field.
Manual Column Sizing and OrderingThe number of columns displayed in the default Phone List view depends on your screen resolution. For an 800x600 screen, the Phone List view displays the following columns:
Other columns are available simply by scrolling to the right. The first customization you might want to make could be changing the width of the existing columns or rearranging the order of the columns. To change thewidth of an existing column, position your mouse on the thin gray line separating the columns. Your mouse pointer will change to a solid black line with two arrows on each side. Click and drag the column separator until your column is the desired width. You can repeat this process for all the columns in your view. You can directly change the order of the columns from within the view. Position your mouse over the column heading and click. The column heading will turn black. Drag the column heading left or right. Release the mouse when you see two red arrows over the column separator before your desired column position. Automatic Column Sizing and OrderingIf you want to have all the columns in the view displayed no matter what your screen resolution, turn on Automatic Column Sizing. Select the Customize Current View link in the Navigation pane or select View, Arrange By, Current View, Customize Current View to display the Customize View dialog box (see Figure 4.9). Figure 4.9. The Customize View dialog box is your starting point for all view customizations.
Click the Other Settings button to display the Other Settings dialog box seen in Figure 4.10. Figure 4.10. Use this dialog box to customize the appearance of your view.
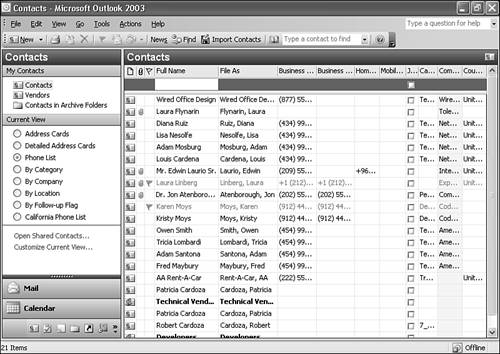
Check the box for Automatic Column Sizing and click OK twice to return to your customized Phone List view (see Figure 4.11). Figure 4.11. The Phone List view with automatic column sizing displays all columns in the view without a horizontal scrollbar.
After you turn on automatic column sizing, changing the width of one column affects the width of all the other columns in the view. Choosing Column Fields to Be DisplayedTo edit which columns are displayed in the view, return to the Customize View dialog box and click the Fields button to display the Show Fields dialog box shown in Figure 4.12. Figure 4.12. The Show Fields dialog enables you to add, remove, or reorder fields.
The Available Fields list on the left shows all fields available in the current view. The Show These Fields in This Order list on the right shows the fields currently displayed in the view. To add a field to your view, select the field in the left list and click Add to move the field from the Available Fields list to the list of fields in the current view. To remove a field from your view, do the reverse. Select the field in the list of fields in the current view and click Remove. The field disappears from the right list and reappears on the left list. You can also drag and drop fields from the left list to the right list. The default field list displayed in the Available Fields list is Frequently Used Fields. If you don't see the field you need in that list, use the Select Available Fields From drop-down box to choose another set of fields. The available field sets are
Adding Fields from FormsChoosingany of these options (except for Forms) displays a list of available fields in the Available Fields list. Choosing the Forms option displays the dialog box shown in Figure 4.13. Figure 4.13. Use this dialog box to select a form that contains the fields you need.
After you select the particular form you need, click Add to add the form to the Select Available Fields From drop-down list. You can then choose that form from the drop-down list and add any of the fields on that form to your view. Rearranging Column Field OrderWhen you're done adding or removing fields from your view, you might want to rearrange them. From the Show Fields dialog box displayed in Figure 4.12, select a field in the right list and click either Move Up or Move Down to change the order of the field in your view. You can also change the order of the fields by clicking and dragging a field up or down. A red dotted line with two arrows shows you the position of your new field. When the line is at your desired position, release the mouse button. The last option in the Show Fields dialog box is to add a new field. You can create new fields in any folder in Outlook. These fields are usually associated with custom forms, but can be created without a custom form as well. To create a new field, clickthe New Field button on the Show Fields dialog box to display Figure 4.14. Enter a name for the new field and select the type and format of the field. You can change the format of the field after you create it, but not the type. After you've done this, click OK. Your new field is added to your view. You can enter data in that field for any item in that folder. The information is stored with the item. Figure 4.14. The New Field dialog box enables you to create your own custom fields.
When you've finished manipulating fields in your view, click OK to return to the Customize View dialog box. Grouping Items in a ViewOur sample view, the Phone List view of the Contacts folder, displays items in a single list. However, you might want to occasionally view similar items in a group. Other views, such as the By Category and By Company views, offer this functionality. Using Outlook's built-in arrangements and intelligent grouping, discussed earlier in this chapter, can provide some pre-defined grouped views. However, if those views don't meet your needs, you can create your own grouping scheme. Creating Customized GroupsIf Outlook's built-in arrangements don't provide the view you need, you can create your own grouping levels by customizing your view. To group items in an existing view, use the following steps:
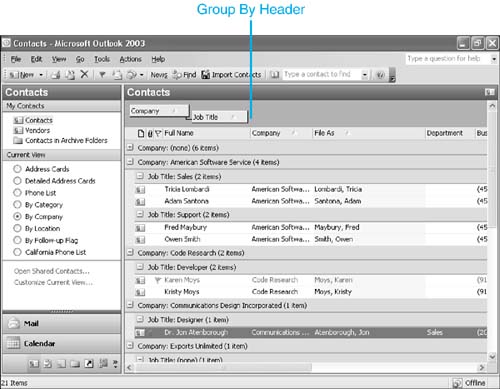
You can modify grouping levels directly in the Group By Header. This header isn't shown by default; however, you can expose the Group By header by right-clicking on one of the column headers in the view and choosing Group By Box. To sort your grouping levels, click on the button for the field you are grouping by. Your group headers will sort in the opposite sort order. To stop grouping by a particular field, right-click the field in the Group By Header and select Don't Group By This Field. To group by an additional field, you can either open the Customize View dialog and select Group By, or you can add additional grouping levels directly from the view itself. To add a grouping level of Job Title to the view shown in Figure 4.16, right-click the Job Title field heading and select Group By This Field. The field is added to the Group By Header as a second grouping level as shown in Figure 4.17. You can also drag a field name from the view into the Group By Header to add a grouping level. Figure 4.17. The Phone List view grouped by company and job title.
After you've established multiple grouping levels, you can rearrange them. To group first by company and then by country, click and drag the Company grouping button in the Group By Header to the left and drop it directly before the Country/Region grouping button. To stop grouping by a particular field, either right-click the field and select Don't Group By This Field or drag the field off the Group By header. As you drag the field off the header, a black X will appear on the field name. You can release the mouse when you see this X to remove the field from your view and remove it from the grouping of the view. If you want to reinsert the field into the view of the folder, drag the field to the column headers you see in the folder. You'll see two red arrows appear over and under the field name. This indicates where in the column order your field will appear. Release the mouse to drop your field.
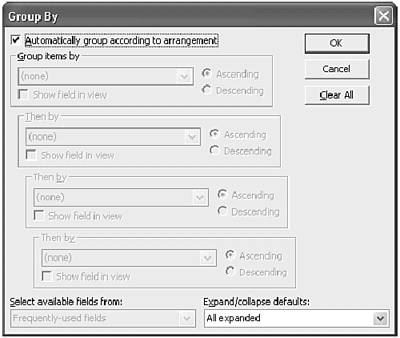
TIP If you're grouping by several different levels, you'll see a button for each grouping level in Group By Header. This can take up a lot of space in your view, especially if you have a low screen resolution. To hide this Group By Header, you can right-click on a field in the Group By Header and select Group By Box. This hides the Group By Header. To show the Group By Header, right-click on a column name and select Group By Box. Sorting Items in a ViewAll views have a default sort order. For the Phone List view, that sort order is Ascending by File As field. You can sort a view in several ways. The simplest way to sort a view by one column is to click on that column name. For a column that isn't currently used to sort in the view, clicking once on the column name sorts the view by that column in ascending order. Clicking the column name a second time sorts the view by that column in descending order. You can also sort by multiple columns at once or even sort by a column that isn't visible in the view. To access advanced sorting options, open the Customize View dialog box by clicking the link in the Navigation Pane and selecting Sort to display Figure 4.18. Figure 4.18. The Sort dialog box enables you to sort a view by up to four columns.
Use the Sort Items By drop-down list to choose the first field to sort by. Much like the field drop-down lists in the Group By box, you can change the available field set from which to choose by using the Select Available Fields From drop-down box. The default field set is Frequently Used fields. When one field is selected for sorting, the first drop-down box marked Then By is enabled. Choose a second sort field and the third drop-down box is enabled. You can sort by up to four fields in any one view. For each field, you can choose an ascending or descending sort. If you choose a sort field that isn't displayed in the view, Outlook will ask you if you want to display the field in the view when you click OK. Select Yes to show the field in the view, or No to sort by that field but not display it in the view. If you change your mind and decide you don't want to sort the view at all, click the Clear All button to remove all sorting from the view. Click OK twice to apply any changes you have made. Filtering Items in a ViewSorting and grouping enable you to find items you need quickly. But there will likely be times when you need to see only a handful of items in a particular folder. To accomplish this, you can filter your view to display only items meeting specific criteria or set of criteria. To filter your view, click Customize Current View on the Navigation Pane or select View, Arrange By, Current View, Customize Current View to display the Customize View dialog box. Click the Filter button to display Figure 4.19. Figure 4.19. The Filter dialog box enables you to specify a variety of criteria.
The Filter dialog box has four tabs to choose from, eachwith different filtering options. The first three tabs are similar to the Advanced Find dialog box.
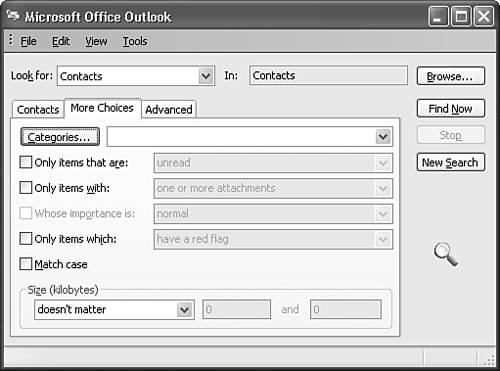
On the Contacts tab of the Filter dialog box, you can enter specific words to add to your filter. To filter by customers in San Francisco, enter San Francisco in the Search for the word(s) field and select Address Fields Only from the In drop-down box. You can also use this page to filter contacts by e-mail address, creation time, or last modified time. To specify more filter settings, select the More Choices tab (see Figure 4.20). Figure 4.20. The More Choices tab enables you to filter by additional criteria.
From this tab, you can filter by category, read/unread status, attachments, importance, or size. Select as many criteria as you need to obtain the results you want. If the first two tabs don't provide adequate filtering options, select the Advanced tab (see Figure 4.21). Figure 4.21. The Advanced tab enables you to create additional filtering criteria.
The Advanced tab enables you to filter by any existing field. To choose a field, click the Field button and move your mouse over the name of a predefined set of fields. As an example, we'll select All Contact fields to display a menu of every available contact field. To choose a particular field, click the field name. Then choose a condition from the drop-down list. The available conditions for text fields are
After you've chosen your condition, enter a value if one is required and click Add to List. For this example, I chose Business Address State as the field to filter by and the Contains condition. To filter by any contacts with a state of California, enter CA in the Value field as shown in Figure 4.22. Figure 4.22. The Advanced Filter tab is used here to filter by contacts in California.
If you need to remove a criterion from the Advanced tab, select the line containing the filter you want to remove and click Remove. Other criteria will remain the same. Click OK twice to apply your filter or click Clear All to clear all filters and start over. There's one last tab in the Filter dialog box: the SQL tab. SQL stands for Structured Query Language and is a method of defining filters for items through code. I highly recommend that you do not directly edit the SQL tab unless you have a thorough understanding of Microsoft's schema nomenclature. If you select to edit the SQL criteria directly, you won't be able to use the other tabs to create and modify filters. Other View SettingsIn addition to grouping, sorting, and filtering, there are a number of other settings you can change to manipulate your view's appearance. To access the other view settings, select Customize Current View from the Navigation Pane and click Other Settings to display the Other Settings dialog box (see Figure 4.23). Figure 4.23. The Other Settings dialog box enables you to customize fonts, Reading Pane settings, and in-cell editing.
Other Settings for Table ViewThe settings displayed in this dialog box change slightly depending on the type of view selected. The settings in Figure 4.23 apply to any Table view. From this dialog box, you can customize the following options:
After you've set the options you need, click OK twice to apply your settings. Other Settings for Card ViewThe other settings dialog box changes depending on the view type you're currently customizing. The other settings dialog for a Card view is shown in Figure 4.24. Figure 4.24. The other settings dialog in a Card view.
In a Card view, you can change fonts, enable in-cell editing, show empty fields, define the card width, and specify the minimum number of lines displayed for fields with multiple lines of data. Other view types have their own particular settings. Experiment with each type of view to see what settings you want to change. Automatic FormattingYou can specify different fonts for items that meet different criteria through the Automatic Formatting dialog box. To display this dialog box, click Customize Current View in the Navigation Pane and select Automatic Formatting to display Figure 4.25. Figure 4.25. The Automatic Formatting dialog box enables you to specify display rules for items.
Some default formatting rules are created for every view. The easiest example of automatic formatting in action is the font for unread items. Any unread item in Outlook is displayed in a bold font by default. You can edit any existing automatic formatting rules or create new ones. To create a new automatic formatting option, click the Add button. A new untitled rule is created and selected. In the Properties of Selected Rule section, change the name of the rule to something meaningful. Click the Font button to specify a font, size, and color for items to use when they meet your subsequent criteria. Click the Condition button to display the Condition dialog box. This box is almost identical to the Filter dialog box shown in Figure 4.19. Specify your condition or conditions and click OK three times to apply your changes and return to your view. Figure 4.26 displays a Card view with contacts in the state of California displayed in italicized font. Figure 4.26. Here a Contacts folder is displayed with California contacts in italics.
You can delete any user-defined automatic formatting rules by selecting the rule and clicking Delete. You cannot delete any of Outlook's default automatic formatting rules. To modify an existing rule, select the rule's name and click the Font button to change the font associated with that rule. For user-defined rules, you can also change the condition. Formatting Columns
Figure 4.27. The Format Columns dialog box enables you to customize column formatting.
This dialog box enables you to customize the display of each column in your view. Depending on the format of your selected column, you can choose from different formatting options. For text columns, you can change the column name and specify a fixed width or choose the best-fit width and specify the alignment of the column. For a date column, you can choose from a list of available date formats. Click OK twice to save your changes. For custom views that use custom fields, the Format Columns options becomes very important. Proper programming practice dictates that when naming fields, you should follow some sort of naming convention. Often that convention is the Hungarian Notation, which means prefacing the name of the field with the three-letter abbreviation of the field type. For example, an integer field designed to store the number of attendees for a meeting might be named intAttendees. A text field to store Building Wing might be named txtWing. When creating a custom view, you probably don't want to see the field names intAttendees and txtWing as your column headings. Meeting Attendees and Building Wing would probably be more appropriate column names. The Format Columns dialog can help you name your columns with more meaningful names. Simply choose the column you want to rename from the list and change the column name. Restoring a View
|
 For more information about creating and using custom forms,


EAN: 2147483647
Pages: 426