Creating and Consuming a .NET Remoting Object
So far we have discussed some of the important concepts and terms associated with .NET Remoting. Now, you are going to complete a set of exercises to create the various components that make up a .NET Remoting application. You are going to create four Visual Studio .NET projects:
-
A class library project for the interface that defines your remote server
-
A second class library project to implement this interface and provide the application logic
-
A Windows console application, which will be your host server and will call the application logic
-
A client application to make calls on the server
There is one more consideration for creating the client-side code that we haven’t discussed yet. You need to provide a local reference for the client application. Although you could provide a copy of the server DLL to all your clients to reference and develop against, that would defeat your purpose of deploying to a single remote server. Your clients do not need the complete implementation DLL; all they need is an interface. This interface exposes any public properties and methods of your class, as well as the calling conventions for those methods. The interface shows what arguments are required for various methods and what data types will be returned.
Let’s start with Exercise 3.1, in which you will create an interface that defines your server class and a server DLL that holds the implementation logic for your server.
Exercise 3.1: Creating the Server and Interface DLLs
Creating the Interface:
-
Create a new Visual Studio .NET Class Library project. Name the project TimeInterface.
-
Change the default code Public Class Class1 to Public Interface ITime and change the name of the class file to ITime.vb by using the Solution Explorer.
-
Define the functions that will be included in the server. Your code should look like this:
Public Interface ITime Function GetServerTime() As DateTime Function GetServerTimeAsString() As DateTime End Interface
-
Save and build your project by using the Visual Studio .NET menus.
Creating the TimeServer Class:
-
Create a new Visual Studio .NET Class Library project. Name the project TimeServer.
-
Change the default name Class1 to TimeClass and change the name of the class file to TimeClass.vb.
-
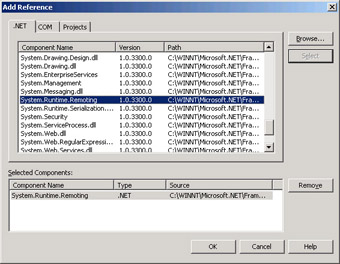
Set a reference to System.Runtime.Remoting.dll.
-
Copy the TimeInterface.dll from the \bin directory of the TimeInterface project to the project directory of the current TimeServer project. Set a reference to this copy of TimeInterface.dll.
-
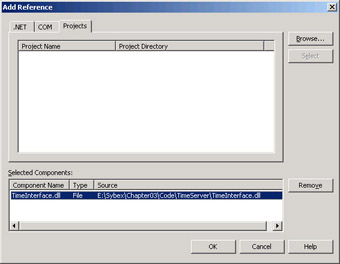
From the Add Reference dialog box, select the Projects tab. Click the Browse button and then locate TimeInterface.dll in your project directory.
-
At the top of your class definition, specify that TimeClass inherits from MarshalByRefObject and implements TimeInterface.ITime. The class will have two simple methods: GetServerTime and GetServerTimeAsString. Each method will implement one of the methods defined in your interface. The code in each method will write a line to the system console (remember that the host for your TimeServer DLL will be a Windows console application) and then return the time from the server.
Your code should look like the following:
Public Class TimeClass Inherits MarshalByRefObject Implements TimeInterface.ITime Public Sub New() Console.WriteLine("TimeClass has been instantiated.") End Sub Public Function GetServerTime() As DateTime _ Implements TimeInterface.ITime.GetServerTime Console.WriteLine("Time requested by a client.") Return DateTime.Now End Function Public Function GetServerTimeAsString() As DateTime _ Implements TimeInterface.ITime.GetServerTimeAsString Console.WriteLine("Time String requested by a client.") Return DateTime.Now.ToLongDateString End Function End Class -
Display the Project Properties dialog box by right-clicking on the project name in the Solution Explorer window. Verify that the Assembly name is TimeServer, the Root namespace is TimeServer, and that the Startup object is (None).
-
Save your project. Build the TimeServer project by using the Build menu.
In Exercise 3.2, you will create a Windows console application that will reference your TimeServer DLL and be responsible for accepting client calls to the TimeClass.
Exercise 3.2: Creating the Host
-
Create a new Visual Studio .NET Console Application project. Name the project TimeHostProject.
-
Change the default name Module1 to TimeHost and change the name of the module file to TimeHost.vb.
-
Set a reference to System.Runtime.Remoting.dll.
-
Copy the TimeServer.dll and TimeInterface.dll files from their respective \bin directories to the project directory for the TimeHostProject.
-
Set a reference to the file TimeServer.dll. From the Add Reference dialog box, select the Projects tab. Then click the Browse button and select the file that you just copied to the host project directory. You must also add a reference to the TimeInterface.dll, because TimeServer depends on this interface.
-
Above your module definition, add the following Imports statements:
Imports System.Runtime.Remoting Imports System.Runtime.Remoting.Channels Imports System.Runtime.Remoting.Channels.Http
-
In the Sub Main procedure, add code to declare a variable for the TimeClass object, register a channel, and register the TimeClass. Also add a console message so you can verify that your host application is running.
-
Your code should look like the following:
Sub Main() Dim timeObject As TimeServer.TimeClass() 'register the channel Dim timeChan As New HttpChannel(8080) ChannelServices.RegisterChannel(timeChan) 'Register TimeClass as a SingleCall object RemotingConfiguration.RegisterWellKnownServiceType( _ GetType(TimeServer.TimeClass), _ "timeUri", WellKnownObjectMode.SingleCall) Console.WriteLine( _ "Running. Press Enter to stop the host application.") Console.ReadLine() End Sub
-
The following code shows another method of the ChannelServices .NET Framework class. You can add this code at the end of the Sub Main procedure to explicitly “un-register” the channel before your host application shuts down.
ChannelServices.UnregisterChannel(timeChan) Console.WriteLine("Unregistered the channel.") Console.WriteLine("Press Enter to stop the host application.") Console.ReadLine() -
Display the Project Properties dialog box by right-clicking the project name in the Solution Explorer window. Verify that the Assembly name is TimeHost, the Root namespace is TimeHost, and that the Startup object is Sub Main.
-
Build the TimeHost project by using the Build menu.
The complete code for Exercise 3.2 is located in Listing 3.4.
Listing 3.4: The Complete Code for the TimeHost Module in Exercise 3.2
Imports System.Runtime.Remoting Imports System.Runtime.Remoting.Channels Imports System.Runtime.Remoting.Channels.Http Module TimeHost Sub Main() Dim timeObject As TimeServer.TimeClass() 'register the channel Dim timeChan As New HttpChannel(8080) ChannelServices.RegisterChannel(timeChan) 'Register TimeClass as a SingleCall object RemotingConfiguration.RegisterWellKnownServiceType( _ GetType(TimeServer.TimeClass), _ "timeUri", WellKnownObjectMode.SingleCall) Console.WriteLine( _ "Running. Press Enter to stop the host application.") Console.ReadLine() ChannelServices.UnregisterChannel(timeChan) Console.WriteLine("Unregistered the channel.") Console.WriteLine( _ "Press Enter to stop the host application.") Console.ReadLine() End Sub End Module Now that you have created your server DLL, the code library containing the business logic that your clients want to access, and you have created the host application for the remote machine, you can turn your attention to creating a client application. This will be done in Exercise 3.3, which a simple Windows Forms project. Please note that when you register the channel in the client code, you can leave it set to port 0; the .NET Remoting infrastructure will select an available port for the client.
Exercise 3.3: Creating the Client
-
Create a new Visual Studio .NET Windows project. Name the project TimeClient.
-
Change the default class name Form1 to frmTimeClient and change the name of the form file to frmTimeClient.vb.
-
Set a reference to System.Runtime.Remoting.dll.
-
Copy the TimeInterface.dll from the \bin directory of the TimeInterface project to the project directory of the new TimeClient project. Set a reference to this copy of TimeInterface.dll. From the Add Reference dialog box, select the Projects tab. Then click the Browse button and locate TimeInterface.dll in your project directory.
-
Create a user interface that looks like the next graphic. Add the following controls:
-
Text box named txtDisplayTime
-
Command button named btnTime
-
Text box named txtDisplayDate
-
Command button named btnDate

-
-
At the top of your form module, add the following Imports statements:
Imports System.Runtime.Remoting Imports System.Runtime.Remoting.Channels Imports System.Runtime.Remoting.Channels.Http
-
Create a Form Load event procedure and add code to this procedure to register the channel. Your code should look like the following:
Private Sub frmTimeClient_Load( _ ByVal sender As System.Object, _ ByVal e As System.EventArgs) Handles MyBase.Load Dim channel As New HttpChannel(0) ChannelServices.RegisterChannel(channel) End Sub
Instantiating and Invoking a Remote Method:
-
In the Click event procedure for the first command button, use the Activator.GetObject method to activate the object. Use localhost as the machine name in the string that is passed to this method. This indicates that you are running the server on the same machine on which the client code is executing. Note that in production applications, this should show the name of a remote computer. You are also specifying port number 8080 and a URI string of timeUri; these must exactly match the values that were used when the channel and object were registered in the host application. Finally, call the GetServerTime method of the TimeClass object.
To do all this, your code should look like the following:
Dim timeObject As TimeInterface.ITime = _ CType(Activator.GetObject(GetType(TimeInterface.ITime), _ "http://localhost:8080/timeUri"), _ TimeInterface.ITime) txtDisplayTime.Text = timeObject.GetServerTime()
-
Create another Click event procedure for the second command button. The code should be substantially the same as for the preceding step. Remember to change the line of code that calls the method on the remote object to the following:
txtDisplayDate.Text = timeObject.GetServerTimeAsString()
-
Make sure the startup object specified in the Project Properties dialog box is set to frmTimeClient. Save and build your client application. The complete code for the client application is shown in Listing 3.5.
-
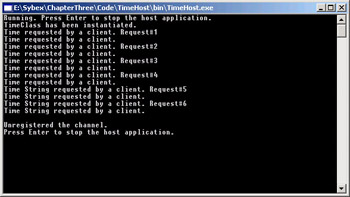
Test your .NET Remoting application by opening a Visual Studio .NET command prompt and navigating to the directory where the compiled executable of your host application is located. Start the host application. You should see a command prompt window that looks like the following.

-
Start the client application and test the buttons. You should see messages display in the host command prompt window and you should see the results displayed in the text boxes on your Windows client application.
-
If you have another computer accessible over a network, you can move the host executable, the TimeServer.dll, and TimeInterfact.dll to the other computer. In the URL in your client application code, change the machine name from localhost to the name of your remote computer.
-
When finished, go back to the command prompt window in which you started the host application and press Enter twice to stop the application.
Listing 3.5: The Client Application
Imports System.Runtime.Remoting Imports System.Runtime.Remoting.Channels Imports System.Runtime.Remoting.Channels.Http Public Class frmTimeClient Inherits System.Windows.Forms.Form 'Windows Form Designer generated code Private Sub frmTimeClient_Load(ByVal sender As System.Object, _ ByVal e As System.EventArgs) Handles MyBase.Load Dim channel As New HttpChannel(0) ChannelServices.RegisterChannel(channel) End Sub Private Sub btnTime_Click(ByVal sender As System.Object, _ ByVal e As System.EventArgs) Handles btnTime.Click Dim timeObject As TimeInterface.ITime = _ CType(Activator.GetObject( _ GetType(TimeInterface.ITime), _ "http://localhost:8080/timeUri") , _ TimeInterface.ITime) txtDisplayTime.Text = timeObject.GetServerTime() End Sub Private Sub btnDate_Click(ByVal sender As System.Object, _ ByVal e As System.EventArgs) Handles btnDate.Click Dim timeObject As TimeInterface.ITime = _ CType(Activator.GetObject( _ GetType(TimeInterface.ITime), _ "http://localhost:8080/timeUri"), _ TimeInterface.ITime) txtDisplayDate.Text = timeObject.GetServerTimeAsString() End Sub End Class
In Exercise 3.4, you are going to make a few changes to the server and host project to illustrate the difference between SingleCall and Singleton remote objects.
Exercise 3.4: Using a Singleton Remote Object
-
In the TimeServer project, make the following modifications to the code:
-
Declare a class-level integer variable named counter.
Dim counter As Int32
-
In each of the two button Click event procedures, increment the counter variable and modify the console message to display the variable:
counter += 1 Console.WriteLine("Time requested by a client. Request#" & counter)
-
-
Save and build the project.
-
Copy the new version of the TimeServer.dll to the TimeHost project directory.
-
Open the TimeHost project. In the Solution Explorer window, expand the References section, right-click on the TimeServer reference, and choose Remove from the pop-up menu.
-
Right-click on the References section. Locate the new version of TimeServer.dll and select it.
-
In the code in the Sub Main procedure of the host application, change the WellKnownObjectMode parameter from SingleCall to Singleton.
RemotingConfiguration.RegisterWellKnownServiceType( _ GetType(TimeServer.TimeClass), _ "timeUri", WellKnownObjectMode.Singleton)
-
Save and build the TimeHost project.
-
Now you can test this in the same way as in Exercise 3.3. You will see results similar to the following graphic.
EAN: 2147483647
Pages: 153