Using Note Containers
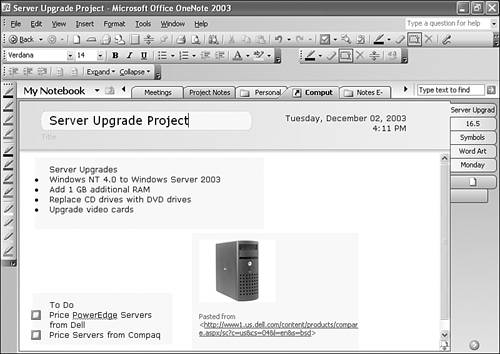
| As you've seen in previous chapters, all notes you take in OneNote, whether on a Tablet PC, desktop, or laptop, are stored in note containers. Figure 16.1 shows a typical OneNote page with three note containers. The note container is the shaded box that contains text, handwriting, graphics or links. Figure 16.1. You can store text, graphics, and links in your note containers.
As you can see, note containers can contain a variety of different types of data. They grow in size to accommodate the data stored within them. Anytime you click on a OneNote page, you're either creating a new note container or entering an existing note container. All OneNote notes are contained in note containers.
To create your note container, click somewhere in a blank area of OneNote. You should see a blinking vertical bar where you clicked, representing your cursor. In short, you do just about everything in OneNote by using note containers. You can move note containers around on the screen, resize them, combine them, create them, delete them, change their display, copy, paste, and cut them. tip
Customizing the Display of Note ContainersThere are a few customizations you can make to the display of your note containers. Choose Options from the Tools menu to display Figure 16.2. Figure 16.2. You can control the display of note containers on the screen.
The Display category of the Options window allows you to control how dark your note containers are shaded. Use the drop-down to choose the level of note container shading you need. As you can see from Figure 16.3, choosing the darkest shading leaves no doubt as to where the note containers are located on the screen. Figure 16.3. You can vary the note container shading from lightest to darkest.
In addition to controlling the shading of the note containers, you can also turn off their display entirely. Uncheck the box marked Show note containers on pages and click OK. The note container is still there, but as you can see from Figure 16.4, it's no longer visible on the page. Figure 16.4. You can turn off display of the note containers entirely.
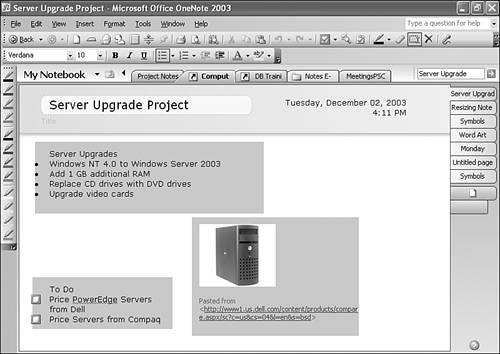
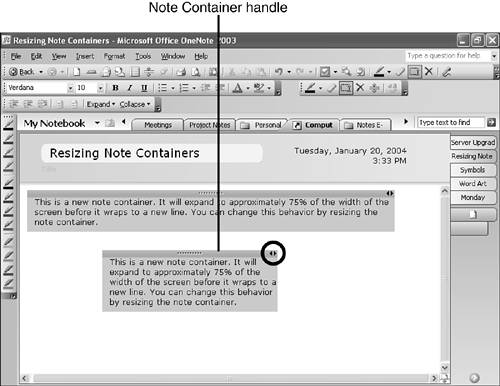
You must click OK to save your changes to the Options settings. Resizing Note ContainersWhen you first start typing in a note container, it expands to approximately 75% of the width of the OneNote page. When your typing reaches the end of the line, it automatically wraps to the next line. If you want to resize your note container, just position your mouse or Tablet PC pen over the top of the note container to display the container's handle (the darker gray strip on the top of the note container). Within that strip you'll see two opposite-facing arrows. As you move your mouse pointer over those arrows, the pointer changes into a double arrow. Click and drag left or right to change the size of your note container. Figure 16.5 shows the same text in two note containers of differing sizes. Figure 16.5. You can resize your note container by clicking and dragging.
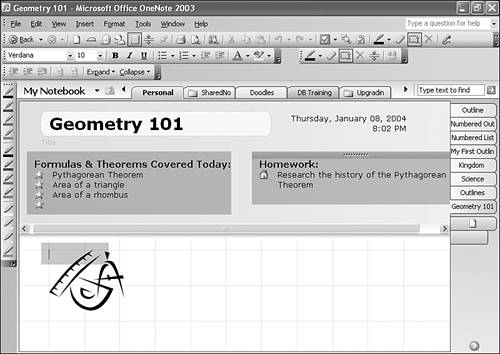
As you resize the note container, the text within the note container wraps properly. Moving a Note Container Around on the ScreenUsing the note container's handle (shown in Figure 16.5), you can move the note container anywhere on your OneNote page. Just position your mouse or Tablet PC's pen over the handle, click and drag the handle to move the note container. You can even move a note container from the note page to the page header. While it's generally not common to store information within note containers in the page header, you might find it useful, as shown in Figure 16.6. Figure 16.6. Sometimes you might want to store information in the page header.
You can also move the note container to another page or section. You can't drag the note container from one page to another. In order to move the note container, you'll need to cut (or copy) it and then paste it at the destination location.
caution
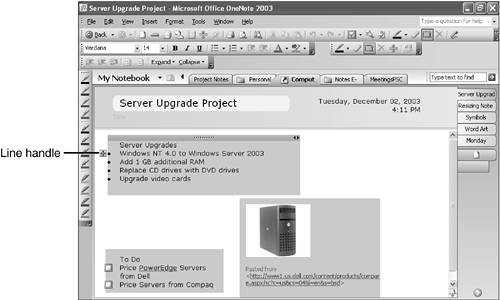
You use the same steps to move a note container to another section within OneNote. Combining Two Note ContainersIt's easy to combine two note containers into a single container. Simply use your mouse or Tablet PC's pen to click the note container's handle. Then drag it up or down until it appears to dock (lock on) to another note container. You'll see the two containers combine before you release the mouse. Rearranging Notes Within a ContainerAs mentioned in the previous section, when combining note containers, it's easy to drag a note container into the middle of another note container. If you've done this and need to rearrange the lines in a note container, or merely want to rearrange the lines in a list or outline, you can do that rather simply. Position your mouse or Tablet PC's pen over the line you want to move. As you hover the pointer over the line, you'll see the line handle, as shown in Figure 16.7. Figure 16.7. You can use the line handle to move lines around within a container.
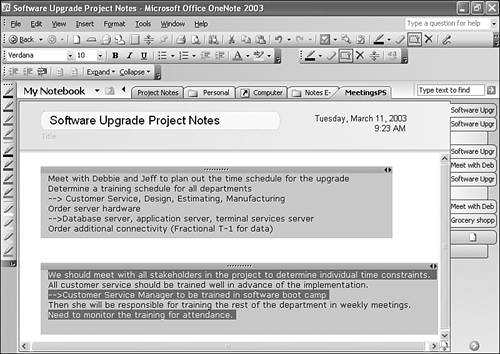
Click once on the line handle to select the line and hold down the mouse button. You can now drag the line anywhere you want on the screen. You can drag it within the current note container or create an entirely new note container. If you want to select multiple lines at a time, you can use the Shift or Ctrl keys to do this. To select adjacent lines, click the first line's handle with your mouse. Then press and hold the Shift key while clicking the last line's handle. If you want to select lines that are not next to each other, click the first line's handle with your mouse. Press and hold the Ctrl key while clicking to select the second line. You can use these methods with any number of lines. For example, in Figure 16.8, you could select the first, third, and fifth lines from the bottom note container. Figure 16.8. You can select multiple lines from the same note container.
If you drag the selected lines up to the first note container on the page, the lines will be inserted at the bottom of the first note container. If you changed your mind before you released the mouse to drop the lines in their new location and attempted to drag them back to their original location, OneNote would remember that the selected lines had other lines between them and would return the lines to their original position. This positional memory is only preserved until you release the mouse. If you change your mind about the position of the lines after you've released the mouse button, you'll have to move the lines back into position manually.
Making a New Note Container from an Existing Note ContainerMuch like you can combine two note containers to make a single note container, you can separate one note container into multiple note containers. All you have to do is use the line handle for one or multiple lines and drag the lines away from their existing container. The line or lines will form their own note container. In addition to creating a new note container, you can also move the lines into a different note container.
|
EAN: 2147483647
Pages: 182