Creating Outlines Using the Pen
| So far, all the outlines we've covered have been created using the keyboard. However, you can create outlines with the Tablet PC pen as well. The process isn't as simple with the pen, though. For example, in Figure 14.11, the training outline looks just fine, but if you tried to use the Outlining toolbar to collapse the third level, you'd find that OneNote doesn't recognize the outline levels. That's because when you write directly on the screen, OneNote doesn't always know that each line you create is part of the same line or note container. Figure 14.11. Writing an outline on a Tablet PC presents challenges.
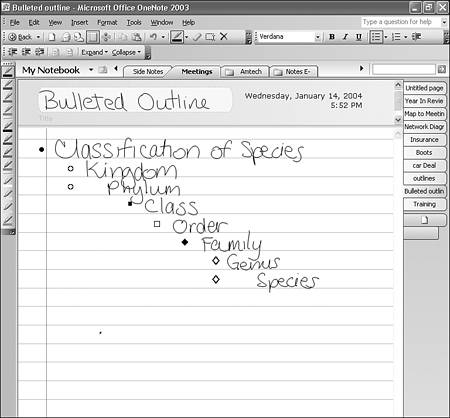
Despite these difficulties, it is possible to create outlines with the Tablet PC pen. Start your outline by writing the first line of your outline on the screen. Next, click the Bullets toolbar button to place a bullet in front of your line of writing. To add the next line of the outline, place your pen on the next line and indent it slightly. As you start writing, it's likely that OneNote will recognize that the second line is part of the same outline and place a bullet next to the text. As you continue your outline, you might notice that OneNote doesn't always recognize your indentation. For example, in Figure 14.12, each line of the outline should be one level below the previous level. However, from examining the bullets, you can see that Kingdom and Phylum are on the same level, as are Genus and Species. OneNote doesn't always recognize that you've actually indented a line, even if it appears indented on the screen. Figure 14.12. Writing outlines doesn't always produce perfect results.
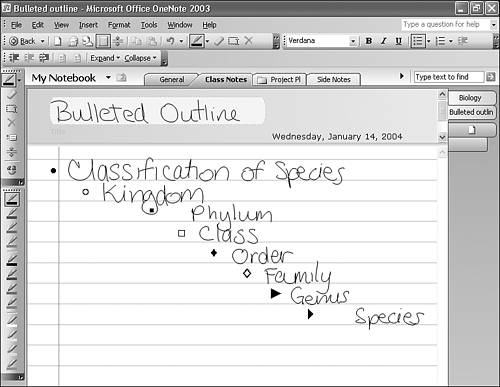
You can edit the outline and correct these mistakes. To indent the Phylum line, place your pen over the line until the line selector appears. Click the line selector with the pen to select the current line and all subsequent lines at lower outline levels. Click Increase Indent level on the Outlining toolbar. This indents all selected lines one level. Repeat this process for the Species line to change your outline into one similar to Figure 14.13. Figure 14.13. You can use the Outlining toolbar to edit your outline.
tip
You'll notice that even after editing your outline with the outlining toolbar, it might still be slightly off center. For example, in Figure 14.13, there's a lot of extra space before Phylum. Unfortunately, when you're writing your outlines, you can't always remedy that problem easily. Typing your outlines will almost always produce more reliable results, however, the convenience of writing your outline might greatly outweigh any idiosyncrasies. |

EAN: 2147483647
Pages: 182
- Legal, Regulations, Compliance, and Investigations
- Initiation of the System Authorization Process
- Appendix D The Information System Security Engineering Professional (ISSEP) Certification
- Appendix E The Information System Security Management Professional (ISSMP) Certification
- Appendix G Control Baselines