Changing the Style of Your Bullets or Numbering
| So far we've created both bulleted and numbered outlines with the default formatting. However, there are a host of styles of both bullets and numbers. You can customize both bullets and numbering. To change an existing bullet style, use the following steps.
If you want to apply the same bullet style to several levels of the outline, you can use your mouse or Tablet PC pen to select multiple levels of the outline before you choose a new bullet style. You can change your numbering scheme in a similar fashion. Choose Numbering from the Format menu to display the Numbering task pane, as shown in Figure 14.15. Figure 14.15. Use the Numbering task pane to choose a new numbering style.
To apply a numbering scheme, first select the portion of the outline you want to change. You might want to change the scheme for the entire outline or only for a portion. Once you have the appropriate lines selected, just click the numbering scheme once in the Task pane. The outline's numbering scheme will change immediately.
Customize Your Numbering SchemeClick Customize Numbering in the Numbering task pane to further customize your numbering, as shown in Figure 14.16. Figure 14.16. You can customize both your sequence and format.
caution
The top box, Apply a sequence, allows you to control the type of numbering you need. For example, you can take a list formatted with 1., 2., 3., 4. and change it to a, b, c, d. Just highlight the entire list, and choose a, b, c, d, e from the Apply a sequence box. After you've chosen a sequence, you can also apply a format. If you don't like a, b, c, d, e, you can change the format to a>, b>, c>, d>, e>. caution
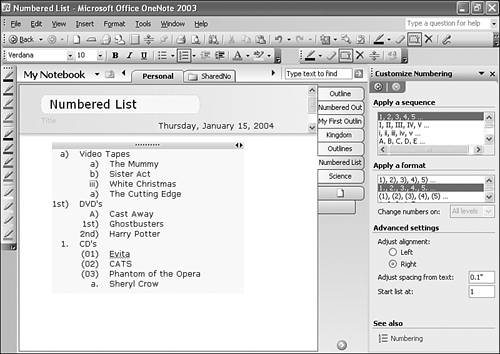
Be very careful changing sequences and formatting. If you want to affect the entire outline, you'll need to select every line of the outline before you begin. Otherwise, you could end up with two parts of the same outline with different sequences and formats. This can be quite confusing, as shown in Figure 14.17. Figure 14.17. Changing the sequence for only part of an outline can produce confusing results.
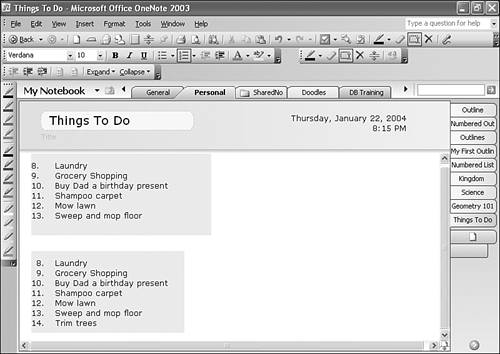
Advanced Numbering SettingsThere are a couple of advanced settings you can access from the Customize Numbering task pane. You can change the alignment of your bullets or numbers by choosing either Left or Right from the Adjust alignment options. It's difficult to discern the difference between left and right alignment unless you have a numbering scheme that extends into two and three digits. For example, in Figure 14.18, the top numbered list is aligned left and the bottom numbered list is aligned right. Figure 14.18. Aligning your numbering either left or right can give your lists a slightly different look.
You can adjust the spacing between the number in the list and the text of the numbered item by entering a different value in the Adjust spacing from text box. caution
If you want to renumber your list automatically, select the entire list and change the value in the Start list at box. OneNote will automatically renumber your list for you.
|
EAN: 2147483647
Pages: 182