Building a Command with the History Panel
|
| < Day Day Up > |
|
Dreamweaver uses commands to modify your documents, from cleaning up boggy Microsoft Word HTML to formatting and sorting tables. You can tap into the power of Dreamweaver's extensibility and build your own commands from steps recorded as you complete them in your document. To build a command this way, you need to use the History panel.
About the History panel
The History panel records steps you make in the current (active) document. By default, it can record up to 50 steps. History is kept only as long as the document is open. Once closed, the history is purged. The panel does not record history across frames.
| Tip | To set a higher number of history steps, choose Edit ® Preferences and click the General tab. Set the Maximum Number of History Steps to a new value. More history steps require more memory usage. |
The History panel is a visual representation of the steps you take and can be used to step back and forth through the steps by sliding the small thumb up and down. This is a great alternative to using Control+Z (Command+Z) to undo and Control+Y (Command+Y) to redo, mainly because it is easier to see the steps and control how many steps (back or forward) you take. When you've made a step and want to proceed from that point, simply continue to work on the document and the "future" steps are overwritten. You can also clear the entire history by using the panel options.
You can also use the History steps to repeat tasks you perform often. There are three methods you can use:
-
You can record steps as you take them. Recording limits you in what you can do, specifically preventing steps that may not be recorded, such as making a selection with the cursor. Recording is saved only as long as you do not make another recording and only for as long as the active document is open. While recording, Dreamweaver won't record steps taken if you switch from the active document to another.
-
You can select steps listed in the History panel and make a new selection and replay the steps. In a similar vein, you can copy the steps and replay them in another document. Copied steps are saved only as long as the maximum number of steps are not surpassed and as long as you do not copy again.
-
You can make a selection of steps in the History panel and save them as a Command. This is the most versatile method of reusing History steps because the command is saved to the program and is available in the current document, any other open document, and in later Dreamweaver sessions after the site and/or the program has been closed.
Some limitations to what steps can be replayed exist, be it by replaying or by making a Command. As you create steps in the History panel, you may see black lines separating some steps but not others — some mouse movements, such as making selections in the document window (by clicking or dragging) can't be played back or saved as part of a command. Try to avoid movements that can't be played back by using the arrow keys instead of the mouse to move the insertion point within the document window. If you need to make or extend a selection, hold down the Shift key while pressing an arrow key. You may find, too, that dragging an element from one location to another on the page causes a step with a red x to appear in the History list. Such steps are not repeatable in a replay or Command.
If this all sounds too complex to be useful, it isn't. Incredibly useful commands can be made from a single step. Give this a try:
-
Create a new Chapter 43 site, copying the chapter43_exercise files from the CD into the site folder.
-
Open the page
 make_command.htm from the Commands folder.
 -
Select the words null link in the page.
-
In the link field of the Property inspector, type javascript:; then press the Enter key to be sure that the information is accepted.
Tip Pressing Enter forces the Design view (and the History panel) to accept the entry.
-
Open your History panel by choosing Window ® Others ® History or by pressing Shift+F10.
-
In the History panel, select the entry made for creating a Hyperlink.
-
From the History panel's menu options, choose Save As Command (Figure 43-2).
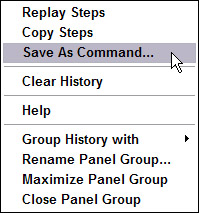
Figure 43-2: The History panel options include Save As Command. -
As shown in Figure 43-3, name the Command make null link and click OK.
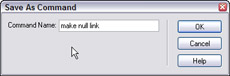
Figure 43-3: The Save As Command dialog box is where you name your command. -
Now add some paragraph returns after the null link text and type a new word or two. Select the new words and choose Commands ® make null link.
Having a null link command is useful because it remains there for every site. While Link History can and will record javascript:; as you add it the first time to build a null link, the Link History is lost when you close the Dreamweaver application — but the null link command you just created remains, and the next time you open Dreamweaver and need a null link, you can use your null link command!
|
| < Day Day Up > |
|
EAN: 2147483647
Pages: 491