The Upgrade Process
This section provides additional details on the three upgrade approaches. The first stage in the upgrade process is to install Windows SharePoint Services 3.0. Then you can upgrade or migrate your Windows SharePoint Services 2.0 Web sites. The upgrade process is broken into four tasks, as follows:
-
Task 1: Install Windows SharePoint Services 3.0 binaries
-
Task 2: Run the prescan tool
-
Task 3: Run the SharePoint Products And Technologies Configuration Wizard
-
Task 4: Upgrade and migrate your Windows SharePoint Services 2.0 Web sites
If you want to use the content database migration upgrade approach, you should install Windows SharePoint Services 3.0 on your new server or servers. (The process is detailed in Chapter 5, "Installing Microsoft Office SharePoint Server 2007." If you want to use the in-place or gradual upgrade approach, tasks 1 through 3 are detailed in this chapter. The first three tasks are similar for both upgrade approaches, and therefore, the details for these three tasks will detail both the in-place and upgrade approaches. Task 4 is upgrade/migration-specific and will be detailed separately.
You can also use the stsadm.exe tool to upgrade and migrate a Windows SharePoint Services 2.0 Web site.
Task 1: Installing Windows SharePoint Services 3.0 Binaries-In-Place/Gradual Upgrade Approach
To install the Windows SharePoint Services 3.0 binaries, complete the following steps:
-
Download Windows SharePoint Services 3.0 from the Microsoft download site, and run SharePoint_setup.exe.
-
If an Open File - Security Warning dialog box is displayed, click Run.
-
A Microsoft Windows SharePoint Services dialog box appears, asking if you want to proceed with the installation. Click Yes.
-
A dialog box displays the progress of the installation. This dialog box might disappear, but the installation is still progressing, so be patient.
-
When the Read The Microsoft Software License Terms page is displayed, review the terms. Select the I Accept The Terms Of This Agreement check box, and then click Continue.
-
If the setup program found an upgradeable product installed on the server, there will be an Upgrade tab with a title of Upgrade Earlier Versions, as shown in Figure 23-2. Choose one of the three following options:
-
Select the Yes, Perform A Gradual Upgrade option button to initiate a gradual upgrade.
-
Select the Yes, Perform An Automated In-Place Upgrade option button to initiate the in-place upgrade.
-
Select the No, Do Not Upgrade At This Time option button to install Windows SharePoint Services 3.0 alongside the Windows SharePoint Services 2.0 implementation.
Note If your Windows SharePoint Services 2.0 implementation does not support one of the upgrade approaches, the appropriate option button will be unavailable. You can see this in Figure 23-2, where the Windows SharePoint Services 3.0 setup program was run on a Windows SharePoint Services 2.0 standalone implementation that used Microsoft SQL Server 2000 Desktop Engine (Windows) (WMSDE).
-
-
Click the Server Type tab, shown in Figure 23-3. Your choice here is dictated by your current Windows SharePoint Services 2.0 installation. Select the Web Front End option button if you have a Web farm or you use SQL Server 2000 or SQL Server 2005. Otherwise, select the Stand-Alone option button, which should be used only if your Windows SharePoint Services 2.0 implementation is a standalone installation that uses WMSDE-that is, you are not using SQL Server 2000 or SQL Server 2005. Using the Stand-Alone option installs Microsoft SQL Server 2005 Express Edition, also known as SQL Express.
Important This is an important step, which is very easy missed. Make sure this does not happen to you. Otherwise, you will need to uninstall Windows SharePoint Services 3.0 and reinstall it.
-
The remaining two tabs, Data Location and Feedback, can be used to customize your installation as described in Chapter 5. If you plan to use the server for search, you should choose a location with plenty of disk space available.
-
Click Upgrade. Setup runs and installs Windows SharePoint Services 3.0 binaries in the C:\Program Files\Common Files\Microsoft Shared\Web server extensions\12 directory-unless you changed the default location-and the following two links are added to the Administrative Tools menu:
-
SharePoint 3.0 Central Administration
-
SharePoint Products And Technologies Configuration Wizard
During this portion of the upgrade process, no databases are created or upgraded and no modifications are made to IIS.
-
-
When the installation has completed, the completion Web page is displayed, as shown in Figure 23-4. Clear the Run The SharePoint Products And Technologies Configuration Wizard Now check box, and then click Close.
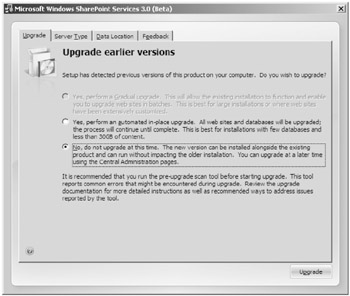
Figure 23-2: The Upgrade tab-Upgrade Earlier Versions
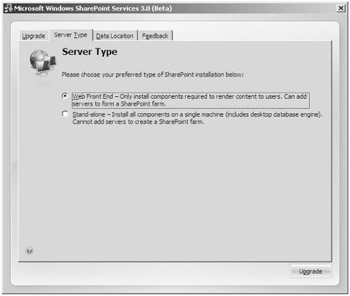
Figure 23-3: The Server Type tab showing the Web Front End and Stand-Alone options
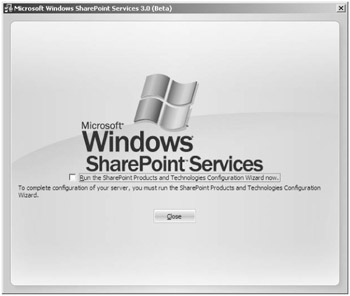
Figure 23-4: Windows SharePoint Services 3.0 binary installation complete
Task 2: Running the Prescan Tool
This should be the second time you have run this tool. The first execution of the prescan tool should be at the planning stage. The syntax of the prescan tool is as follows:
-
prescan [/c file] /All | [/v] urls
If you have your own custom site definitions (custom templates), you can use the prescan /C parameter to specify a file path to the configuration files for custom templates. By adding custom templates to the configuration file, you tell prescan to mark them as custom templates. See Chapter 25 for more information on using this option. Other switches with this tool include the following:
-
/All scans the entire farm.
-
/v specifies Virtual Server scan mode; the default is SPSite scan mode.
-
Urls specifies a list of one or more SPSite or virtual server URLs to scan.
To run the prescan tool, complete the following steps:
-
Run the pre-upgrade scan tool at this stage to be sure that you have identified and addressed any issues. To do this, open a command prompt and type the following commands:
CD C:\Program Files\Common Files\Microsoft Shared\Web server extensions\12\B IN prescan /All
-
Depending on the size of the installation, the pre-scan process can take some time. A percentage value will display showing progress. When complete, an "operation successful" message is displayed, followed by the names of two files-a log file and a summary file. The output looks similar to Figure 23-5.
-
The _Log.txt file contains a list of all Web sites scanned, files that are unghosted, and any custom templates. A portion of the file can be seen in Figure 23-6.
The _Summary.xml file contains similar information, as shown in Figure 23-7.
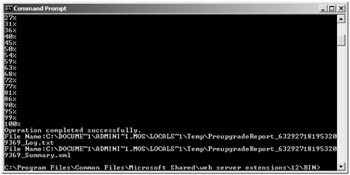
Figure 23-5: Prescan output
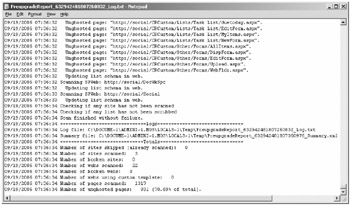
Figure 23-6: Preupgrade report _Log.txt file
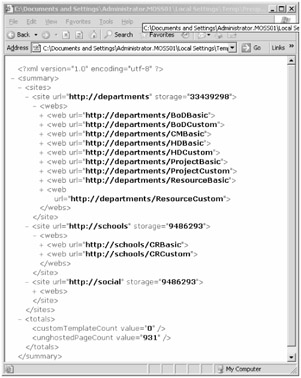
Figure 23-7: Preupgrade report _Summary.xml file
| Important | Do not add any servers to your server farm after this point in the upgrade process, otherwise you could corrupt your installation. Wait until the upgrade process is complete. |
Task 3: Running the SharePoint Products And Technologies Configuration Wizard
The SharePoint Products And Technologies Configuration Wizard creates a Windows SharePoint Services 3.0 Web application to host the SharePoint 3.0 Central Administration Web site. It creates a new configuration database to store configuration data for Windows SharePoint Services 3.0 and copies configuration data into this new database, from the Windows SharePoint Services 2.0 configuration database.
If you need language packs, install them now. In an in-place upgrade, if a particular Windows SharePoint Services 2.0 language pack is installed but its corresponding Windows SharePoint Services 3.0 language pack is not installed, at this point-that is, before the upgrade-the upgrade log records errors. However, the upgrade operation will still complete.
Run the SharePoint Products and Technologies Configuration Wizard using the following steps:
-
Click Start, point to All Programs, point to Administrative Tools, and then click SharePoint Products And Technologies Configuration Wizard.
-
In the SharePoint Products And Technologies Configuration Wizard, on the Welcome To SharePoint Products And Technologies page, click Next.
-
A message appears, notifying you that Internet Information Services (IIS), the SharePoint Administration Service, and the SharePoint Timer Service might need to be restarted or reset during configuration.
-
Click Yes to continue with the wizard.
-
A message appears, as shown in the Figure 23-8, notifying you that you should download and install new language template packs for the new version. Click OK to confirm the message and continue with the wizard.
-
-
If this is a gradual upgrade, perform the following steps:
-
The Connect To A Server Farm page is displayed, as shown in Figure 23-9. Select the No, I Want To Create A New Server Farm option.
-
On the Specify Configuration Database Settings page, perform the following actions:
-
In the Database Server text box, type the name of the server running SQL Server 2000 or SQL Server 2005.
-
In the Database Name text box, either except the default database name, SharePoint_Config, or type a database name.
-
In the Specify Database Access Account section, type the username and password that will be used to connect to the SQL server. The username should be entered in the format domain\username.
-
Click Next.
-
-
-
If you did not choose the Stand-Alone server type, you are presented with configuration screens for the SharePoint Central Administration Web application. Complete these screens as follows:
-
On the Configure SharePoint Central Administration Web Application page, if you want to use a specific port number for SharePoint Central Administration, select the Specify Port Number check box and then type the port number to use.
-
In the Configure Security Settings section, select either NTLM or Negotiate (Kerberos) as your authentication provider, depending on your environment, and then click Next.
Important To enable Kerberos authentication, you must perform additional configuration. For more information about authentication methods, see Chapter 5.
-
The Completing The SharePoint Products And Technologies Configuration Wizard page is displayed, as shown in Figure 23-10.
-
If this is a gradual upgrade, the Advanced Settings button will be active. Use this to enable Active Directory Account Creation Mode. This feature is unchanged in Windows SharePoint Services 3.0.
-
Verify the settings, and then click Next.
-
-
The SharePoint Products And Technologies Configuration Wizard will now perform 10 configurations tasks for an in-place upgrade or 11 configuration tasks for a gradual upgrade approach. A clean Windows SharePoint Services 3.0 install usually consists of 9 configuration tasks. Task 1 commences, which initializes the upgrade and checks whether the pre-upgrade scan tool has been run.
-
If this is an in-place upgrade, a message appears notifying you that if you have a server farm with multiple servers, you must run setup on each server to install the new Windows SharePoint Services 3.0 binary files before running the configuration wizard and starting the upgrade process. Depending on your server farm configuration, and where you are in the process of installing and configuring Windows SharePoint Services 3.0, you have three choices:
-
If this is the only server in your farm, no other actions are necessary. Click OK to continue with the wizard.
-
If you have other servers in your farm, and you have not yet run setup and the configuration wizard on the other servers, leave this message open on this server-the designated server-and then run setup and the configuration wizard on the other servers in the farm. When all the other servers are at this same stage, you can return to this, the designated, server and click OK to continue with the SharePoint Products And Technologies Configuration Wizard. You can also run the SharePoint Products And Technologies Configuration Wizard from the command line. See Chapter 24 for more details on how to do this.
-
If you have already run setup and the configuration wizard on all servers, the SharePoint Products And Technologies Configuration Wizard has completed on the designated server, and the Windows SharePoint Services 3.0 farm has no pending jobs, click OK to continue with the configuration wizard.
-
-
The upgrade process then continues with task 2, initiating the upgrade sequence. This task can take some time, after which the other tasks run.
-
The Configuration Successful page is displayed, as shown in Figure 23-11. Review the settings that have been configured, and then click Finish.

Figure 23-8: Installing Windows SharePoint Services Language Template Packs
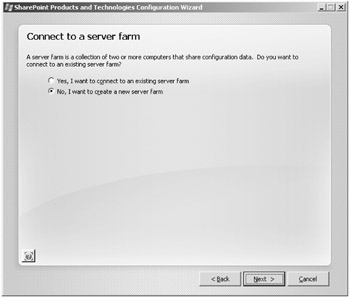
Figure 23-9: Connecting to a server farm
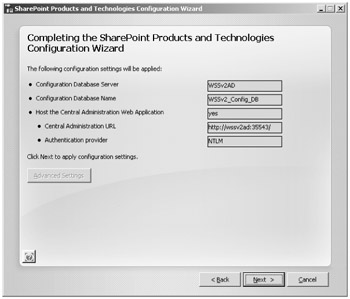
Figure 23-10: Completing the SharePoint Products And Technologies Configuration Wizard
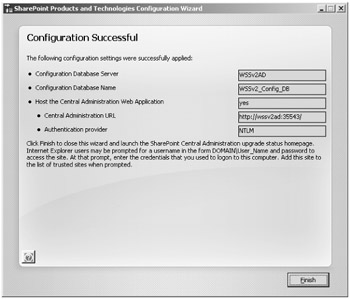
Figure 23-11: The Configuration Successful page
Task 4a: Upgrading and Migrating Windows SharePoint Services 2.0 Web Sites-In-Place Upgrade Approach
To complete an in-place upgrade process, following these steps:
-
The SharePoint Products And Technologies Configuration Wizard closes and the Upgrade Running page opens, as shown in Figure 23-12. You might be prompted to enter your username and password before the Upgrade Running page will open.
Important If the Upgrade Running page does not display or you get an error that the service is unavailable, this might be due to the excessive work that the server is undertaking, resulting in a timing issue. It does not mean that you have a failure. Do not reboot. Wait a while, and then click your browser's refresh icon. You can also check for error messages in the Upgrade.log and the trace log files, which are located at %SystemDrive%\Program Files\Common Files\Microsoft Shared\Web server extensions\12\LOGS. The trace log is named in the following format: Machine_name-YYYYMMDD-HHMM.log, where YYYYMMDD is the date and HHMM is the time.
-
The process of upgrading the Windows SharePoint Services 2.0 Web site is automatically started and consists of a number of scheduled timer jobs, which are started sequentially. These might take a while to complete. To check on the status of the upgrade process, click the browser refresh icon. You can monitor each timer job by opening the new SharePoint 3.0 Central Administration Web page. Then on the Operations tab, under Global Configuration, click Timer Job Status. The progress column shows the percentage complete for the current timer job, as shown in Figure 23-13. This is not the progress for the whole upgrade progress-only for this particular timer job.
-
The upgrade is complete when the Status changes to No Job Pending, as shown in Figure 23-14.
Note If the upgrade fails or reports issues, refer to the Upgrade.log and Trace.log files.
-
On the Upgrade Running Web page, in the left navigation pane, under Actions, click Finalize Upgrade. The Finalize Upgrade Web page is displayed, as shown in Figure 23-15. This page shows an overview of known upgrade actions that you need to complete. Do not click Complete Upgrade until you have completed these actions and updated other servers in your farm.
-
If there are any other servers in the farm, then on each server complete the SharePoint Products And Technologies Configuration Wizard as described in task 3.
-
When the configuration wizard has completed running on all servers on the farm, return to the SharePoint 3.0 Central Administration Web page. At the bottom of the home page in the Farm Topology Web Part, all servers should be listed together with the services they are running.
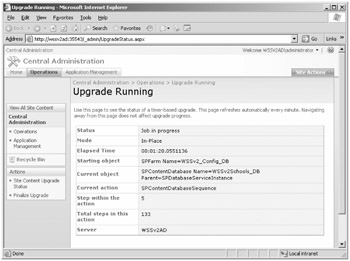
Figure 23-12: The Upgrade Running page
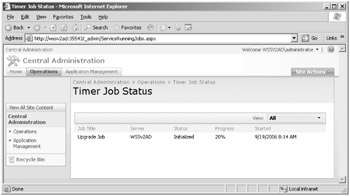
Figure 23-13: The Timer Job Status page
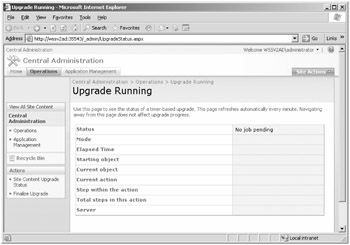
Figure 23-14: Status showing No Job Pending
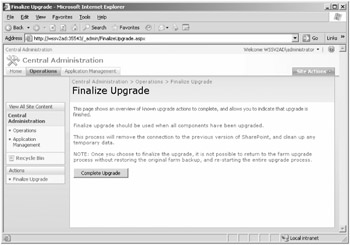
Figure 23-15: The Finalize Upgrade page
Task 4b: Upgrading and Migrating Windows SharePoint Services 2.0 Web Sites-Gradual Upgrade Approach
Unlike the in-place upgrade, the gradual upgrade does not automatically upgrade any Windows SharePoint Services 2.0 Web sites. You have to manually start this process, either using the Central Administration Web pages or using stsadm.exe. The following procedure details the Central Administration method. Details on using the command-line tool stsadm.exe to upgrade sites is covered in Chapter 24.
As a pre-upgrade task, you should have decided the names for the temporary URL domains for your Windows SharePoint Services 2.0 Web sites. For example, if the pre-upgrade URL for a Windows SharePoint Services 2.0 Web site is http://departments.contoso.msft, the new URL could be http://departmentsold.contoso.msft. Post upgrade, the new URL will be used for the Windows SharePoint Services 2.0 Web site and http://departments.contoso.msft will be used for the upgraded Windows SharePoint Services 3.0 Web site. You could use a new port number with the same host name for the new URL, such as http://departments.contoso.msft:8080, but usual practice is to create a host header. If this is your decision, at this point in the procedure create a CNAME entry on your DNS server if you haven't already done so.
If Kerberos is enabled for the Windows SharePoint Services 2.0 Web site, ensure that you have registered your service principal names (SPN) for the new URL. End-user applications ask for a Kerberos service ticket based on the URL of the Web service. Therefore, you need two SPNs-one for the Windows SharePoint Services 2.0 new URL (http://departmentsold.contoso.msft) and another for the Windows SharePoint Services 3.0 Web site (http://departments.contoso.msft). To register the SPN for the new URL, use the following command, where contoso\Windows SharePoint ServicesAppPool is the IIS application pool identity for the IIS Web site http://departmentsold.contoso.msft:
setspn -A http:// departmentsold.contoso.msft contoso\Windows SharePoint ServicesAppPool
| More Info | See Chapter 5 for more information on configuring Kerberos. |
| Important | There are difficulties using the Kerberos protocol to connect to multiple Web applications that run on different ports under different identities. Therefore, when using Kerberos, it is recommended that for the new URL you use a different host name than the original URL for the Windows SharePoint Services 2.0 Web site. For more information, see Knowledge Base articles 899900 and 908209 found at http://support.microsoft.com/default.aspx/kb/899900 and http://support.microsoft.com/kb/908209 respectively. |
Use the following steps to migrate Windows SharePoint Services 2.0 Web Sites using the gradual upgrade approach.
-
Open the SharePoint 3.0 Central Administration Web page if the SharePoint Products And Technologies Configuration Wizard did not automatically open it. Then on the Operations tab, under Upgrade And Migration, click Site Content Upgrade Status.
-
The Site Content Upgrade Status Web page is displayed, as shown in Figure 23-16. In the Next Action column, click Begin Upgrade for the Web site you want to upgrade.
-
The Set Target Web Application Web page is displayed, as shown in Figure 23-17. First, check that the Web application you want to upgrade appears in the Web Application To Upgrade section.
-
In the New URL For Original Content section, type a port number or host header name. This should match the new URL you created in step 1.
-
In the Application Pool For New Web Application section, either use an existing application pool or create a new application pool. If you do create a new application pool, it is recommended that you use the same IIS application pool identity (account) for the new URL as you used for the pre-upgraded URL. If the existing application pool used the IUSR_ComputerName or IWAM_ComputerName accounts, then to change or obtain the passwords for these accounts, refer to Microsoft Knowledge Based article 297989, found at http://support.microsoft.com/kb/297989.
-
In the Reset Internet Information Services section, select either Restart IIS Automatically or Restart IIS Manually depending on how you want to restart IIS on other farm servers.
-
In the Security Configuration section, select either Negotiate (Kerberos) or NTLM, depending on your environment.
-
In the Content Databases section, select either Automatic Database Name Selection or Manually Set Database Names. If you choose the Automatic database name option, a new database will be created using the naming convention <old_database_name>_DB_Pair.
-
Click OK. The Operations In Progress Web page is displayed while the following actions occur:
-
The new host header or port is added to the existing Web application.
-
The IIS application pool is created, if chosen.
-
A new Web application is created. It is named <original_web_application_name>_Pair, whose home directory location is: c:\Inetpub\wwwroot\wss \VirtualDirectories\GUID, with the host header or port of the original Web application. The new Web application is created using the new application pool.
Note You must redeploy Web Parts in the bin directory of c:\Inetpub\wwwroot\wss\VirtualDirectories\GUID. You may need to create the bin directory if one does not already exist.
-
A new database is created.
When the Web application and database are created, the Site Collection Upgrade Web page is displayed, as shown in Figure 23-18.
-
-
Open a new browser window, and type in the Address text box the original URL for your Windows SharePoint Service 2.0 Web site-for example, http://departments.contoso.msft. You should be automatically redirected to http://departmentsold.contoso.msft, and your original Windows SharePoint Services 2.0 Web site should be displayed. If it is not, check that your DNS entry is set correctly. Do not progress further until you are able to successfully browse to your Windows SharePoint Service 2.0 Web site. If you need to administer the Windows SharePoint Services 2.0 Web site using the Windows SharePoint Services Central Administration Web pages, you need to use the new URL-that is, http://departmentsold.contoso.msft.
-
On the Site Collection Upgrade Web page, in the left navigation pane under Actions, click Upgrade settings.
-
The Upgrade Settings Web page is displayed. Select the check box if you want to reset your Web sites during the upgrade process, and then click Save.
Note The default behavior is to keep your customizations during the upgrade process. This is the same default behavior as the in-place upgrade process. You can choose after the upgrade process to reset Web sites and pages to site definitions using the browser at a per-site level. However, with this setting, you can bulk reset all your Web sites within a content database, but only during the upgrade process.
-
On the Site Collection Upgrade Web page, select the check boxes next to the site collections you want to upgrade and then click Upgrade Sites.
-
The Sites Selected For Upgrade Web page is displayed, detailing the number of site collections, storage used originally, and the originating and target database names. Check that these details are correct by using the Web site analysis results obtained during the pre-upgrade tasks.
-
Click Continue. The Upgrade Running Web page is displayed, which is similar to the in-place upgrade process. A number of timer jobs are created. However, the mode is now Side-By-Side. Initially, the first job might be in a pending status. Once the job is in progress, it might take a while to complete.
-
The upgrade is complete when the Status has changed to No Job Pending. If the upgrade fails or reports issues, refer to the Upgrade.log and Trace.log files.
More Info Information on troubleshooting configuration wizard failures and how to resume an upgrade can be found at http://technet2.microsoft.com/Office/en-us/library/1033.mspx?mfr=true.
-
Open a new browser window, and type in the address text box the original URL for your Windows SharePoint Service 2.0 Web site-for example, http://departments.contoso.msft. You completed a similar exercise in step 10, where you were automatically redirected to http://departmentsold.contoso.msft. However, now that the upgrade is complete, you will not be redirected. Instead, you should now see the upgraded Web site. You can still browse to your original Windows SharePoint Services 2.0 Web site by using the new URL-that is, http://departmentsold.contoso.msft.
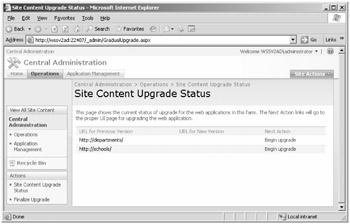
Figure 23-16: Site Content Upgrade Status page
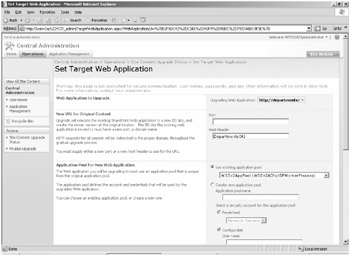
Figure 23-17: Set Target Web Application page
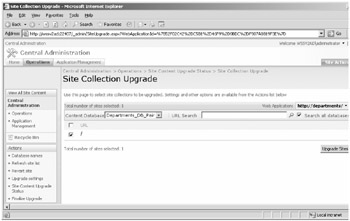
Figure 23-18: Site Collection Upgrade page
Task 4c: Performing a Content Database Migration
A content database can contain one or more site collections. Using the content database migration approach, you can gradually migrate the content databases you have created in your Windows SharePoint Services 2.0 installation. After you have installed and configured Windows SharePoint Services 3.0 on a new farm, complete the following steps:
-
Configure your new farm to match the settings of your old farm. There are no automatic method available that will take a Windows SharePoint Services 2.0 farm and create a similar Windows SharePoint Services 3.0 farm. You have to manually complete this task, which might include the following steps:
-
Create IIS Web sites for each IIS Web site in your Windows SharePoint Services 2.0 installation. For each IIS Web site, use the properties dialog box to increase the connection timeout value on the Web Site tab and, using the Configuration button on the Home Directory tab, increase the ASP script timeout on the Options tab. Although you could leave the creation of the IIS Web site to the Application Management Web page in step 4 of this procedure, by creating it now you can create the bin and resource directories for custom code and assemblies. Ensure you do this on all Web front-end servers if you have a farm implementation.
-
Copy customizations, such as custom Web Parts and site definitions, from your old farm to all Web front-end servers. It is important that these customizations be deployed prior to upgrading the content database so that they will be available during upgrade. Custom Web Parts must be deployed to the bin folder of the Web application or to the global assembly cache (GAC) of the server. Site definitions should be deployed either during the Windows SharePoint Services 3.0 setup or after setup using the command line. See Chapter 25 for more information on this.
-
Re-apply farm configurations, such as outgoing e-mail server, security and permissions, quota templates using the SharePoint 3.0 Central Administration Web pages. This is a manually intensive and error-prone task, so take extra care during this task.
-
Ensure that all necessary services are started, by using the Services On Server link on the Operations Web page, as shown in Figure 23-19.
-
-
Run prescan.exe on your Windows SharePoint Services 2.0 installation for content databases you plan to migrate.
-
Set the relevant Windows SharePoint Services 2.0 SQL content database as read-only. This will avoid the need to merge any updates post upgrade. Create a copy of the content databases on the SQL server that your Windows SharePoint Services 3.0 farm is configured to use. There are several options available, such as creating a backup of the SQL content database and then restoring it, using a different name if the SQL service is used by both the Windows SharePoint Services 2.0 and 3.0 farms, or copying the content database file and log file to the default database location on your SQL server and attaching it. The locations for a default SQL Server installation are as follows:
q
SQL Server 2000: C:\Program Files\Microsoft SQL Server\MSSQL\Data
q
SQL Server 2005: c:\Program Files\Microsoft SQL Server\MSSQL.1\MSSQL \Data
To attach the database, you can use one of the following tools:
q
SQL 2000: Enterprise Manager
q
SQL 2005: SQL Server Management Studio
Or you can use the SQL command-line tool, osql.exe. For more information, refer to SQL Server 2005 Books Online, which can be found at http://www.microsoft.com/technet/prodtechnol/sql/2005/downloads/books.mspx.
Note Users will see warning messages when the content databases are set to read-only. You must inform your users of this in your communications plan.
-
You can attach the content database that contains the root Windows SharePoint Services 2.0 Web site using either the SharePoint 3.0 Central Administration Web pages or stsadm.exe command, Use stsadm.exe to attach the content databases for large sites. The stsadm.exe command is detailed in step 9 of this procedure, and in Chapter 24. Otherwise, in the SharePoint 3.0 Central Administration, click the Application Management tab. Then in the SharePoint Web Application Management section, click Create Or Extend Web Application.
-
On the Create Or Extend Web Application Web page, click Create A New Web Application.
-
On the Create New Web Application Web page, complete the following actions:
-
In the IIS Web Site section, click the Use An Existing IIS Web Site option button and select the IIS Web site you created in step 1.
-
Alter the Security Configuration, Load Balanced URL, Application Pool, and Reset Internet Information Services sections, if appropriate. See Chapter 5 for more information on these options.
-
In the Database Name And Authentication section, in the Database Name text box, enter the name of the content database you attached in step 3.
-
In the Search Server section, select the appropriate Windows SharePoint Services search server and then click OK.
-
-
If you change the IIS Web site from Kerberos to NTLM authentication, a message is displayed. Click OK.
-
An Operation In Process Web page is displayed, after which the Application Created Web page is displayed. This states that there is no new SharePoint site collection created, which might lead you to believe that your content database was overwritten. This is not the case. Open a new browser, and type the address you created in step 1a.
Note If you did not complete step 2 before copying the Windows SharePoint Services 2.0 content database, you will get an error Web page stating that prescan.exe also was not run on this content database and the upgrade process will fail.
-
If the Web application contains more than one content database, you can use the stsadm.exe command-line tool to add the other content databases similar to the following command:
stsadm -o addcontentdb -url http://departments -databasename Departments_DB -databaseserver SQLServer
The content database for the root site must be added in step 4 and is the first to be upgraded. However, once the root content database is upgraded, there is no particular order for subsequent content databases.
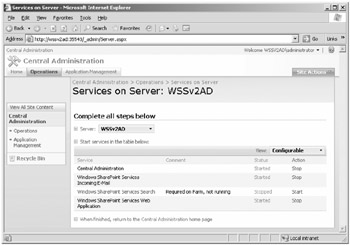
Figure 23-19: Services On Server page
| Note | If you try to use the Add A Content Database On The Manage Content Databases Web page, an error Web page is displayed stating that the database you are trying to attach requires an upgrade, which could time out the browser, and that you must use the stsadm.exe command. Using the command line allows you to batch the upgrade task and schedule it to run out of hours. |
EAN: 2147483647
Pages: 299