Sharpening Your Images
| If there's one thing about editing digital photos that frustrates people, it's how to sharpen them. There are two unwritten truths in digital photography:
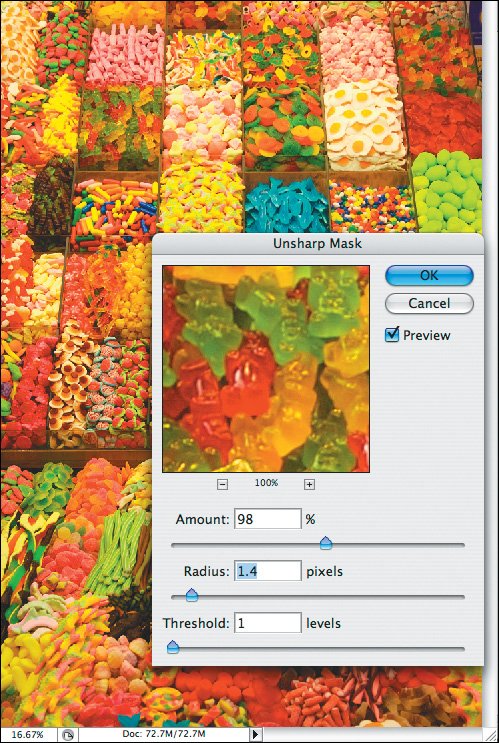
Luckily, I'm going to teach you how to get past truth number two. Unsharp Mask ExplainedThe term Unsharp Mask is often confusing. If you came from a traditional film and darkroom background, you're familiar with the process of masking during development. But for digital photographers, or those who have never spent time in a darkroom, the idea of masking can be hard to grasp. Essentially, in masking you're masking, or hiding, the "unsharp" areas. In digital photography, the job of masking is done by enhancing the contrast between edges in your photo. Photoshop does this with the Unsharp Mask filter (Filter > Sharpen > Unsharp Mask) (Figure 8.14). Other image-editing programs have similar controls, sometimes with different names, but always with the same method of sharpening. With three controls available to define how edges are found and enhanced, you have a great deal of control over the final result. Let's take a closer look at each of the Unsharp Mask controls to understand how they work. Figure 8.14. Unsharp Mask is a powerful filter that allows you to improve the appearance of your digital photos. Don't be fooled into thinking it will fix a blurry photo, though.
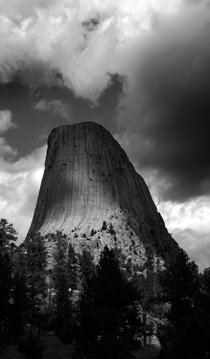
Now, by themselves these controls aren't hard to understand or master. It's the interaction among them that can lead to hair loss and increased stress. You see, changing Radius affects how strongly Amount appears, and adjusting Threshold can magnify or reduce the effect of both Amount and Radius. Luckily, the controls are presented in the general order of use. You will typically make adjustments to Amount first, to get a rough value for how much sharpening to apply to the photo. Then, by adjusting Radius, you control how prominent that sharpening is. Finally, you can fine tune the results with the Threshold control. The Sharpening Process in ActionSharpening differs based on the intended outputincluding size and media. It makes sense then that you don't want to apply sharpening to your file until all other editing tasks, including resizing, are completed. In Figure 8.16, you see an original image with no sharpening applied. Edges are soft, and detail tends to blur together slightly, giving the entire image the appearance of being a bit out of focus. Figure 8.16. Here's the original image prior to sharpening. Edges are soft with a lack of detail throughout.
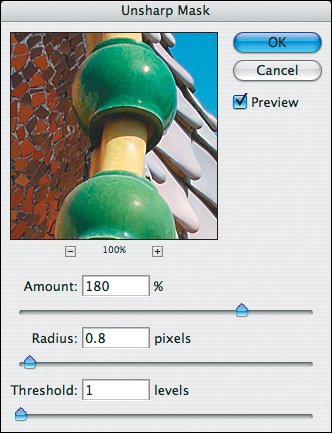
The first step in sharpening this image is to set the Radius to a rough estimate of what I think the image will need. In this case, I've selected a width of .8, which is a good compromise number. A pixel width higher than 1.0 in most images can begin to adversely increase the halo, or glow, around the images' edges. Next, I set the Amount to control how strongly the effect is applied (Figure 8.17). In this case, a setting of 180% gives me the look I want without overemphasizing the edges. Finally, I set the Threshold to 1, which prevents lower contrast areas from being affected but still finds the edges of tiles and roof lines to produce the sharpening shown in Figure 8.18. Figure 8.17. After setting the Amount control, things are looking much better.
Figure 8.18. Here I've fine-tuned the sharpening effect with the Threshold slider.
A Few Sharpening GuidelinesAlthough every image situation is unique, there are some general guidelines that will help you with using the sharpening tools. I go into these in great detail in my book Print Like a Pro (Peachpit Press, 2006), where I have an entire chapter devoted to the magic of sharpening.
|


EAN: 2147483647
Pages: 91