Section 3.5. Working with Headers and Footers
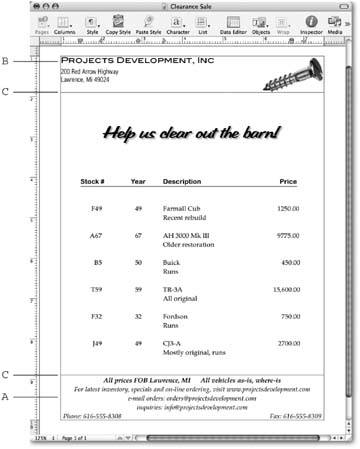
You often see headers and footers used at the top and bottom of each page to display the title of a book, a chapter number, or a page number. You can use these repeating strips to hold anything you want: a logo or other image, a date, a legal warning or copyright notice, or even an ad (Figure 3-13).
You can see an example of a footer at the bottom of this page where, like most books, footers or headers are used as a place to display page numbers , the book title, and the chapter name . Oftenas in this bookheaders and footers are different on the right- and left-side pages.
|
You can also use headers and footers in much shorter documents to store your letterhead or return address, the date or time you created the document, the name of the computer file, and so on.
Note: Surprising but true: you can't include a footnote in the footer. Footnotes appear above the footer, below the body text. See Section 2.1.4.3 for more footnote facts.
Pages lets you create different headers and footers in different parts of your document in order to, for example, use one header setup for your introduction and table of contents, and a different setup for the body of your document. You create this kind of design by dividing your document into sections using section breaks , a process described on Section 3.5.3.
3.5.1. Adding Headers and Footers
You can add headers and footers to any Pages document. Choose View  Show Layout, and Pages displays the header and footer outlines. Click inside the outline, and then enter and format text just as you would in the body of the document, using all the character and paragraph formatting tools, including styles, background colors, and so on.
Tip: You don't actually have to turn on Show Layout to enter header and footer text. Watch the cursor as you move it from the body of the document over the header region, for example. It changes from an I-beam cursor to an arrow pointer when you move over the margin between the body and the header, and then changes back to an I-beam cursor when you're over the header. Click and start typing to add text to the header.
Headers and footers aren't just for text either. You can add photos or artworka logo perhapsor use Pages' Shapes (Chapter 3), Table, or Chart (Chapter 4) tools to add those items. (Any of these objects behave the same in a header or footer as they do in the body of the page.)
Whatever you add to a header or footer shows on every page of your document. To change the layout or content of headers or footers in different parts of the document, or to have headers and footers only in part of the document, you must first break the document into sections using Section Breaks (see Section 3.5.3).
Pages makes one exception to the above rule: you can make the first page headers and footers different from the rest of the document. You'd use this to create a letterhead with your name, address, and logo on the first page but not on subsequent pages, for example; or to make sure your report's title page doesn't display any headers or footers. Open the Layout Inspector, click the Section tab and then turn on the Configuration checkbox for "First page is different."
Pages can create different right and left headers or footerssimilar to those used in this bookif you turn on the checkbox for "Left and right pages are different." Then you can format your left and right side headers independently, and Pages alternates them throughout the document.
3.5.2. Dividing Your Document with Sections
When you create lengthy, complex word processing documentsbooks, reports , dissertations, and so onyou may find it handy to break them up into chapters, one per file. For example, a book with 10 chapters would be composed of 10 separate files. Once that's done, you can format each file in different ways to reflect the kinds of information it contains, while using styles to keep the overall appearance similar. Furthermore you don't put all your eggs in one basket this wayif one of your files gets corrupted, God forbid , you don't lose your entire manuscript.
There are some equally good arguments, however, for keeping your entire manuscript in one file. For example, you can use the Find or Find & Replace commands to search your entire manuscript at once. Using the Pages sections feature, you can break up your single document into individual sections. Pages can divide a document into as many sections as you like, each with distinct formatting.
For example, you may write a business report that contains an introductory narrative; a section with lots of facts and figures, tables and footnotes, set in two columns; another section featuring customer endorsements with photographs set in three columns ; and the concluding narrative. For this type of job, divide (into sections) and conquer!
Pages' sections work in concert with layouts to divvy up various aspects of document formatting.
-
Layouts control the column setup and allow you to create wider margins. You find these settings in the Layout Inspector's Layout tab. Each time you want to switch from, for example, two columns to three columns, insert a layout break to create a new layout.
-
Sections control page formatting: numbering sequence, headers and footers, and whether or not right and left pages are formatted differently. Modify the settings in the Layout Inspector's Section tab. Sections also contain master objects , background images that appear on every page of the section (see Section 4.3.9.3). If you want to, for example, begin a new page numbering sequence for your book's appendix or change the arrangement of headers and footers, insert a section break to create a new section.
You can create as many layouts as you need within a section. And if you add a section break within a layout, the new section automatically inherits the formatting and layout setup of the previous section.
Note: When you add a section break inside a layout, Pages duplicates that layout for the new section. If you make an adjustment to the first section's layoutchange the number of columns for exampleit doesn't affect the second section's layout.
3.5.3. Inserting Section Breaks
You can insert a section break anywhere in a document. To do so, choose Insert Section Break. Pages adds the break and moves the following text to the next page. Since sections control page formatting, a section break always acts as a page break. The new section begins life as a clone of the previous section: the layout's columns, and the headers and footers are unchanged.
When you click a page thumbnail in the organizer (choose View Show Page Thumbnails to display the organizer) Pages only lets you select, move, or delete entire sections. Pages makes a distinction between physical pages those things that your printer spits outand what geeks call logical pages that which the program treats as a page. Pages sees a logical page as a section comprising one or more physical pages. A logical page consists of any group of pages between section breaks, or from the last section break to the end of the document. Although every physical page shows in the organizer, if you attempt to select one, Pages allows you to only select the entire sectionthe logical page. So if you want to move or delete the individual pages of a section, you'll have to add a section break at the bottom of each physical page to turn it into a logical page.
Note: This logical page business sounds illogicalin fact, Pages doesn't even have a term for it. Pages' Help helpfully offers, "pages are actually sections " Highly illogical, Captain!
To change the headers and footers for the new section, place the insertion point within the section and choose View Show Inspector, click the Layout Inspector button, and then click Section. Turn off the checkbox for "Use previous headers and footers (Figure 3-14). Now, as you modify the contents of the header and footer, your changes affect only this document section.
You can start a new page-numbering sequence in this section by clicking the "Start at" button and entering a beginning number for the new sequence.
You can create a differently formatted first page for this sectiona title page or a document divider page, for exampleif you turn on the checkbox for "First page is different." When you turn on this checkbox, Pages deletes the contents of the header and footer for the section's first page. If you need to, you can add anything back into the first page header and footer; it shows only on that page.
3.5.4. Auto-entry: Formatted Text Fields
Pages offers three kinds of special automatic-entry text called formatted text fields . Though you can place them anywhere in your document, headers and footers are common locations. Add them by choosing the following items from the Insert menu:
-
Date & Time . Choose this command and Pages displays a window from which you can select a date and time format (Figure 3-15). Then click Insert and it adds the date, the time, or both at the insertion point. You can make the date and time auto-updatingthe dates and times change each time you open the documentby leaving the checkbox turned on to "Automatically update the date and time when the document is opened." You'd choose this option, for
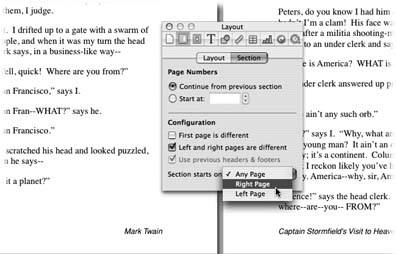
Figure 3-14. You can create different headers and footers on facing pagesa method commonly used in booksby turning on the checkbox for "Left and right pages are different" in the Layout Inspector's Section tab. Turn on "First page is different" if you don't want the same headers and footers on the first page of the documentfor example, if you've got a title page with no header or footer. If your new section follows a section containing headers and footers, Pages automatically continues those headers and footers in the new section. Turn off the checkbox for "Use previous headers & footers" if you want to modify or delete them for the new section. Use the "Section starts on" pop-up menu if you want to begin a section on the right or left page, for example, to start each section on the right page. You can choose to carry your page numbering through from the previous section, or start anew for this section by clicking the "Start at" button and entering the beginning number for the sequence.
example, to create a daily press release or a fax cover sheet so that the day and time of those documents is always current. This is a great choice for such one-shot throwaway itemsbut no good at all for record-keeping like invoices or journal entries (because the dates never stay put). Turn off that checkbox to create fixed dates and times that record the moment you insert themand stay that way.
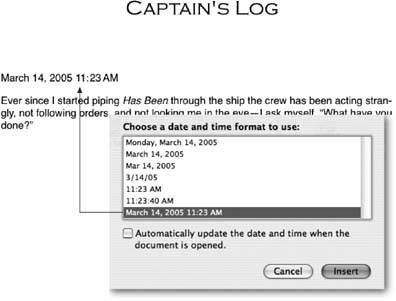
Figure 3-15. Choose Insert
Date & Time to automatically time-stamp your journal entries. Make sure you turn off the checkbox for "Automatically update the date and time when the document is opened," and Pages inserts a fixed time and date in your document. Leave that checkbox turned on for single-use documentssay, a fax cover sheet or a press release templatewhere you want the current date and time displayed every time you open the document. Pages derives the date and time formats in this list from OS Xs preferences. If you prefer using military time, or formatting the date differently, choose Apple menu System preferences . International, and then click the Formats tab to change those settings. (OS X includes Earth dates onlyStardate is not an option.)
You'll quickly discover that you can't edit a Date & Time text field; it appears in your document as a solid, unbreakable block of text that resists your efforts to click inside.
Control-click a Date & Time text field, and then choose Edit Date & Time to again summon the window allowing you to change the date and time format; choose Update Date & Time Now to change the date and time to the present momenteven if it was formatted as a fixed date and time.
-
Page Number . What is hands down the most popular form of automatic text entry, usually found in headers and footers? The page number. Choose this command and Pages inserts the number of the current page in Arabic format. After it's inserted, Control-click the number and choose from Arabic, upper or lowercase Roman, or upper or lowercase alphabetical for your page-numbering sequence. (If you choose to use the alphabet and have more than 26 pages, Pages starts doubling up the letters for the second run through the alphabet, for example, aa, bb, cc, and so on.)
You can't tell just by looking at the screen, but behind the scenes Pages has created an automatically-updating page-number calculator not just an ordinary typed number. So if you add a few pages to the beginning of your document, the page-number text field changes to reflect each page's new position.
You can start your page-numbering sequence at a number other than one if, for example, this document is the third installment of a larger work. Open the Layout Inspector, click the Section tab, click the "Start at" button, and then enter a starting number in the box. You can also create more than one series of page numbers in the same document in order to, for example, number your 10-page preface using Roman numerals (i, ii, iii, iv ). To create more than one page-numbering sequence, you must first divide the document into sections (see Section 3.5.3).
-
Page Count . Pages enters the total number of pages in the document when you use this command. Combine this with Page Number when you want your header to say, for example, Section 1.1.1 of 72 .
Note: When you insert a page number or page count into your document, it appears onscreen just like any number you might have typed into the document. Even if you choose to show invisibles (View
Show Invisibles), Pages gives you no indication that these numbers are actually formatted text fields. If you highlight the number and type another number to replace it, youve deleted a formatted text field and replaced it with a regular number character. The only way to tell for sure if a number's a formatted text field is to Control-click the number. If it's a page number or page count text field, the top of the pop-up menu lists the number display options. If it's a regular number character, the pop-up menu begins with Cut, Copy, and Paste. 3.5.4.1. Adding page numbers to a header or footer
As far as Pages is concerned , you can insert a page number anywhere in your document. If you find it useful, you can insert a sentence in your training manual that says, "You've now read 20 pages. Stand up and take a break before continuing."
However, most of the time you want the page number to appear in the header or footer, as it does in almost any book or magazine (Figure 3-16). Follow these steps to add a page number to either spot:
-
Choose View
Show Layout and click to place the insertion point in the header or footer . If you're adding a page number to a new, empty header or footer, Pages uses left alignment. If you prefer, choose center or right alignment by choosing Format
Text and selecting the appropriate command (or use the buttons in the Text tab of the Text Inspector). If you want your page number to read "Section 1.3.1.1" (instead of just "12"), type Page and a space.
-
Choose Insert
Page Number . Pages adds the number to your header or footer (it reads "1" if you're working in a header on the first page of your document). If you don't want to use Arabic style (1, 2, 3), Control-click the newly inserted page number and select one of the other numbering schemes from the pop-up menu: a, b, c; i, ii, iii; and so on.
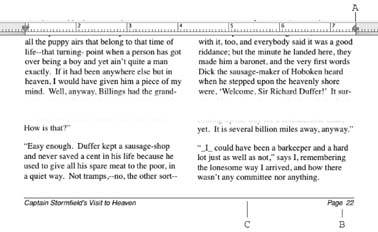
Figure 3-16. People typically format a footer for a book or term paper by including the title on one side of the page and the page number on the other side. You can accomplish this with tabs. Click to place your insertion point in a new footer, leaving it set to left alignment. Choose View . Show Rulers and click the ruler to place a tab at the right margin (A). Double-click the tab icon twice to change it into a right-aligned tab. Now type your title into the footer, press Tab and type "Page," press the space bar, and then choose Insert . Page Number. Pages inserts the number (B) and keeps the page number perfectly aligned with the right margineven if you write hundreds of pages. If you want, you can add a rule line (C) with the Shape tool, to separate the footer from the body of the page (see Section 4.2.4).
In preparing the preface for your book, for example, you may want to use the "i, ii, iii, iv " numbering style; you might use the "a, b, c, d " style for an inserted addendum; and so on. (Remember: you can use different page-numbering sequences or styles within the same document only if you've divided the document into sections. See Section 3.5.3.)
-
If you want your header or footer to display the total page count as well, type another space, of , space, and then choose Insert
Page Count . Pages adds the page count text field to the header to make it read, for example, Page 1 of 53 . Control-click this number to choose another numbering style.
-
Format the text and numbers .
Highlight the contents of the header or footer and format the text as you normally would, using styles or any paragraph and character formatting tools to change the font, size, color, margins, background color , and so on.
EAN: 2147483647
Pages: 134