Section 3.4. Creating Columns
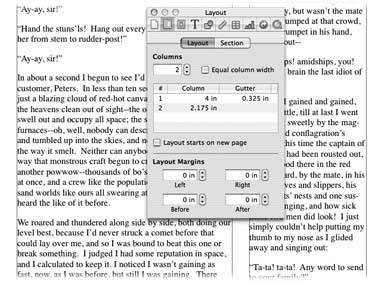
3.4. Creating ColumnsPage-design experts who study readability cringe at a page crammed from top to bottom with typewriter-style text. Even if you've done your readers a favor by inserting white space between paragraphs, that full-width column is simply too wide for efficient reading. The problem isn't reading a long line of textthe problem arises when your eyeballs have to sweep back across the page and find the beginning of the next line. The solution lies in adjusting font size and column width. If you break up the text into narrower columns those poor eyeballs don't have to zig and zag quite so far back and forth. In other words, the wider the page, and the smaller the type, the more you need columns to reduce line length. (For exhibit A, check out any newspaper.) Pages makes creating columns in your document effortless. Click the Columns button in the toolbar and choose two, three, or four columns from the pop-up menu. Pages instantly divides your document's text into evenly spaced columns. 3.4.1. Using LayoutsBut what if you don't want your entire document laid out with columns? Or perhaps you'd like more than four columns, or want your columns to be of varying widths. Pages handles such column maneuvers by subdividing your document into layouts . Layouts are invisible divisions in the document, each of which can be set up with a different column design. You create layouts by inserting a layout break at the point you'd like to change the column setup, whether it's changing the number of columns, their width, or their margins. If you don't insert any layout breaks , your whole document is one layoutin other words, the arrangement of columns is the same throughout. You can insert as many layout breaks as you needeven several to a page, spaced as closely as one line apart. 3.4.1.1. Layout breaks Create a layout break by placing the insertion point in your text at the spot you'd like to change a column setup. Choose Insert Note: Working with columns and layouts is much easier if you can see the invisible layout breaks and margin guidelines (that is, the outlines of columns and margins). Choose View  Show Layout (or press -Shift-L) to turn on their display. Show Layout (or press -Shift-L) to turn on their display. 3.4.1.2. Adjusting the number of columns Open the Layout Inspector if you need more precise control of your columns or if you need more than four of them. Choose View Enter a number in the Columns box or use its up and down arrow button to set the number of columns. Pages creates that many equal-width columns on your page. You can create a maximum of 10 columns in Pages, but the actual maximum depends on your document's page size and orientation. For example, Pages can create a maximum of seven columns on a standard letter-size sheetthough the maximum you'd actually want to use if someone's going to read those columns is more like four.
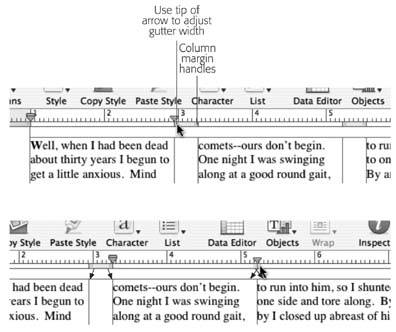
Turn on the checkbox for "Layout starts on new page," and Pages incorporates a page break into your layout break, starting the layout on the next page if it's not already at the very top of a page. You can add one or more layout breaks to a page in order to, for example, use two columns at the top of the page, three columns in the middle, and one column at the bottom. 3.4.1.3. Adjusting column width The easiest way to adjust the width of columns and gutters (the margins between columns) is directly on the page, with the ruler. Make sure layout guidelines are showing (View The Layout Inspector lets you numerically set column and gutter widths. You might find this useful if you have to match a column width to some existing artwork, for example. Turn off the checkbox for "Equal column width." Double-click the measurement for the column you want to change and type a new measurement. Press the Tab key or click one of the other column or gutter measurements, and Pages adjusts the column in your document. When you change the width of a column this way, Pages keeps the overall page width the sameit adjusts the other columns to compensate for your change (the gutter measurements are unaffected).
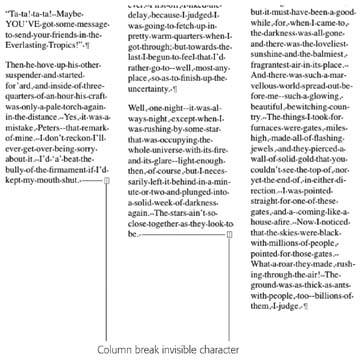
You can adjust the margins around a layout in order to set off the layout from the rest of the document. Open the Layout Inspector and click the Layout tab. Enter measurements in the Left or Right Layout Margins boxes to add that amount to the documents margins for this layout. Enter measurements in the Before or After boxes to insert space before or after this layout at the layout break, to separate it from the preceding or following layout. 3.4.1.4. Column breaks Pages provides a second tool that works hand-in-hand with layouts to help you manage multiple column design. You can use a column break to end one column's text and force the text to continue at the top of the next column (Figure 3-12). To create a column break, place the insertion point where you want the column to end, and then choose Insert
You'll find column breaks useful to provide white space at the bottom of a page or layout. You can also use column breaks to prevent "almost" orphans and "almost" widowstwo lines of a paragraph at the bottom or top of a column. In a single-column layouta normal page, that isa column break functions like a page break, sending the insertion point and any following text to the top of the next page. You can remove a column break by choosing View |
EAN: 2147483647
Pages: 134
- ERP Systems Impact on Organizations
- Enterprise Application Integration: New Solutions for a Solved Problem or a Challenging Research Field?
- Distributed Data Warehouse for Geo-spatial Services
- Healthcare Information: From Administrative to Practice Databases
- A Hybrid Clustering Technique to Improve Patient Data Quality