| In addition to creating your Storyboard Sequence, you can achieve a number of other tasks while still in the Storyboard interface. You'll accomplish most of these tasks using the advanced features of the Clip Viewer, but you can also add various filters to each clip, creating some basic visual effects without leaving the Storyboard. You accomplish this using the FX library. Adding filters and other FX In truth, adding a filter to a Storyboard clip has limited value and this operation is probably best left until the clip is on the Timeline. However, if you want to use a simple effect, such as zooming in on a picture or adding a Lens Flare effect, then it is possible to do this from within the Storyboard.  Tip Tip
To add a clip FX filter to a Storyboard clip 1. | With the Storyboard interface open, click the Library tab and select the Editors Rack in the Realtime Clip FX folder in the right window of the Project Browser (Figure 5.24).
Figure 5.24. The Effects Library. The effects editors have been sorted by name. 
This displays all the video filters available to you.
| 2. | To display the filters as in Figure 5.24, click once on the Name tab.
| 3. | Select a simple filter (in Figure 5.24 the 2D Editor CPU has been selected), and double-click it.
This opens the Effect Editor interface.
| 4. | Click the All tab to display your clips if they are not already displayed (Figure 5.25).
Figure 5.25. The 2D Editor window opens and the Project Browser automatically moves to the bottom of the screen. 
| 5. | Click once on any one of your clips inside the Project Browser.
A white star appears in the clip's top-right corner, and the clip itself is displayed inside the editor.
| 6. | You can now alter the effect in any way you choose. In Figure 5.26 the clip has been flipped horizontally to give the illusion of a right-hand drive car.
Figure 5.26. Here, the Mirror tab has been opened (the small triangle next to the word Mirror was clicked), and the Flip Horizontal box has been checked. 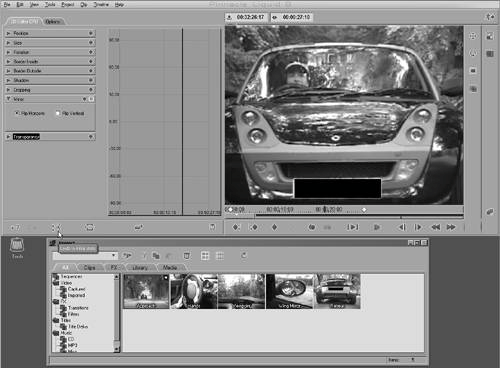
| 7. | When you have finished editing, click the Running Man button  in the top- right corner of the editor. in the top- right corner of the editor.
|
Tip
To remove an effect from a clip 1. | Right-click any clip with a white or blue star in the top right corner and select FX Properties from the pop-up menu (Figure 5.27).
Figure 5.27. Right-clicking a clip displays this pop-up menu. At the very bottom is the FX Properties selection. 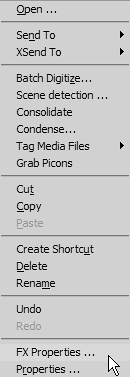
The Clip FX Prop window appears (Figure 5.28).
Figure 5.28. The Clip FX Prop window. Here you can deselect an effect by clicking the X or by highlighting the effect and clicking the Bin button. 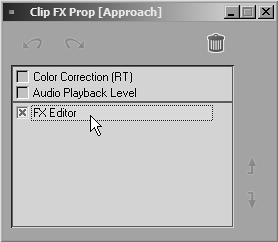
| 2. | Do one of the following:
|
Tip
Advanced features of the Clip Viewer The Clip Viewer has an extended dialog arrow that gives you access to the Base Color Corrector, the Audio Playback tool, and the Scene Detection tool. Their use within the Storyboard is limited; however, the main features are listed below. The Base Color Corrector can be used to quickly correct basic color problems, to add a color cast to a clip (for example, blue for a night effect), or to turn a clip to black and white quickly by turning the saturation down to 255. The Audio Playback tool can be used to quickly adjust clips with too much noise, such as those of a running car. The Scene Detection tool is probably the most useful of the three. In Storyboard mode, you can use it to divide up long clips quickly and easily.
All of these features are discussed in greater depth throughout this book. Refer to the index for their location. |