| After playback, you may find that some clips have too much footage either at the beginning or the end of the clip. To fix this, you need to use the Clip Viewer to trim off the unwanted material (Figure 5.19). Figure 5.19. The Clip Viewer is used extensively in the Storyboard area to trim unwanted footage from individual clips. The Clip Viewer shown here has been customized with additional tool buttons. 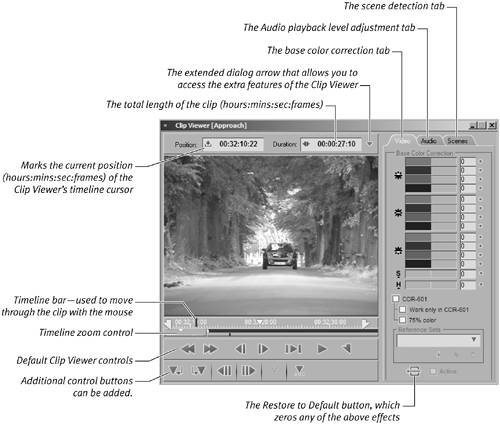
The Clip Viewer is a powerful part of the Storyboard interface with a number of interesting features including color correction, scene detection, and audio level adjustment. It is a good idea to explore the potential of this tool even though it might not look that exciting. To open a clip in the Clip Viewer Do one of the following: - Double-click a clip in the Project Browser to open it up inside the Clip Viewer.
- Right-click and select Open.
If this sends the clip to the Source Viewer, then you are probably using a dual-screen display. For advice on this, see the sidebar "Sending a Clip to the Clip Viewer When in Dual-Screen Mode," later in this chapter. To set mark-in and mark-out points in the Clip Viewer 1. | Once the clip is loaded into the Clip Viewer, use the mouse or the arrow keys to look for the best place for your clip to startyour new in point.
This is called scrubbing and is discussed in the sidebar "Scrubbing Explained," on the next page.
| 2. | Once you have found the ideal start to your clipthe in pointpress the I key on the keyboard or click the Mark-In Point button  . .
You will see that a small Mark-In Point icon has now been added to the Timeline of the Clip Viewer (Figure 5.20).
Figure 5.20. The left side of the Clip Viewer shows the Mark-In point that has been added to the clip. 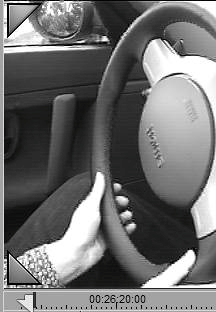
| 3. | To select a point where you would like your clip to finishthe out pointscrub through the clip again until you find the optimal point, and then press the O key or click the Mark-Out Point button  . .
A small Mark-Out Point icon has now been added to the Timeline of the Clip Viewer (Figure 5.21).
Figure 5.21. The right side of the Clip Viewer shows the Mark-Out point that has been added to the clip. 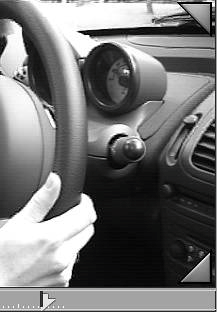
| 4. | Use the Zoom tool to reduce the view if you can't see both the mark-in and the mark-out points on the Timeline display (Figure 5.22).
Figure 5.22. The Zoom tool in the bottom left of the illustration can be used to scale the Timeline. When the cursor is placed over the Zoom tool, a magnifying glass appears next to it. 
| 5. | Right click the Clip Viewer toolbar and select Player>Play In to Out to play back the clip from the new points you have just defined.
| 6. | You can set a different mark-in or mark-out point simply by moving the cursor to a new point and pressing the I or the O key again.
|
 Tip Tip
Scrubbing Explained Scrubbing is a term used when the Timeline cursor is moved manually through each frame, rather than being played back. Scrubbing can be performed using either the mouse or the keyboard. To move the Timeline cursor quickly to the point you want, use the mouse by: 1. | Placing the white arrow onto the Timeline of the Clip Viewer
| 2. | Holding down the left mouse key
| 3. | Moving the mouse to the left or right
|
If your mouse is equipped with a wheel, this too can be used to step forward or backward one frame at a time. If you want to move the Timeline cursor with a little more accuracy, then use the keyboard arrows. This allows you to step through each frame one at a time. Holding down the arrow key will move the clip forward or backward at speed. The J, K, and L keys can also be used with the Clip Viewer. K stops playback, L plays the clip forward a little faster each time it is pressed, and J plays the clip backward a little faster each time it is pressed. |
Tips Hitting Home or End will take you to the first or last frame of your clip. However, if this is a Subclip, then hitting the Home or End key will take you to the mark-in and mark-out points of the master clip, not the Subclip. The extended dialog arrow is always grayed out if you open a Storyboard element in the Clip Viewer. To use the advanced features of the Clip Viewer, you must double-click a clip inside the Project Browser. This is because a Storyboard element is a copy of the original clip, and as a result, you can only alter its mark-in and mark-out points.
Sending a Clip to the Clip Viewer When in Dual-Screen Mode When you are in dual-screen mode, a clip is sent to the Source Viewer instead of the Clip Viewer. To overcome this, right-click inside the right window of the Project Browser and select Project Properties from the list. This brings up the Project Properties screen. The center section of this screen gives you the option of what Liquid Edition should do when you double-click a clip. Change this from the default to Load Clip into Clip Viewer. You can change this back again at any time. |
Mark-In and Mark-Out Points Mark-in and mark-out points are the basic currency of any nonlinear editing program, and it is important to understand the concept. Remember: adding either a mark-in or mark-out point does not physically alter the original clip. It merely tells the program to ignore any material that falls outside of these two points. For a further explication of nonlinear editing, see Chapter 1. |
Trimming a Storyboard element You can also directly trim a clip (or Storyboard element) without opening the Clip Viewer. While this has limited potential for editing, it does create a very quick way of previewing a clip. To open a media clip without using the Clip Viewer 1. | Make sure the Project Browser is displaying the clips in Picon View and then select the Picon you want to view by clicking it once.
| 2. | Hold down the Alt key and double-click the element.
The Picon plays inside its own little thumbnail (Figure 5.23) and a small Timeline appears underneath it.
Figure 5.23. A Storyboard element playing inside its own picon. 
|
To trim a clip inside its own Picon 1. | Press the spacebar once to stop playback.
It's now possible to move the clip backward and forward, either frame by frame using the left and right arrow keys, or quickly using the mouse.
| 2. | Pressing the I key on the keyboard will set a mark-in point inside the Picon. Pressing O on the keyboard will set the mark-out point.
|
|