| There are four color correction filters that are suitable for different kinds of jobs. Two of them are Realtime filters (denoted by the RT stamp after their name), and the other two need to be rendered before you can see their results. No one filter does everything you want it to, so to get the best possible color correction for your project, you need to use each different filter at some stage. Base Color Correction CPU: A Realtime filter you can use to quickly correct problem areas, such as brightness and contrast and also for adding basic color casting. Auto Color Correct CPU: Use this to automatically correct certain instances of poor lighting or bad white balance. Color Editor (Classic): This is essentially the same as the Base Color Corrector but it isn't a Realtime filter, although it does have additional functions. ColorCorrection Editor: Use this to make major alterations to color. It comes with a set of powerful tools and you can also use it for special effects; however, it is not a Realtime effect and will need to be rendered.
Each of these filters has an invaluable and unique place in Liquid Edition. You need to experiment with them all if you want to get the best from them.  Tips Tips
All the color correctors follow the same rules as all other filters, and you can apply them to a Timeline clip, a Timeline Track, or a clip in the Project Browser. They are also stackable. None of the color correctors have keyframes turned on by default, and the Auto Color Corrector doesn't support them at all. Generally speaking, you should carry out color correction uniformly over the entire clip, unless, of course, you're trying to achieve a special effect using a momentary color shift.
Color Calibration To successfully use any of the color correctors, you need to be sure that what you are looking at on your PC monitor is an accurate depiction of true colors. With video editing, the easiest way to do this is to compare your monitor's output to the signal from a good quality TV so that you can see how close the match is. If there is a discrepancy between the two, you need to find a way to calibrate your monitor, but don't forget to allow your monitor to warm up first. If you have no TV output, then you're going to need to perform a lot of trial and error before you find the right calibration settings because things can look different on an RGB or LCD monitorparticularly on inexpensive models. Tools for calibrating monitors are widely available via the Internet, and most graphics cards include some kind of rudimentary setup instructions in the driver (Figure 11.1). Figure 11.1. An example of the NVIDIA color calibration tool found in the Windows Display Properties. 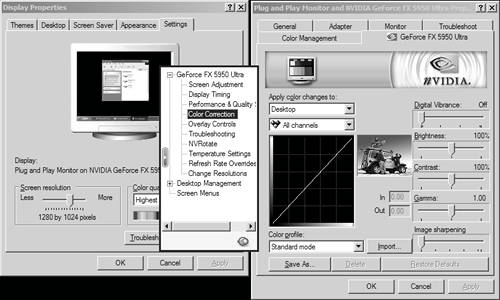
|
|