Process
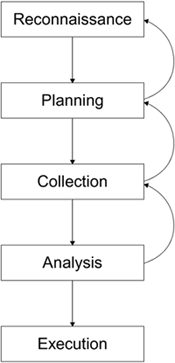
| The process an attacker follows is very similar to the process that the military uses when planning an operation. In essence, you have to first find out where you want to go (reconnaissance). Then, you have to figure out how to get there and what you will do when you arrive (planning and collection). Finally, you need to review your collection and then execute the operation. While it might be a bit of a stretch to say that an attacker plans and executes with military-like precision, even the most undisciplined attackers follow (unknowingly) some aspects of this process, as shown in Figure 16.1. Figure 16.1. High-Level Attacker Process
The process is cyclic because, at any point, additional information may be required that forces a return to an earlier phase to obtain the information. ReconnaissanceOne of the most important aspects of any attack is reconnaissance; the target must be identified. In the wireless LAN case, there are two ways that an attacker can identify a target, and the motive of an attacker plays an important part here. If the attacker is just looking for network access, then he will seek until he finds an easy victim. By contrast, in a targeted attack, the attacker focuses on finding access associated with his target, which is slightly more difficult for the attacker and significantly more difficult for the defender to defend against. If the attacker is only looking for network access, his reconnaissance could be limited to looking at any of the many publicly available databases or maps of access points. These maps and databases can be found on many Internet sites, such as www.nodedb.com, and an attacker need only find one near his current location. The process, however, is slightly more difficult for the attacker if he has to find a specific target. Finding a wireless LAN target requires war driving, which is a process named after the term war dialing.[1]. War driving, or wilding, seeks to find access points accessible outside the bounds of their deployment in the street, for example.
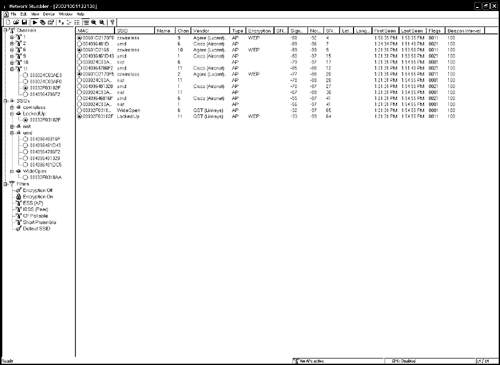
The tools required for war driving are simple and widely available: a notebook computer, a Wi-Fi PC card, a special software program, and, optionally, a directional antenna and GPS receiver. Simple war driving can be done with a completely standard setup because both Microsoft Windows XP and Apple's MacOS X have a means to identify Wi-Fi equipment built in. They lack, however, the ability to trace; that is, to record the time and location of identified access points. The next two sections discuss two of the most popular war driving software programs available at the time of this writing. NetStumblerOne of the most popular software programs for war driving is the NetStumbler program (www.stumbler.net). This program, which only works under Microsoft Windows, provides an intuitive user interface along with the ability to connect with several types of GPS receivers. The result, when combined with a laptop and GPS, is an easily installed and operated tool for war driving. One of the main reasons for the popularity of NetStumbler, besides the fact that it runs on the most popular operating system family, is that it is easy to install and operate. Just download, plug in a supported Wireless LAN card, and double-click! NetStumbler displays most of the information needed in one screen, broken down into two panes (see Figure 16.2). The left pane provides shortcuts for displaying the networks in just about any fashion. By default, the main pane on the right displays all the networks. However, you can easily choose to view only those networks on a specific channel, specific SSIDs or those with encryption, and so on. In fact, the interface is so intuitive and easy to use, we won't waste any more time explaining it. Figure 16.2. NetStumbler Main Screen
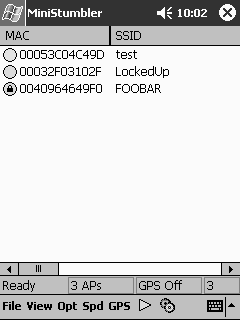
The maker of NetStumbler, Marius Milner, even has a tool worthy of James Bond: MiniStumbler, which runs on a Pocket PC (see Figure 16.3). Now, attackers can walk around the interiors of office buildings, without attracting attention, with a PDA hidden in their inner suit pocket. With this program, any wireless LANs located in publicly accessible buildings are at risk of detection, and potential compromise, if they lack basic security protection. Figure 16.3. PocketStumbler
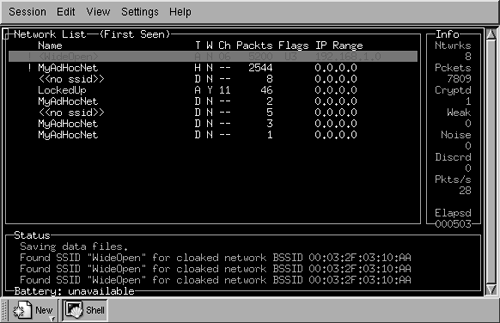
While NetStumbler is easy to operate, it lacks the sophistication of the next tool that we're going to describe: Kismet. From an attacker's point of view, one of the major problems with NetStumbler is that it operates in an active mode that is, it transmits probe requests as part of the process of finding access points. Using probe requests creates an additional problem for the attacker because the attacker won't be able to identify any of the closed or cloaked networks; these networks will not respond to a probe request without the correct network name (SSID). KismetAnother popular tool for war driving is Kismet (www.kismetwireless.net). Kismet is a completely passive tool (does not transmit probe requests) that runs under the Linux and OpenBSD operating systems. Kismet includes all of the functionality of NetStumbler as well as basic traffic analysis functionality. An attacker running Kismet easily determines the network configuration for those networks running without basic WEP protection, and it displays character strings it sees in the traffic. This is good for finding passwords and so on. Kismet does this by examining and displaying the traffic on the targeted network such as IP headers and ARP requests. This process provides essential information to the attacker so that they may use (or should we say abuse) the targeted network. Kismet saves the information it collects in a series of files that can be viewed later. These files contain lists of all of the information about a network, raw packet dumps, and captured WEP traffic so that it can be fed into one of the open source WEP crackers available (more on that later in this chapter). The main window of Kismet is shown in Figure 16.4. On the right side, there is a short informational panel displaying the number of networks found (Ntwrks), the number of packets (Pckets) seen, the number of encrypted packets (Cryptd), the number of encrypted packets with a weak IV (Weak), packets interpreted as noise (Noise), the number of packets discarded due to bad CRC (ICV) values (Discrd), the packet rate (Pkts/s), and the total elapsed time in seconds (Elapsd). The lower panel lists status messages as they occur. The largest and main panel of Kismet provides a network list of all of the networks found since Kismet was started as well as information about each of the networks. The exact information shown for the networks is configurable. Figure 16.4 shows the default configuration. Figure 16.4. Kismet Main Window
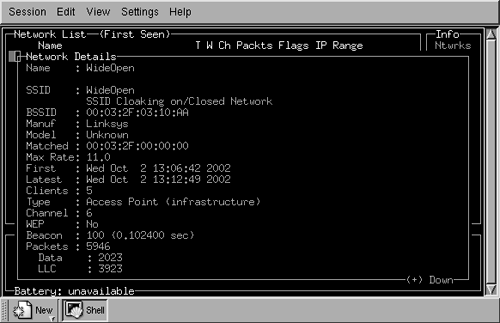
The first column lists the name, or SSID, of the network found. An exclamation point (!) before the name indicates activity was seen in the last three seconds, while a period (.) indicates activity was seen in the last six seconds. The next column, headed by "T", indicates the type of network identified. An "A" indicates an access point in infrastructure mode, a "D" indicates a data-only host or station, and an "H" indicates an ad-hoc network master. The third column, headed by "W", indicates whether WEP is used by the network. "Y" indicates yes, and "N" indicates no. One of the interesting things about Kismet is what the developer calls "fuzzy encryption detection." Some access points don't properly indicate when WEP is used by setting the appropriate bit in the IEEE 802.11 header of the packet. As a result, relying solely on that bit results in misidentifying some networks as not using WEP when they really do. Kismet looks at the first few bytes of the LLC header to see whether they are the same. If they are, WEP is not used. If they aren't, encryption is being used. The fourth column, "Ch", shows the channel that the network is using. This is followed by the number of packets seen, Packts. The sixth column, Flags, provides information about the network. Specifically, it indicates how the IP Range in the next column was determined. An "A" indicates that the IP block was found by an ARP packet, and a "U" indicates that the block was found with a UDP packet. Both indicators ("A" and "U") can be followed by a positive integer value that indicates the number of octets that match within the address block. Finally, a "D" indicates that the block was found with a DHCP packet, and a "C" indicates that Kismet identified Cisco discovery packets on the network, and thus Cisco equipment. In addition to the main window, Kismet provides several other popup displays that provide additional information about a specific network. When Kismet starts up, it is in Auto fit mode. In this mode, the network names change position automatically based on the last network seen. In this mode, you're unable to scroll among the networks and select one to learn more information. So, the first thing you want to do is select the Sort window by pressing "s". You are presented with a number of different ways to sort the network information in the main pane. When you make a choice, the window redisplays. You are now able to scroll among the displayed networks with the up and down arrows. In Figure 16.4, the first network, WideOpen, is selected. By pressing the "i" key, a popup window appears with all of the information Kismet knows about the selected network. An example is shown in Figure 16.5. Figure 16.5. Kismet Network Information Display
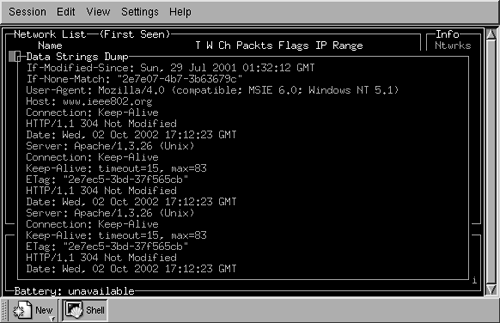
As you can see in Figure 16.5, Kismet provides a great deal more information about the selected network than NetStumbler. Kismet can even provide a real-time dump of the ASCII strings that it sees on the selected network. To get that information, click the "d" key in the main window (see Figure 16.6). The strings from the intercepted traffic are displayed, indicating in the example in the figure, the download of a Web page from www.ieee802.org, which we initiated as part of a test. This window continues to show the intercepted strings until you exit by clicking the "x" key. Figure 16.6. Kismet Strings Dump
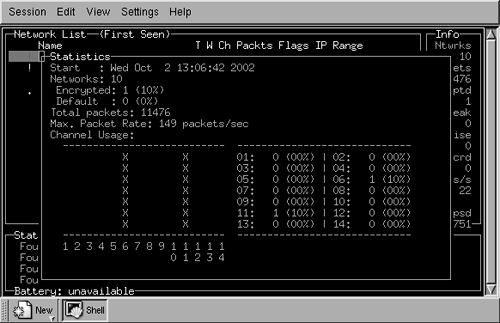
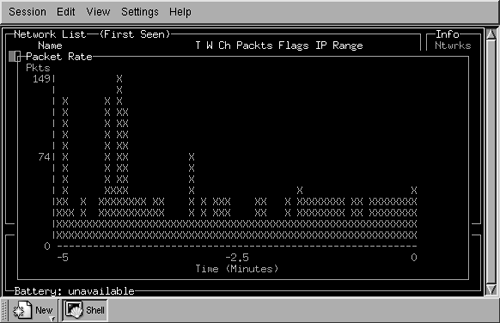
Note that one potential issue with the use of Kismet, and specifically this function, is that it may violate state and/or federal law by intercepting communications. We certainly do not advocate such use and, if you are tempted to try the tool, we highly recommend that you discuss this issue with your own legal counsel before proceeding. Kismet provides two other informational popup windows. The first provides statistics about channel and encryption usage (Figure 16.7). Open it by clicking "a" from the main window. Open the second window (Figure 16.8) by clicking "r" to show the packet reception rate. Figure 16.7. Kismet Channel Usage
Figure 16.8. Kismet Packet Reception Rate
We've covered only part of Kismet's capability. We haven't covered the files that Kismet generates as archival information, or the integration of Kismet with a global positioning system (GPS). Learning and using these capabilities are straightforward; but as with any powerful tool, Kismet takes a little bit of time to get the most out of it. Once you've learned the basics, however, Kismet becomes a potent tool. |
EAN: 2147483647
Pages: 151
