Example Scenarios
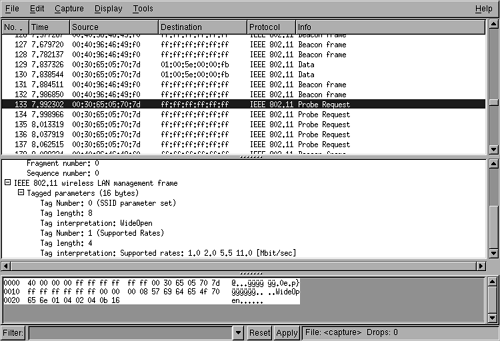
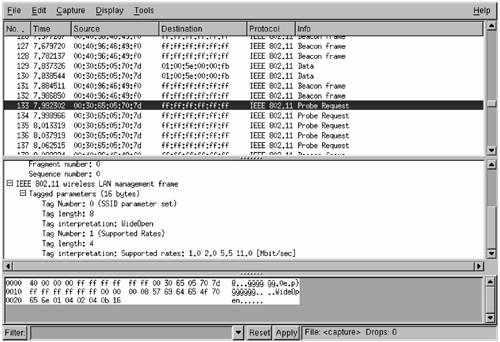
| The remainder of this chapter describes two example scenarios. The first is a network that does not provide any security; we'll call it WideOpen. The second, which uses the original basic Wi-Fi protections, we'll call LockedUp. Both the WideOpen and the LockedUp network are shown in Figure 16.4 so you can see the initial identification of the network. We will now pretend to be an attacker with the goal, in each case, of becoming a fully functional peer on the network. PlanningThis section explains the steps we need to follow to meet our goal of becoming a fully functional peer on each of the example, or target, networks. WideOpenThe WideOpen network is running without WEP, and as such Kismet was able to determine the IP network address range (refer back to Figure 16.4). Kismet also creates a file of all of the captured packets (usually named Kismet-<date>.dump, where <date> is the date when the packets were captured), which you can review with a tool such as Ethereal (www.ethereal.com), as shown in Figure 16.9. Using Ethereal, you can determine the MAC address of valid clients as well as determine whether the wireless network is using shared-key authentication. In Figure 16.9, a packet trace is shown of the WideOpen network using Ethereal. A probe request from a client is shown prior to the client joining the network. Figure 16.9. Ethereal Capture and Display Screen
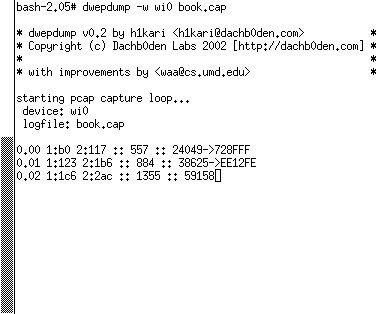
At this point, we probably don't need any collection beyond that already done by Kismet. Therefore, we're ready to execute and become a peer on the network once we've successfully identified a valid client and determined whether shared-key authentication is being used. We don't expect that shared-key authentication is being used because, although shared key is specified by IEEE 802.11, shared key is not allowed in Wi-Fi certified equipment. LockedUpThings are much different with the LockedUp network (see Figure 16.10). In this case, we can't see any of the network parameters we see in Kismet. Therefore, we must first crack the WEP key with one of the many WEP-cracking utilities that are available on the Internet. One of the more effective programs, bsd-airtools by David Hulton (www.dachb0den.com/projects/bsd-airtools.html), comes with a set of utilities for scanning and cracking WEP networks. This example covers two of those tools, dwepdump and dwepcrack. Dwepdump collects WEP-encrypted packets and stores them in a file for later use by dwepcrack, which attempts to recover the corresponding WEP key. Both tools are explained in more detail later in this chapter. Figure 16.10. Ethereal Display of the WEP-Protected LockedUp Network
So our plan now is to move on to collection, when we'll use dwepdump to collect enough traffic to successfully break the WEP key. CollectionThe process of using dwepdump to collect enough packets to recover a WEP key is simple; the most difficult part is determining what key size (40 bits or 104 bits) the network is using. As a rule of thumb, you're probably best starting with 40 bits unless you suspect the target network is particularly concerned about security. A sample invocation and screenshot of dwepdump collecting traffic for 40-bit WEP is shown in Figure 16.11. The screen shows six columns. The first three indicate the number (in hexadecimal) of weak IVs found for the first three key bytes. The first column is the one described by Scott Fluhrer et al. (2002) and the second and third columns are those described by the developer of bsd-airtools, who extended the FMS beyond the first key byte. The fourth column displays the total number of packets with a weak IV, the fifth column lists the total number of packets seen, and the last column displays the actual weak IV found of the first class only. We made this modification to help show what weak IVs look like; you won't see this column in the tool you download. You'll also note that the IV is printed backward. Figure 16.11. Dwepdump Screen Capture
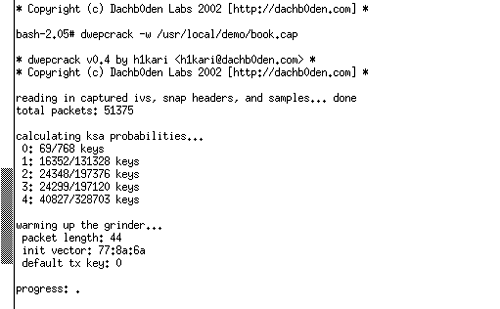
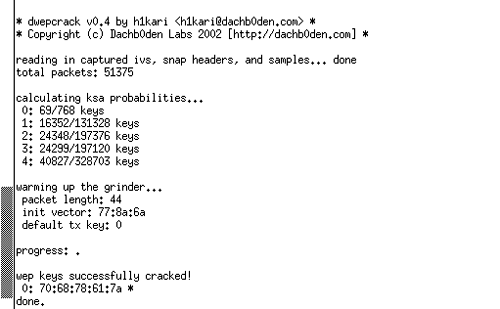
Dwepdump must run until you collect at least 60 (0x3c in hexadecimal) weak IVs for the first byte (first column displaying 0x3c). You may also require more than 60 weak IVs for the first key byte in practice because this attack is probabilistic in other words, each weak IV for the first byte provides a hint as to the first key byte with a 5% probability. In our experience, having around 80 weak IVs guarantees success, while 60 works most (but not all) of the time. The length of time required to recover these packets depends on the load and number of clients visible to the collection client. It also depends on the type of equipment being used by the target. If all of the equipment being used by the target filters out weak IVs (as most of the major vendors' latest firmware does), dwepdump may never collect enough of the important first class of IVs. If, however, the equipment is not filtering weak IVs, the length of time will vary from 20 minutes to several days, depending on the network load. AnalysisAt this point in the process, we've collected enough data to begin analyzing it. In some scenarios, however, more data may be required. In such scenarios, we could just go back to collection or planning when we need to revise our plan. Recovery of WEP KeyOnce enough packets have been collected, recovering the WEP key is straightforward using dwepcrack. An example of starting dwepcrack is shown in Figure 16.12. In this case, however, the key is not correctly identified. When this happens, you have two choices. You can go back and try and collect more packets to add to those you've already collected, or you can use a fudge factor to identify the key. Dwepcrack works by calculating the probability for all 256 potential byte values for each position within the key. Thus, a 40-bit key would have an array of probabilities of [5 x 256]. The fudge factor tells the cracking program how far down the list of probabilities to try for each position. Thus, a fudge value of 2 would try the top two likely key values in each position until it found the correct match or finished trying each value. A brute-force of the entire key space would, therefore, be a fudge value of 256. It's not worth using a fudge value of 256 because it probably won't finish. Instead, you could use a value under six when you have more than 60 of the first class of weak IVs. Figure 16.12. Dwepcrack Failing to Find the Correct Key
Figure 16.13 shows a run of dwepcrack using a fudge factor under six on the same set of data analyzed in Figure 16.12. In this case, however, the WEP key is found quickly after all of the data is read into memory from the file system. You'll find that the reading of the data into memory is usually the most time-consuming process and that, once that data is in memory, the amount of time spent analyzing the data is less than a minute. Figure 16.13. Dwepcrack Finding the Correct WEP Key
Dwepcrack is an incredibly powerful tool, and it doesn't take a significant effort to learn how to use all of its power. Current versions of dwepcrack run on both FreeBSD and OpenBSD. Passive Identification of Network ParametersAt this point, you've recovered the WEP key. But you know nothing of the network configuration. You basically have two choices. The first is to write a custom program (none currently exists for downloading) that decrypts the data you've already collected and formats it for display in Ethereal. The second is to use the WEP key and collect more traffic with your wireless LAN card set to decrypt the traffic and display it in Ethereal. Alternatively, you can set the encryption key in the Kismet configuration file and Kismet will identify the network parameters for you. In either case, you must examine the raw packet traces to determine the IP space and other network parameters used by the target network. While this process may sound daunting, it in fact is rather trivial to accomplish. Once you've completed this step, you have all of the information you need to become a peer on the LockedUp network. ExecutionAt this point, you have obtained all of the information needed to become a fully functional peer on both the LockedUp and WideOpen networks. You cracked the WEP key for the LockedUp network, and WideOpen does not use encryption. Next, you simply pick the time to join the network and set the parameters on your computer just as you do for any other network. The only possible curve ball is if MAC address filtering is being used. In this case, you'll immediately realize that you can't use the network, so you need to go back to the data you collected and identify a MAC address that was using the network. Now, just listen first to make sure that the address isn't still being used, and if it isn't, use the driver interface to set the MAC address to the address you've identified as valid. This works only with certain types of Wi-Fi cards on certain operating systems, for example, FreeBSD, OpenBSD, and Linux. |
EAN: 2147483647
Pages: 151