Selecting and Editing Text
3 4
When you want to add, edit, format, copy, cut, or paste all or part of a shape's text, you first need to know how to select it, which Table 4-1 shows. You can move the insertion point by clicking anywhere in the text block or by using the arrow keys on the keyboard.
Table 4-1. Techniques for Selecting Text
| Action | Tool | Technique |
|---|---|---|
Select a text block | | Click the Text Block tool, and then click a shape. |
Open a shape's text block and select all the text in it | | Do one of the following:
|
Display the insertion point | | Open the text block as described in the preceding row of this table, and then click once. |
Display the insertion point | | Click a shape or text. |
Select part of the text in a text block | | Click a shape, and then drag to select the text you want. Or click at the start of the text you want, hold Shift, and then click at the end. |
Select a word | | Click a shape, and then double-click a word. |
Select a paragraph | | Click a shape, and then triple-click a paragraph. |


You select text when you're about to do something to it, such as copy, cut, or format it. Unless you want to work with individual words, you can simply select the shape, and then take an action. For example, to format a shape's text, you can select the shape, and then click a format. You don't necessarily have to use the Text tool to select the text you want to format.
For details, see "Formatting Text."
Note
When you begin to type, Visio automatically zooms in on the drawing so that you can see what you are typing. To return to the original magnification, press the Esc key or click anywhere outside the shape or text block after you type the text.
Typing Special Characters
If you use the Insert, Symbol command in Microsoft Word or other Office programs, you might wonder how to add symbol and special characters in Visio. You can insert ANSI characters into text. The ANSI character set consists of 256 characters established by the American National Standards Institute. How ANSI characters look on-screen depends on which font you are using.
To type ANSI characters
- Make sure your keyboard's NumLock is enabled.
- Hold down the Alt key. Using the keys on the numeric keypad, type 0, and then type the numeric ANSI code for the character you want.
For example, to type an em dash (—), press Alt+0151.
Cutting, Copying, and Pasting Text
You cut, copy, or paste text within Visio diagrams and between other programs. The commands you use will look familiar if you use other Microsoft Office programs, as Table 4-2 shows. What's new in Visio 2002 is the ability to copy text and its format so that you can paste it into another application. Visio pastes text in rich text format, so formats are preserved.
Table 4-2. Techniques for Cutting, Copying, and Pasting Selected Text
| Action | Tool on Standard Toolbar | Keyboard Shortcut |
|---|---|---|
Cut | | Ctrl+X |
Copy | | Ctrl+C |
Paste | | Ctrl+V |


The text you copy or cut in Visio is temporarily stored in the Windows Clipboard. It remains in the Clipboard until you cut or copy something else, which allows you to copy a shape or text once, and then paste it in multiple locations. (This is standard Windows behavior; it's not unique to Visio by any means.)
Tip
Instead of copying and pasting, you can duplicate shapes wholesale—text and all—with one command. Select a shape, and then press Ctrl+D (or choose Edit, Duplicate). Visio creates a copy and pastes it on the drawing page.
Copying Text from Other Programs
You can also copy text from another program and paste it into Visio. For best results, create a text-only shape, and then paste the text. For example, in Microsoft Word, select the text you want, and then press Ctrl+C to copy it. In Visio, click the Text tool, drag to create a text-only shape in the location you want, and then press Ctrl+V to paste the Word text. Visio pastes the text and its formats.
If you don't create a text-only shape before pasting text from another application, Visio pastes it as an embedded object. When you double-click the text, Visio opens the original application in which the text was created so that you can edit it.
Deleting Text from a Shape
When you delete text from a Visio shape, you remove only the text, not the text block. You can't delete a text block, although a text block that doesn't contain any text isn't visible. If you delete all the text in a text-only shape, however, Visio also deletes the shape.
To delete text from a shape, follow these steps:
- Click the Text tool on the Standard toolbar, and then click a shape.
Visio places the insertion point in the shape's text block.
- Select the text you want, and then press the Delete key.
- Press Esc or click outside the shape to close the text block.
To delete a text-only shape, select the shape with the Pointer tool, and then press the Delete key.
Adding Text to Lines and Connectors
You can add text to any line or connector (that is, any 1-D shape). Where the text ends up depends on the shape. If you draw a line, select it, and then type, Visio places your text on the center of the line, as Figure 4-6 shows. You can see the line through the text, which may or may not be the look you want. To make the text more readable, you can add an opaque background behind the text, as Figure 4-7 shows, and you can adjust the size and position of the shape's text block.
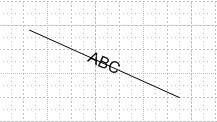
Figure 4-6. You can add text to any line you draw. By default, Visio centers the text atop the line.
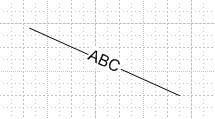
Figure 4-7. With the Format, Text command, you can choose a solid color to appear just behind the text to make it more readable.
Note
Because the background color fills in the area around the text, the color only appears when a shape contains text.
To put a solid background behind the text on a line, follow these steps:
- Select a line, and then choose Format, Text.
- Click the Text Block tab.
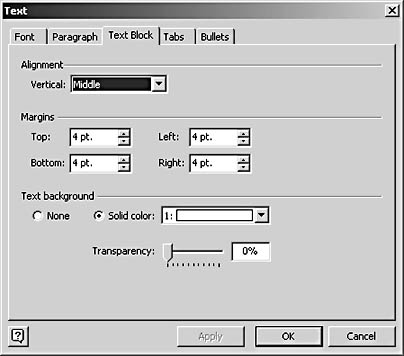
- In the Text Background area, select Solid Color. To display a color other than white behind the text, choose a color from the list box.
- Click OK.
Visio fills only the area behind the shape's text with the solid color you selected. If you type more text, the area of solid color is adjusted to fit.
Tip
You can apply this procedure to any shape with text, not just lines.
Repositioning Text on Lines and Connectors
If you're using one of the many line or connector shapes from a Visio stencil, as Figure 4-8 shows, you typically don't have to think about the text format. The Visio shape designer has done that for you, and you can just type and go. However, when you know the secrets to formatting text on lines, you can more easily customize the built-in connector shapes when you need to. For example, you can use the Text Block tool to move the location of the text on the line. To do this, click the Text Block tool, select the shape to display its text block, and then drag the text block to a new position.
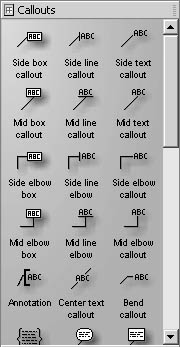
Figure 4-8. These shapes from the Callouts stencil are really just lines with specially formatted text (and a few SmartShape formulas thrown in for good behavior). Use callout shapes to annotate your drawings.
Editing Locked Lines and Connectors
Many of the Visio callout and line shapes are locked to prevent the text from rotating as the line is dragged. Locking ensures that the text stays right side up when viewed on the page. You can tell that a shape is locked when you select it with the Text Block tool—padlock handles will appear.
To rotate text on a locked shape, follow these steps:
- Select the shape, and then choose Format, Protection.
- The Protection dialog box appears. If the shape is locked to prevent rotation, the Rotation check box is selected.
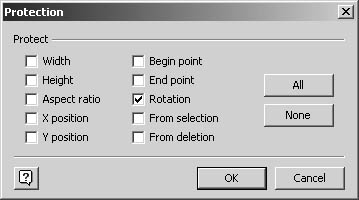
- Clear the Rotation check box, and then click OK.
On the drawing page, the padlock handles no longer appear on the selected shape.
- Click the Text Block tool, click the shape, and then drag a round corner handle to rotate the text block.
Adding and Editing Text in Groups
Because groups are composed of several shapes, each of which can have a text block, adding text can be a little more involved than with other shapes (see Figure 4-9).
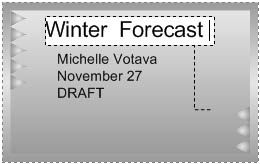
Figure 4-9. The Note Box Triangles shape on the Borders And Titles stencil is a group that contains two text blocks: one for the title and one for other information.
In theory, here's how you can add and edit text in any group:
- Click the Text tool, click a group, and then start typing to add text to the group's text block.
When you start typing, Visio zooms to 100% view so you can see the text more easily.
- If the group contains a shape with additional text that you want to edit, click the shape to subselect it, and then type.
- To close the text box, press Esc, or click outside the group.
Tip
To place an insertion point in one of a group's shapes, subselect the shape, and then click the Text tool.
You can also use the Text Block tool to subselect shapes in a group and move or resize their text blocks.
Complications can arise when you're working with a Visio-designed group that has special behavior. Some groups include text that you cannot edit; others are locked against text entry altogether. The intention of the shape designers is to make the group behave properly, given its diagram context. Even so, if you want to add text to a locked or protected shape, you usually can—but the shape may not work the same afterwards.
For details about groups and behavior options, see "Working with Groups."
Adding Text on a Layer
In many offices that routinely create drawings such as blueprints or other plans, files are passed around for review, and reviewers add text comments directly to the drawing on a separate layer. Sometimes this process is called "redlining" a drawing, because review comments traditionally appear in red for certain drawings. Anyone can take advantage of this useful method of marking up a diagram or drawing in Visio without affecting the diagram itself, as Figure 4-10 shows. When you add text to a layer, you can format that layer differently to make the text easier to see or hide it temporarily to view only the diagram. You can also print just the objects—including text—on a particular layer.
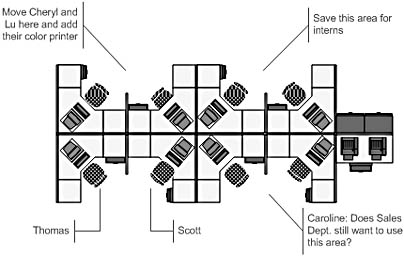
Figure 4-10. In this office layout, comments (which are shapes from the Callouts stencil) appear on a separate review layer so that text can be hidden or printed separately.
After you create a new layer specifically for your comments, you designate it as the active layer. If you haven't used layers in Visio before, this may sound a little abstract, but all it means is that any objects you add to the drawing, including callout shapes or other text, will automatically be assigned to the layer. You can assign a color to the active layer, so that your comments are easier to see. A layer color doesn't change a shape's original color, but as long as the layer color is enabled, the shape is displayed using that color.
To create a separate layer for text, follow these steps:
- In the drawing you want to add comments to, choose View, Layer Properties. The Layer Properties dialog box appears.
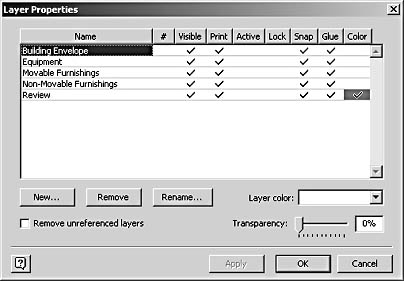
- Click New. In the New Layer dialog box, type a name for the layer.
For example, type Review or Comments.
- Click OK to close the New Layer dialog box.
In the Layer Properties dialog box, Visio adds the new layer to the bottom of the list of layers and selects it.
- Click in the Active column for your new layer.
A check mark appears next to the layer to show that it is the active layer for the drawing.
- If you want your comments to appear in a particular color, click the drop-down arrow in the Layer Color box, and select a color.
The color you choose will be used to display all shapes and text assigned to your comments layer.
- Click OK, and then type comments or add shapes in your drawing.
Shapes and text that you add are assigned to the comments layer and displayed in the layer color you selected.
After you've created a comments layer and added text to it, you can selectively hide, show, and print your comments or change their color as follows:
- If you want to hide the comments layer and view only the drawing, as Figure 4-11 shows, choose View, Layer Properties, and then clear the check mark in the Visible column for your comments layer. Click OK.
- If you want to print only the comments, choose View, Layer Properties, and then clear the check mark in the Print column for every layer except your comments layer. Click OK, and then print the drawing.
- If you want to view the comments in a different color, choose View, Layer Properties, select your comments layer, and then choose a different color in the Layer Color list. If you no longer want to use a layer color, clear the check mark in the Color column for your comments layer, and then click OK.
- If you no longer want shapes and text to be assigned to your comments layer automatically, you must deactivate the layer. To do this, choose View, Layer Properties, and then clear the check mark in the Active column for your comments layer. Click OK.
Layers are also a powerful tool for organizing shapes in a drawing.
For details about using layers, see "Controlling Shapes with Layers."
Tip
If more than one person is reviewing a drawing, create a redlining layer for each reviewer and give each layer a different display color.
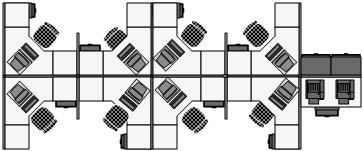
Figure 4-11. By setting the comments layer to not visible, you can see your drawing alone, without the text.
EAN: 2147483647
Pages: 211