Managing Users and Groups
|
| < Day Day Up > |
|
The purpose of a server is to provide services, files, or data to one or more people. In the information technology field, people who use a computer or system are referred to simply as users. This term is derived from the term end users, meaning the people on the end of the technology line, the ones ultimately using the product or service. For example, a Web server provides Web pages (data) to any user who can connect to that Web server via the Internet or a local network. The people accessing that data are the Web server’s users.
Many offices, even small ones, use a server to store information. That way, all the authorized employees have access to the same data, since that data is located on a centralized server rather than on any individual employee’s personal machine. In many if not most cases, you want some people on your network to have access to certain data and not to have access to other data. For example, you would probably want human resources personnel to have access to a person’s personal records, but you might not want accounting or sales to have access to the same data. It is therefore necessary to restrict a person’s access to only those items that are pertinent to the performance of his job. It is also probable that you would not want general users to have access to system administration tools. They might accidentally or even intentionally change important system settings. This could be annoying, or it could shut down your system.
With the Linux operating system, each time a user logs on, the settings in his user account determine what files and directories he has access to and what ones he does not. The place to start managing users and groups is with user accounts. Using the KDE interface, you would go to System Settings and select Users and Groups. You should then see a screen that looks very much like the one in Figure 6.1.
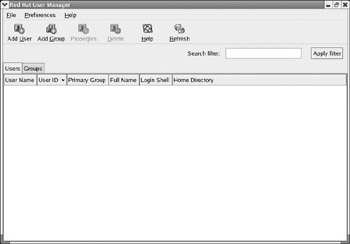
Figure 6.1: Red Hat User Manager.
The options on the toolbar should be fairly self explanatory. If you prefer to use drop-down menus rather than toolbars, you can access these same items by choosing File from the drop-down menu. Under that you will see Add User, Add Group, and the other options shown on the toolbar.
Let’s add a user just to get the feel of how it’s done. You begin by clicking the Add User button on the toolbar, or selecting File and then choosing Add User from the drop-down menu. Regardless of which method you use, you should then see something very much like what is shown in Figure 6.2.
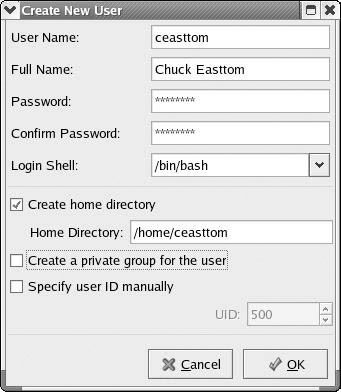
Figure 6.2: Create New User.
The first two fields are obvious. In the first field, you simply enter a username. What you select for a username is a matter of personal preference, but many organizations use the person’s first initial and last name. For example, the username for the author would be ceasttom. You then enter that person’s full name in the second field. Next you need to enter a password. You will be required to type this password twice to ensure that the password was correctly entered.
If you want your system to be secure, there are a few guidelines regarding passwords you must follow. To begin with, there are programs freely available on the Internet that are used to guess passwords. For this reason your password should never be any common word or any word associated with you. It is foolish to use the names of your children, spouse, your anniversary, or other such items as passwords. Another good rule to follow is to mix letters and numbers. For example, if your password were banana, you should consider using something like banana189 instead. Finally, the longer your password is, the harder it will be to crack. Many system administrators make all users pick passwords between 5 and 20 characters long.
The next step is to check whether or not you want a home directory for this user. In most cases, the answer will be yes. This is the default directory that user will have access to when he logs on. It is where he will store files and data. All home directories are subdirectories of the directory home. It is a common practice to name the user’s home directory the same as the username. In fact, this user utility will by default create a home directory name that is the same as the username. So, for example, the default home directory for the author would be /home/ceasttom. If you do not want to use the default name, then you will have to manually change it. You do that by typing in the alternative directory you want to use. You then have two check boxes that need to be unchecked. One is labeled “Create a private group for the user,” and the other is labeled “Specify user ID manually.” The first setting would create a private group for your user and place him in it (more about groups in just a bit). The other would require you, the administrator, to create a unique user ID number for that user. That number is how the Linux system recognizes the person. Usernames are for people to read and understand. If you choose to do this manually, you will need to keep track of all user IDs and ensure that you never try to use the same one twice. It is far simpler to let Linux handle that.
There is one more item on the Create New User screen that we purposely left to last. That is the Login Shell setting. Most users will want to use the bash shell, which you may recall is the most commonly used Linux shell and is selected by default. However, you can select from a list of shells, and any one of them can be the default shell for a particular user. When you are finished adding a user, the screen should look something like what you see in Figure 6.3a. All you need to do now is press the OK button, and you will have created a new user account.
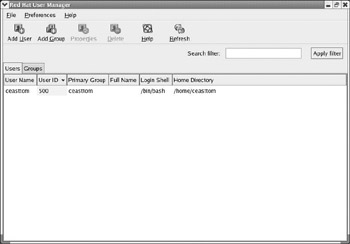
Figure 6.3A: A new user account.
If you restart the machine and log on with this username and password, you will notice a few changes. The first is that your starting directory would be that user’s home directory rather than the root directory. The only reason why root is your current starting directory is because you have logged on as root. The second change would be that you would find that when you attempted to use many administration functions, you would be asked to supply a superuser password. Superuser is a term in Linux that denotes someone logged on to a regular user account who is using administrative privileges. To do this, you must have the root password. In short, superuser mode is being logged in as a normal user but using the root password to have temporary access to root privileges.
You have now established a user account, but what does this user have access to? The answer is, not much. At this point he will have access to his home directory and not much else. In Linux, users are put into groups, and those groups are assigned access to certain resources. The access rights a user has depends entirely on what groups that user belongs to. When you double-click on a user account (or if you single-click on it and select Properties from either the toolbar or the drop-down menu), you are presented with a User Properties screen. This screen has four tabs. The first is the account information you provided. This includes username, password, home directory, and login shell. The other three tabs are where we will determine important parameters about this account, including what groups that user belongs to.
The second tab, Account Info, is shown in Figure 6.3b. This tab allows you to set an expiration date for the account or even to lock out the account. If you have a temporary employee, you definitely want to set an expiration date for that employee’s account. Should you terminate an employee, you must immediately lock out his account.
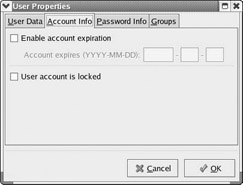
Figure 6.3B: The second tab of the User Properties page.
The third tab contains information about a user’s password. One important security precaution you can take is to require that users change their passwords periodically. In Figure 6.3c you can see the screen where you would set the expiration date of the account if you wanted to. The user in question will get a warning that his password is about to expire every time he logs in for five days preceding the expiration date. These are very useful features you probably will want to turn on. Having the password expire after a given period of time forces users to change their passwords from time to time. This definitely heightens security in your system. If you are going to force the user to change his password, you should remind the user that his password’s expiration date is drawing near. This gives him time to think of a new password. Many organizations have policies regarding acceptable passwords. These policies often include a minimum password length. A good basic password policy, if you don’t already have one, is to require passwords to be at least five characters long and include both numbers and letters.
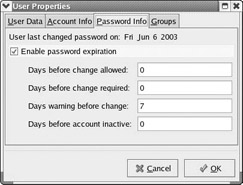
Figure 6.3C: Password settings.
The fourth tab of the User Properties screen is where we establish the groups a user belongs to. Select this tab and you will see the Group Properties screen, which is shown in Figure 6.3d. You can see a long list of groups; some may make sense to you, and others will make more sense as you move forward in this book. There are several groups listed, and some may seem quite obscure to you. One that will probably make sense to you is the adm group. This group is for administrators. If you add a user to this group, that user will have some administration privileges. Contrary to what you might think, though, this group does not have the unlimited administration privileges of the root user. To practice, you may want to add the user you just created to the adm group. You can see that one of the easiest ways to grant a user access to certain items is to add him to the appropriate group. For example, if you want him to have access to the Web server, you add him to the apache group.
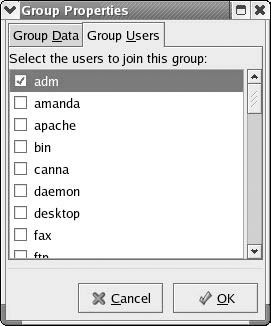
Figure 6.3D: Adding a user to groups.
| Note | Apache is the name of the Web server that ships with Red Hat Linux. Using Apache is covered in a later chapter. You may be interested in knowing that Apache runs as a daemon. A daemon is a program that runs in the background and is not visible to the user. In Windows, such programs are referred to as services. |
In some cases you will want to create your own new groups. This is just as easy as creating new user accounts. To add a new group, click on the Add Group button on the toolbar or select File from the drop-down menu and select Add Group. You will then be prompted to assign the group a name, as shown in Figure 6.4. It usually is a good idea to use logical names for your groups, names that indicate the type of group it is.
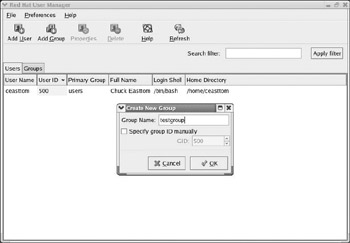
Figure 6.4: Adding a group.
You will need to click on the Groups tab to see the new group you have added, as well as any groups that were previously added. Once you do that, you can click once on your group to highlight it and then press the Properties button in the toolbar. You can also select File from the drop-down menu and choose Properties. Whatever method you use to get there, you will finally arrive at a screen much like the one in Figure 6.5. You should then click on the Group Users tab so that you can see what users are assigned to the group.
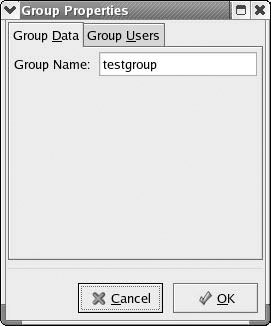
Figure 6.5: Group Properties.
You will notice that, in addition to the user you added, there are a number of users already on the list. Some of these users are actually applications. Many applications run as daemons. We previously said that a daemon is much like a service in Windows. Whether it is referred to as a daemon or a service, it is essentially just a program that runs in the background and has certain tasks it must fulfill. Usually, daemons handle system functions, things that the average PC user has no need to interact with. For this reason, daemons usually do not have a graphical user interface. For now, you need not be concerned with these other user accounts that are already loaded into the system. Simply find the username you added and put a check by it, as you see in Figure 6.6, and click the OK button.
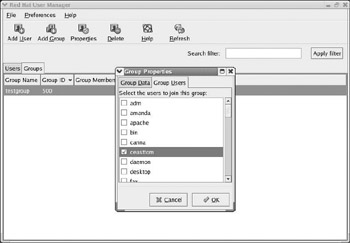
Figure 6.6: Adding users to a group.
|
| < Day Day Up > |
|
EAN: 2147483647
Pages: 247