Hardware Information
|
| < Day Day Up > |
|
You can find all the detailed information you might need by looking in the Preferences category, under the Information subcategory. You can see the various hardware options shown in Figure 4.9.
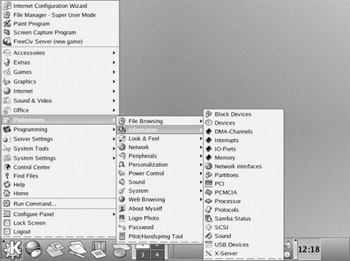
Figure 4.9: Hardware Information.
We will not delve deeply into these various settings because they depend on a thorough knowledge of PC hardware, and that is beyond the scope of this book. A good rule of thumb to remember on any computers settings is if you don’t know much about it, leave it alone. You are more likely to cause problems than you are to improve your system.
You may wonder why this is even mentioned, since it is given such cursory treatment. The answer is twofold. To begin with, should you ever be speaking to a technical support person over the phone, he will probably ask about your hardware settings. You should at least know how to find them. Second, some readers will choose to expand their PC knowledge and learn more about PC hardware. The PC hardware is the same whether you run Windows or Linux. However, most PC hardware books have a strong bias toward Windows and will probably tell you where to find these settings in Windows but not in Linux.
Configuring Network Settings
Configuring your network settings is something you will probably have to do. Whether your PC is connected to a local area network (LAN) or simply connected to a cable modem or DSL (digital subscriber line) modem, you will need to configure your network settings. There are two ways to configure your network card settings. Both are found under the System Tools group, shown in Figure 4.10.
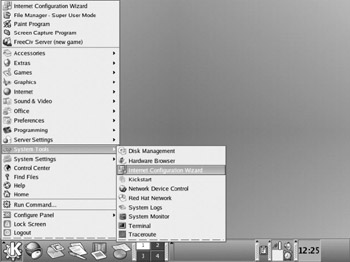
Figure 4.10: Network settings.
The first method is to go to Network Device Control and manually set all the parameters there. The second is to use the Internet Configuration Wizard. In this section, we will examine both methods.
Let us begin with the Internet Connection Wizard. We begin with this option because it is the easiest to follow, and because you certainly will want to get on the Internet as soon as possible. As with any wizard you have used in Windows, this wizard is simply a series of screens that walk you through the required steps to accomplish a goal. It is assumed that you have minimal knowledge of the task at hand, so the wizard helps you. The first screen of this wizard is shown in Figure 4.11. The entire purpose of any wizard is to walk you through some process in an easy-to-follow, step-by-step manner.
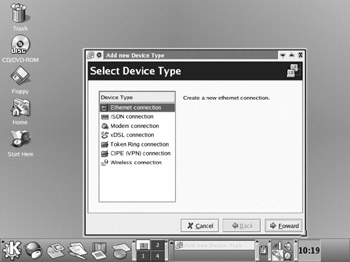
Figure 4.11: The Internet Configuration Wizard, screen one.
The first step in this wizard is to select what type of Internet connection you have. The list contains several items, and some are more likely to be found on the typical machine than others. We will walk through the most commonly used Internet connections step by step so that you will be able to set up your Internet connection regardless of the network connection type. There are three types we will not look at. The first two are the Token Ring connection and the VPN (virtual private network) connection. It is highly unlikely that you have either of these in your home, and if it is a work environment, you will need your network administrator to assist in setting up either of them. Token Ring, in particular, is an older technology that was popular with certain companies, notably IBM, but is not widely used in business any longer. It is also virtually unheard of to have a Token Ring network in a home. We also will not discuss the ISDN because it is not very uncommon in the U.S., and if it is used in Europe you will need to contact your Internet service provider to find out what settings to use.
Let us begin with the Ethernet connection. Ethernet is the most common type of network connection. Most office networks and virtually all home networks use Ethernet. Ethernet connections are the basic network cards you probably have seen many times. The connection to an Ethernet card is an RJ-45 connection. RJ-45 connectors essentially look like rather large phone connectors. In fact, they are very much like the telephone connector, except that RJ-45 connectors have eight wires in them, whereas the standard telephone connector has four wires. Just for your information, the standard telephone connector is called an RJ-11. The RJ stands for Registered Jack. If you use a cable Internet connection, it probably comes into your home and connects with normal coaxial cable (the same cable used for television, round wire about 1/4-inch thick with a connector that has a single needle-like protrusion in the middle) to a box, and then a network cable (also called CAT 5— category 5—cable) comes to your computer’s network interface card (NIC). This means you have an Ethernet connection. You also are using an Ethernet connection if your PC gets to the Internet via a local area network (LAN) such as in an office environment.
| Note | If you are not familiar with these hardware terms, remember to look in Appendix D, “PC Hardware,” which provides a basic crash course in PC hardware. It won’t make you a trained PC service technician, but at least it will make you a computer user who understands basic PC hardware and terminology. |
The next screen takes you to a list of the network cards that Linux has detected on your PC. You should see your card somewhere on the list. If you do not, your card may not be supported in Linux. That means that you will need to contact your card’s manufacturer to find out if it supports Linux and, if so, where to obtain the appropriate driver for the network interface card. This screen is shown in Figure 4.12.

Figure 4.12: Selecting your Ethernet card.
| Note | You will see the terms network card, NIC, NIC card, and Ethernet card used interchangeably in most computer books. They all refer to the same thing. |
The next screen is used to configure your IP address. All computers on the Internet must have a unique IP address. Your Internet service provider (ISP) either assigns you an IP dynamically each time you log on or assigns you a static IP address that is always the same. If the former is true, simply select the option Automatically Obtain IP Address Settings with: DHCP. DHCP stands for Dynamic Host Configuration Protocol. It means that when you dial up to your ISP or log on to your network, an IP address is assigned to your PC automatically from a pool of available addresses. If your IP address is permanently assigned, referred to as a static IP, then select Statically Set IP Address. You will then need to set the three fields with information that your ISP or network administrator gives you. The final screen, shown in Figure 4.13, simply verifies your settings and lets you apply, cancel, or back up and change something.

Figure 4.13: Confirming your settings.
That’s it; your network card is set up and ready to go. Congratulations! That wasn’t that hard, was it?
The next most commonly found connection type in homes and small offices is a modem connection. If your phone line plugs into the back of your PC, you are using a modem. When you select the Modem option on the first screen of the wizard and then move forward, you will be presented with a list of modems detected on your PC. Like the Ethernet configuration, it is possible that your modem will not show. If that is the case, you will have to contact the manufacturer of the modem to verify that your modem is supported by Linux.
The next screen asks you to set modem properties. This screen is shown in Figure 4.14.
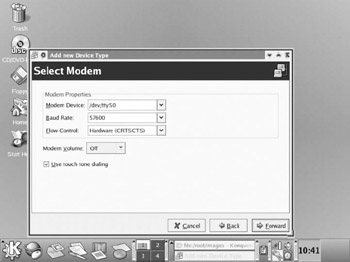
Figure 4.14: Selecting modem settings.
The first setting is the Modem Device. Linux refers to all modems as tty followed by a number. For example, your modem might be tty1. If you have two modems, you will have tty1 and tty2. If you have more than one modem, you can select the one you want to use here. The other two settings, Baud Rate and Flow Control, are specific to your modem. The box it came in or the owner’s manual would have that information. Next you set Modem Volume to whatever setting you prefer (it will work the same either way). Finally, you may notice that the Use Touch Tone Dialing setting is selected by default. Very few people have rotary phones these days, but if you do, deselect this option.
Now press the Forward button, and you are taken to information regarding your provider. This is shown in Figure 4.15.
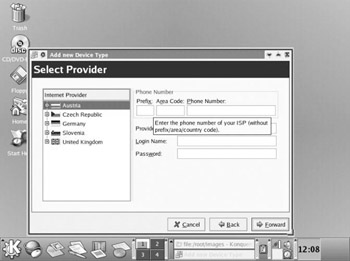
Figure 4.15: Your provider settings.
You can select a particular nationality here, if that is appropriate for your situation. Then you enter the phone number your ISP gave you to dial for Internet services. You will then put in your provider’s name, and the login name and password that your ISP provided. This is shown in Figure 4.16.

Figure 4.16: Entering the appropriate provider settings.
You are then taken to a screen that is identical to the final screen of the Ethernet setup. You will see the setting you selected and have a choice to apply the settings, cancel the settings, or back up and change your settings.
Another type of connection you might have is wireless. In the coming years, the odds of you using a wireless connection will increase. More and more businesses and even homes are going to wireless networks. Most consumer electronics stores now sell wireless kits for your home at a very reasonable price. For this reason, it is important that you know how to set this up in Linux.
The first screen of the wireless setup, shown in Figure 4.17, asks you to set various hardware settings for your connection. These settings include the IRQ and IO for your wireless network card. Previously we discussed where you could find all hardware settings on your machine. You may need to return to that section in KDE to find out what the appropriate settings are for your machine.
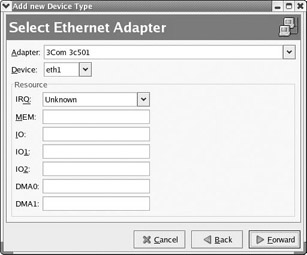
Figure 4.17: Setting up a wireless connection.
You also will select what type of adapter you have. There are several that Linux supports, and you can click on the drop-down list to see if your wireless adapter is on the list. If it is not, you will need to contact the manufacturer. The list is fairly large, however, as you can see in Figure 4.18.
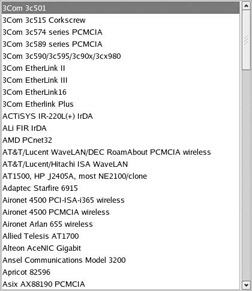
Figure 4.18: Wireless adapters.
As you have guessed by now, regardless of which device you are setting up, the wizard always ends by presenting you with the choices you made and giving you a chance to apply those settings, back up and make changes, or cancel the entire process. Setting up your Internet connect, as you have seen, is not particularly difficult. However, there are times when it is not sufficient. For example, if you purchase a new network card and install it, you will need to configure it before you can connect to the Internet.
Fortunately, the Internet Configuration Wizard is not the only way to configure Internet or network settings. There is also Network Device Control. This is found under System Tools just like the Internet Configuration Wizard. The initial screen of the Network Device Control shows any network cards you have, their names, and their current status. This is seen in Figure 4.19.
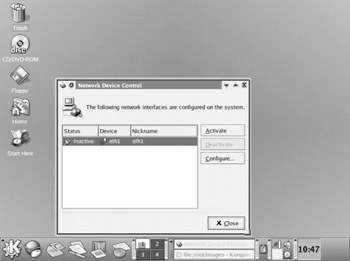
Figure 4.19: Network Device Control.
You will notice the buttons on the right side. With these you can activate or deactivate the network device or configure it with a single click. Obviously, it must be properly configured before you can successfully activate it. Let’s click on the Configure button and take a look at how to configure a network card in Linux. When you click on the Configure button, you are taken to a screen such as the one in Figure 4.20. The plethora of choices, buttons, and tabs may seem daunting at first, but don’t worry, we will walk through all of them.
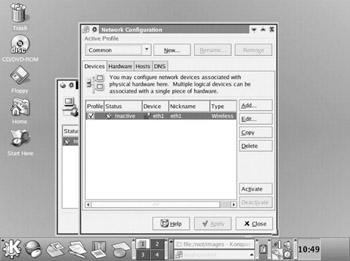
Figure 4.20: The Devices tab of Network Device Control.
The first tab, Devices, lists the various network cards on your machine and their current status and types. In case you were not aware, it is entirely possible to have more than one network card in a PC, although most home PCs probably only have one NIC card. The second tab, Hardware, is where one goes to add, change, or delete a particular network card. This screen is seen in Figure 4.21.
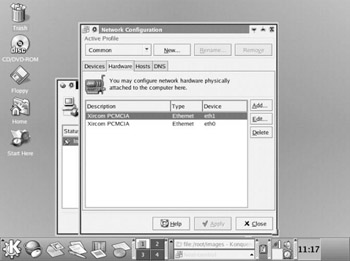
Figure 4.21: The Hardware tab of the Network Device Control.
The last two tabs, Hosts and DNS, are where your configuration takes place. The Hosts tab is where you will set the IP address for your network card.
| Note | All PCs have what is called a loop back address, which is 127.0.0.1. Linux treats this address as an actual physical network card. That way, even if you have only one NIC in your machine, you will see two Ethernet devices listed. |
To set the IP address for your NIC manually, select Add or Edit, depending on whether you are adding a new IP address or editing an existing one. You will see something much like what is shown in Figure 4.22.
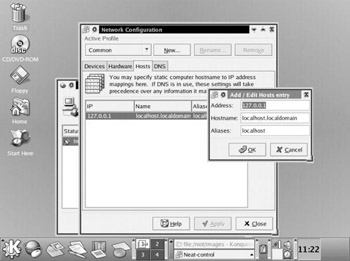
Figure 4.22: Adding and editing IP addresses.
If you clicked Add, the three fields will be blank. If you highlight an existing Ethernet device and press Edit, the three fields shown will have that device’s current settings. You can then enter whatever IP address and hostname you have been assigned by your ISP or network administrator. Aliases can be any name or names you select. This is simply a name that should be easy for you to recall.
Virtually all local area networks must use DNS service in order to use the World Wide Web. DNS is a networking protocol that translates the URL you enter (such as www.chuckeasttom.com) into an IP address. If you are on a network that uses DNS, you can enter the settings for it on the DNS tab. These settings will be provided by your network administrator. The screen is shown in Figure 4.23.
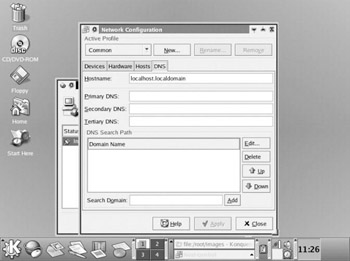
Figure 4.23: Setting the DNS settings.
Your network card should now be configured. You can communicate on your local network, if you are on one. As you can see, this is not particularly difficult.
|
| < Day Day Up > |
|
EAN: 2147483647
Pages: 247