| < Day Day Up > |
In addition to desktop settings, there is a variety of other preferences you might want to set. These preferences can be found under the Preferences
The second subcategory is Information. This category provides a lot of useful information regarding various hardware devices in your computer. This will be dealt with in some detail in the
You will notice that under Look & Feel you can set some of the same settings you accessed by right-clicking your mouse on the desktop. You can set the desktop settings, backgrounds, and even screensavers. However, you also can set a few other items here. For example, if you select Taskbar, you have several options you can set regarding the look and behavior of your taskbar. These options can be seen in Figure 4.8. They include whether to group similar
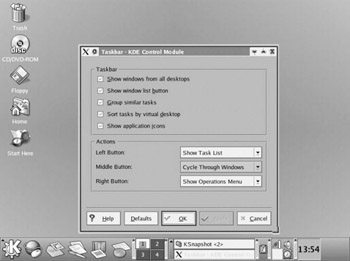
Figure 4.8:
Taskbar settings.
| < Day Day Up > |
| < Day Day Up > |
You can find all the detailed information you might need by looking in the Preferences category, under the Information
Figure 4.9:
Hardware Information.
We will not delve deeply into these various settings because they depend on a thorough knowledge of PC hardware, and that is beyond the scope of this book. A good rule of thumb to remember on any computers settings is if you don’t know much about it, leave it alone. You are more likely to cause problems than you are to improve your system.
You may
Configuring your network settings is something you will probably have to do. Whether your PC is connected to a local area network (LAN) or simply connected to a cable modem or DSL (digital subscriber line) modem, you will need to configure your network settings. There are two ways to configure your network card settings. Both are found under the System Tools
Figure 4.10:
Network settings.
The first method is to go to Network Device Control and manually set all the parameters there. The second is to use the Internet Configuration Wizard. In this section, we will examine both
Let us begin with the Internet Connection Wizard. We begin with this option because it is the
Figure 4.11:
The Internet Configuration Wizard, screen one.
The first step in this wizard is to select what type of Internet connection you have. The list contains several items, and some are more likely to be found on the typical machine than others. We will walk through the most commonly used Internet connections step by step so that you will be able to set up your Internet connection regardless of the network connection type. There are three types we will not look at. The first two are the Token Ring connection and the VPN (virtual private network) connection. It is highly
Let us begin with the Ethernet connection. Ethernet is the most common type of network connection. Most office networks and virtually all home networks use Ethernet. Ethernet connections are the basic network cards you probably have seen many times. The connection to an Ethernet card is an RJ-45 connection. RJ-45 connectors
| Note |
If you are not familiar with these hardware terms, remember to look in Appendix D, “PC Hardware,” which provides a basic crash course in PC hardware. It won’t make you a trained PC service technician, but at least it will make you a computer
|
The
Figure 4.12:
Selecting your Ethernet card.
| Note |
You will see the terms network card, NIC, NIC card, and Ethernet card used interchangeably in most computer books. They all refer to the same thing. |
The next screen is used to configure your IP address. All computers on the Internet must have a unique IP address. Your Internet service provider (ISP) either assigns you an IP dynamically each time you log on or
Figure 4.13:
Confirming your settings.
That’s it; your network card is set up and ready to go. Congratulations! That wasn’t that hard, was it?
The next most commonly found connection type in
The next screen asks you to set modem properties. This screen is shown in Figure 4.14.
Figure 4.14:
Selecting modem settings.
The first setting is the Modem Device. Linux refers to all modems as
tty
followed by a number. For example, your modem might be
tty1
. If you have two modems, you will have
tty1
and
tty2
. If you have more than one modem, you can select the one you want to use here. The other two settings, Baud Rate and Flow Control, are specific to your modem. The box it came in or the owner’s manual would have that information. Next you set Modem Volume to whatever setting you prefer (it will work the same either way). Finally, you may notice that the Use Touch Tone Dialing setting is selected by default. Very few people have
Now press the Forward button, and you are taken to information regarding your provider. This is shown in Figure 4.15.
Figure 4.15:
Your provider settings.
You can select a particular
Figure 4.16:
Entering the appropriate provider settings.
You are then taken to a screen that is identical to the final screen of the Ethernet setup. You will see the setting you selected and have a choice to apply the settings, cancel the settings, or back up and change your settings.
Another type of connection you might have is wireless. In the coming
The first screen of the wireless setup, shown in Figure 4.17, asks you to set various hardware settings for your connection. These settings include the IRQ and IO for your wireless network card. Previously we discussed where you could find all hardware settings on your machine. You may need to return to that section in KDE to find out what the appropriate settings are for your machine.
Figure 4.17:
Setting up a wireless connection.
You also will select what type of adapter you have. There are several that Linux supports, and you can click on the drop-down list to see if your wireless adapter is on the list. If it is not, you will need to contact the manufacturer. The list is
Figure 4.18:
Wireless adapters.
As you have guessed by now, regardless of which device you are setting up, the wizard always ends by presenting you with the choices you made and giving you a chance to apply those settings, back up and make changes, or cancel the entire process. Setting up your Internet connect, as you have seen, is not particularly difficult. However, there are times when it is not sufficient. For example, if you purchase a new network card and install it, you will need to configure it before you can connect to the Internet.
Fortunately, the Internet Configuration Wizard is not the only way to configure Internet or network settings. There is also Network Device Control. This is found under System Tools just like the Internet Configuration Wizard. The initial screen of the Network Device Control shows any network cards you have, their
Figure 4.19:
Network Device Control.
You will notice the buttons on the right side. With these you can activate or deactivate the network device or configure it with a single click. Obviously, it must be properly configured before you can successfully activate it. Let’s click on the Configure button and take a look at how to configure a network card in Linux. When you click on the Configure button, you are taken to a screen such as the one in Figure 4.20. The
Figure 4.20:
The Devices tab of Network Device Control.
The first tab, Devices, lists the various network cards on your machine and their current status and types. In case you were not aware, it is entirely possible to have more than one network card in a PC, although most home PCs probably only have one NIC card. The second tab, Hardware, is where one goes to add, change, or delete a particular network card. This screen is seen in Figure 4.21.
Figure 4.21:
The Hardware tab of the Network Device Control.
The last two tabs, Hosts and DNS, are where your configuration takes place. The Hosts tab is where you will set the IP address for your network card.
| Note |
All PCs have what is called a loop back address, which is 127.0.0.1. Linux treats this address as an actual physical network card. That way, even if you have only one NIC in your machine, you will see two Ethernet devices listed. |
To set the IP address for your NIC manually, select Add or Edit, depending on whether you are adding a new IP address or editing an existing one. You will see something much like what is shown in Figure 4.22.
Figure 4.22:
Adding and editing IP addresses.
If you clicked Add, the three fields will be blank. If you highlight an existing Ethernet device and press Edit, the three fields shown will have that device’s current settings. You can then enter whatever IP address and hostname you have been assigned by your ISP or network administrator. Aliases can be any name or names you select. This is simply a name that should be easy for you to recall.
Virtually all local area networks must use DNS service in order to use the World Wide Web. DNS is a networking protocol that
Figure 4.23:
Setting the DNS settings.
Your network card should now be configured. You can communicate on your local network, if you are on one. As you can see, this is not particularly difficult.
| < Day Day Up > |