| Forms provide a familiar, easy-to-use interface for interacting with site visitors and obtaining information. HTML specifies a standard appearance for the form objects on your pages (Figure 8.1). This makes it easy for users to recognize Web forms and understand how to use them. Figure 8.1. HTML includes a variety of form objects for gathering information from page visitors. 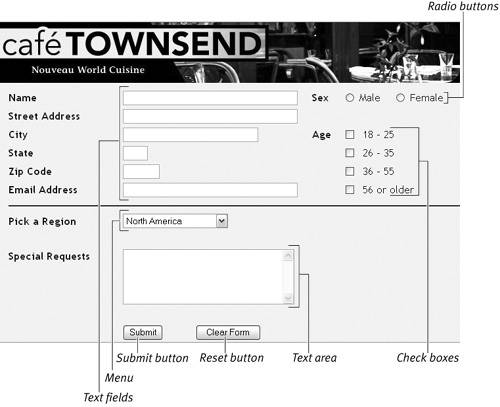
The following are among the most commonly used form objects: Text fields, for entering a single line of text Radio buttons, for selecting a single option from a group of two or more choices Check boxes, for selecting multiple options from a group of two or more choices Text areas, for entering multiple lines of text Menus, for selecting one option from a menu of two or more choices Lists, for selecting one or more options from a scrollable list of two or more choices
HTML forms also include buttons, such as a submit button for submitting form data to a server, and an optional reset button to clear the data entered in a form. An image can be used in place of a button by inserting an image field. HTML forms might also include other types of fields besides text fields, such as hidden fields and file-upload fields. Hidden fields don't display on the page but send information to the server when the submit button is clicked. For example, a hidden field might be used to include information about the type of browser a visitor used to view the page. File-upload fields allow users to upload files from their computer to the server. Finally, HTML forms might include accessibility features, such as labels for form fields or fieldsets for associated groups of form objects. (Both of these features help viewers using screen readers to access forms.) For more information on adding accessibility features to forms, see Dreamweaver Help (F1). Submitting form data to a server HTML provides form objects for displaying forms on a Web page and collecting data from a user, but you also need an application server, such as ASP, PHP, or ColdFusion, to process the data that you collect. To enable the form data to be submitted to the application server for processing, you need to add two attributes to the HTML form tag: an action attribute, which specifies the location of the page on the server that contains the forms processing code, and a method attribute, which specifies the HTTP method used to submit the form data to the server. The form tag can also include a name attribute and an id attribute, which identify this specific form. You have a couple of options when sending the form data. You can send it either as form parameters or as URL parameters. Form parameters are sent to the server via the HTTP POST method, which sends the form data in the body of the HTTP message from the browser to the server. URL parameters are sent to the server via the HTTP GET method, which adds the form data to the end of the URL that is specified in the action attribute and sends the data as part of the URL. (For more details on using form and URL parameters, see the section "Using URL and Form Parameters," later in this chapter.) To create an HTML form: 1. | From the File menu, select New > Page > HTML to create a new HTML page.
| 2. | To insert a form, do one of the following:
- On the Insert bar, select the Forms Insert bar from the drop-down list. (If the Insert bar isn't visible, from the main menu choose View > Toolbars > Insert.) Click the Form button on the Forms Insert bar to add a form to your page (Figure 8.2).
Figure 8.2. Use the Forms Insert bar to insert forms and form objects in your pages. 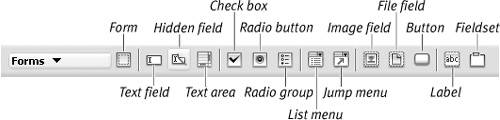
- From the Insert menu, select Form > Form to add a form to your page. In Design view, the form displays as a box with a dashed red border (Figure 8.3).
Figure 8.3. After you insert an HTML form, it appears in Design view as a box with dashed borders. 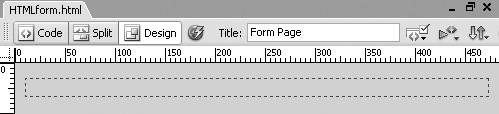
| 3. | To add form objects, do one of the following:
- On the Insert bar, click the button for the form object you want to add (Figure 8.3).
- From the Insert menu, choose Form, and from the submenu, choose the form object you want to add (Figure 8.4).
Figure 8.4. From the Insert menu choose Form, and then choose a form object, such as Text Field, from the submenu. 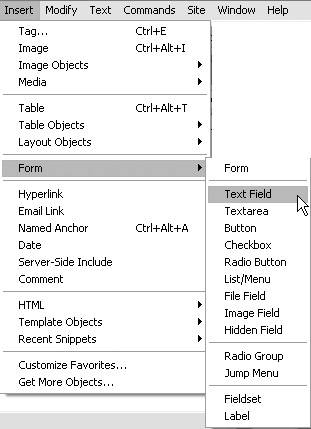
| 4. | In the Property inspector, set the form properties by entering values for attributes of the form tag (Figure 8.5):
Figure 8.5. Use the Property inspector to specify properties for your form. 
In the Form Name field, enter a name that uniquely identifies this form. In our case, we're using the name contactInfo. In the Action field, enter the URL of the page on the server that contains the forms processing code, which for our purposes is http://www.example.com/contact.asp. From the Method drop-down list, select an HTTP method to submit the form data to the server. We're using the POST method. From the Target drop-down list, select an optional target type if you want the server to return form data to a specific browser window. We left this field blank since we don't want to return the form data to a specific window or frame. See Dreamweaver Help (F1) for more details on using a target attribute with a form. From the Class drop-down list, select an optional CSS style attribute if you have defined CSS styles for this page. For our purposes, we're selecting None. From the Enctype drop-down list, select a Multipurpose Internet Mail Extension (MIME) encoding type attribute for the submitted data if the server needs that information to process the form data. See your application-server documentation for more information.
| 5. | In the Document window, add text in front of each form object that describes the field.
For example, you might enter Name for a text field in which the user enters his or her name. This text displays on the page when it's viewed in a browser, and helps the user to understand what data is being collected with the form object.
|
 Tip Tip
Dreamweaver includes a Jump Menu option on the Forms Insert bar, as well as in the Insert menu as a form object. A jump menu is a menu-list object with a JavaScript behavior that associates a URL with each menu item. When a menu item is selected, the browser opens the associated URL. For more details on creating jump menus, see the section "Using JavaScript with Form Objects," later in this chapter.
Building Forms Using ColdFusion Dreamweaver includes additional enhancements for creating forms in ColdFusion MX 7, including a CFForm Insert bar with buttons for inserting ColdFusion forms and form objects. You can access this Insert bar by opening any ColdFusion page and then selecting the CFForm Insert bar from the Insert bar menu (Figure 8.6). Figure 8.6. Use the CFForm Insert bar to insert ColdFusion forms and form objects in ColdFusion pages. 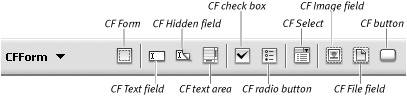
ColdFusion forms offer everything available in HTML forms, plus many additional options, such as formatting the form in Flash or XForms (XML forms). To activate the enhancements, define a Dreamweaver site with a ColdFusion testing server. (For more information on specifying a testing server, see Chapter 2.) For more information on ColdFusion forms, see the ColdFusion documentation (Help > Using ColdFusion). |
|