| One of the ways you can create a dynamic form is to begin with a static form and then convert the form objects to dynamic ones. The contents of a dynamic form object, such as a menu list, are determined when the page is requested from the server, ensuring that the most current data is used in the form. To use dynamic form objects, you must start with a dynamic page type, such as ASP, PHP, ColdFusion, ASP.NET, or JSP. The exercises in this section use PHP, but the process for creating dynamic form objects is the same for PHP, ASP, ColdFusion, and JSP. For more information on creating dynamic form objects using ASP.NET, see Dreamweaver Help (F1). In this section, we'll populate form objects on a PHP page with dynamic content by defining recordsets based on a MySQL database named midtownGraphicArts. This database contains three tables: employeeInfo, benefitInfo, and deptInfo. Figure 8.7 shows a MySQL description of the three tables in this database, including table names, field names, and data types. Figure 8.7. You can use the MySQL Monitor to display the fields, data types, and primary key of a MySQL database table. 
We'll add the following dynamic form fields to our page: A dynamic text field that automatically enters a value for the employee name based on the value of a database field. A set of dynamic check boxes for employee benefits that are automatically checked based on the value of database table fields. A set of dynamic radio buttons for employee gender that are automatically selected based on the value of a database table field. A dynamic menu that automatically selects a value for the employee department based on the value of a database field.
To follow along with the exercises in this section, you'll need to create the midtownGraphicArts database with its three tables. You can download the text file midtowngraphicarts.txt from this book's Web site at www.peachpit.com/dw.vqp to copy all the SQL statements you need to create the database. For more details on creating a MySQL database, see "Creating a Database," in Chapter 5. You also need to create a connection to the database. For more information on creating a MySQL database connection, see "Making a Connection to Your Database," in Chapter 4. To create a dynamic text field: 1. | From the File menu, select New > Dynamic page > PHP to create a new PHP page.
To create dynamic form objects, you must start by inserting an HTML form on the page.
| 2. | From the Insert menu, select Form > Form to add a form to your page.
| 3. | From the Insert menu, select Form > Text Field to add a text field to your page.
| 4. | In the Design view window, select the text field.
| 5. | Define a recordset that includes all the fields from the table in the database you want to use, and name the recordset.
You'll need this recordset to complete the next two steps. If you want to follow along with this exercise, we're using the employeeInfo table in the midtown-GraphicArts database, and we'll name that recordset employee (Figure 8.8). (For more information on defining recordsets, see Chapter 6.)
Figure 8.8. To create the employee recordset, select the All radio button to select all the fields in the employeeInfo table. 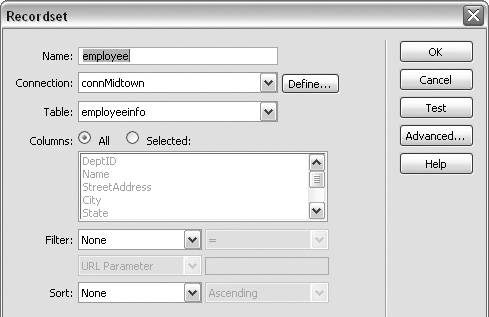
| 6. | In the Property inspector, enter a name in the TextField field. In our example, we're using Name for our text field (Figure 8.9). In the Char Width field, enter 50 for the width of the text field display. Click the lightning bolt button next to the Init Val field.
Figure 8.9. Enter a name for the text field and a value for the width of the text field in the Property inspector. You can access the Dynamic Data dialog by clicking the lightning bolt button next to the Init Val field. 
The Init Val field contains the code for binding a recordset field to the text field. (This code will be added in Step 8.) The Dynamic Data dialog appears (Figure 8.10).
Figure 8.10. Select a recordset field in the Dynamic Data dialog to bind dynamic data to the text field. 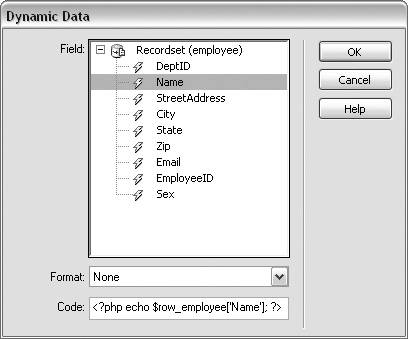
| 7. | Click the plus (+) button to expand the employee recordset and display the field names. Select the Name field to bind this field in the recordset to the text field in the form.
Dreamweaver automatically creates the PHP code for the binding, which then appears in the Code field of the Dynamic Data dialog.
| 8. | In the Dynamic Data dialog, click OK to close the dialog and insert the binding code in your page.
A placeholder with the table and field name appears in the text field in Design view, and the dynamic text field also appears in the Server Behaviors panel. When you preview the page in a browser, text from the database will be automatically inserted into the text field (Figure 8.11).
Figure 8.11. The value for the Name field in the database is automatically inserted in the dynamic text field when the page is viewed in a browser. 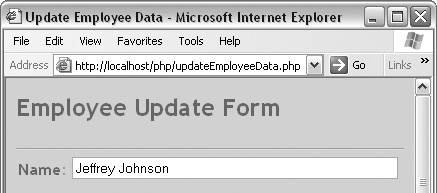
| 9. | Save the page as updateEmployeeData.php.
|
 Tip Tip
To make a multiline (text area) field, select the text field in Design view. Then, in the Property inspector, select the Multi Line radio button. In the Char Width field, enter the width of the text area. In the Num Lines field (which appears when you select Multi Line), enter the height of the text area.
To create a dynamic check box: 1. | Open the updateEmployeeData.php page that you saved in the previous task.
| 2. | From the Insert menu, select Form > Checkbox.
| 3. | In the Design view window, select the check box.
| 4. | In the Property inspector, in the Checkbox Name field, enter a name for the check box. For our purposes, the name is Health Insurance (Figure 8.12).
Figure 8.12. Enter a name and checked value for your check box.
Checkbox Name field 
This check box will be used to indicate whether the employee selected Health Insurance as a benefit.
| 5. | In the Checked Value field, enter a value to be sent to the server when the check box is selected.
In our example, entering a value of Yes means that Yes is the data that will be sent to the server if the employee has selected Health Insurance.
| 6. | Define a recordset that includes all the fields from the benefitInfo table in the midtownGraphicArts database, and name that recordset benefits (Figure 8.13). (For more information on defining recordsets, see Chapter 6.)
Figure 8.13. To create the benefits recordset, select the All radio button to select all the fields in the benefitInfo table. 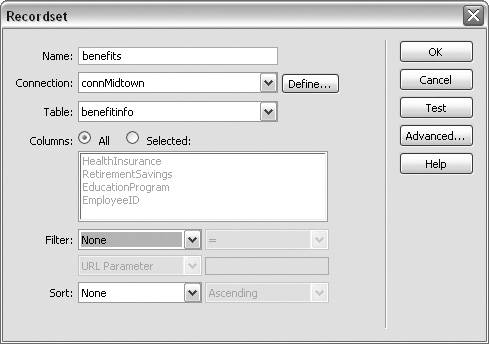
You will need this recordset to complete the next few steps.
| 7. | In the Property inspector, click the Dynamic button to dynamically select the check box's initial statethat is, whether the check box is initially selected or unselected when users first see it.
The Dynamic CheckBox dialog appears (Figure 8.14). In the CheckBox field, the check box named Health Insurance (or whatever name you entered in Step 4) is selected.
Figure 8.14. In the Dynamic CheckBox dialog, you can add dynamic data and specify the value that the field must have to be selected when the page opens. 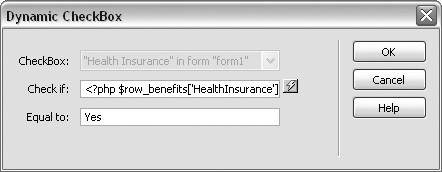
| 8. | Click the lightning bolt button next to the Check If field. The Dynamic Data dialog appears (Figure 8.15).
Figure 8.15. Select the HealthInsurance field in the Dynamic Data dialog to bind dynamic data to the field. 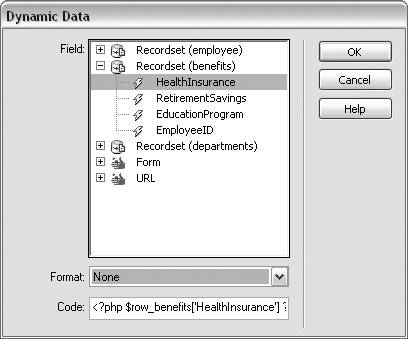
| 9. | Click the plus button to expand the benefits recordset. In the recordset name list, select the HealthInsurance field to bind it to the check box. Click OK to close the Dynamic Data dialog.
| 10. | Return to the Dynamic CheckBox dialog (Figure 8.14). In the Equal To field, enter the value (Yes) that the field must have in order to be checked when the page opens. Click OK to close the dialog.
| 11. | You can add additional check boxes by repeating Steps 2 through 10.
When the page is opened in a browser, the Health Insurance checkbox will be dynamically selected if the value in the HealthInsurance field in the benefitInfo table is Yes (Figure 8.16).
Figure 8.16. The Health Insurance check box is automatically checked when the page is viewed in a browser if the HealthInsurance field in the database table has a value of Yes. 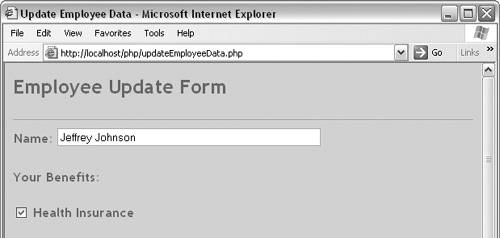
|
To create dynamic radio buttons: 1. | Open the updateEmployeeData.php page.
| 2. | From the Insert menu, choose Form > Radio Group. The Radio Group dialog appears.
| 3. | In the Name field, enter a name for the groupuse the field name from the database table that you're using to make this radio group dynamic (Figure 8.17).
Figure 8.17. Use the Radio Group dialog to insert a set of radio buttons. You can specify labels, values, and button layout in this dialog. 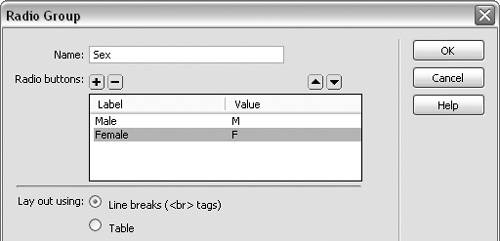
For our purposes, we're using the Sex field in the employeeInfo table from the midtownGraphicArts database, so we're assigning the name Sex for the group.
In the next few steps, we'll create a group of two radio buttons. When the page is opened in a browser, one button will be dynamically selected based on the value for the Sex field in the recordset.
| 4. | In the Radio Buttons section, click the plus (+) button to add labels for the radio buttons. Enter a label for the text you want to display on the page next to the button and the value to be sent to the server when the radio button is selected. In our case, the labels we'll add are Male and Female, with values of M and F, respectively. Click the plus button to add more buttons to the group.
| 5. | In the Lay Out Using section, select a layout type for the radio buttons.
You have two options: Line Breaks or Table. The Line Breaks option enters the labels and buttons sequentially in single lines of text separated by a line break. The Table option creates a table and inserts each label and button in a table cell.
| 6. | Click OK to close the Radio Group dialog and insert the buttons on the page (Figure 8.18).
Figure 8.18. After you complete the Radio Group dialog, buttons are inserted in your page according to the button layout you selected in the dialogin this case, line breaks. 
| 7. | In the Design view window, select one of the radio buttons.
You will need a recordset to complete the next steps. You can use the employee recordset you created in Step 5 of "To create a dynamic text field," earlier in this chapter.
| 8. | In the Property inspector, click the Dynamic button to dynamically select the initial stateselected or unselectedof the radio button.
The Dynamic Radio Group dialog appears (Figure 8.19).
Figure 8.19. In the Dynamic Radio Group dialog, you can select a radio group and add dynamic data. The state of the radio buttons (selected or not selected) is determined dynamically when the page opens. 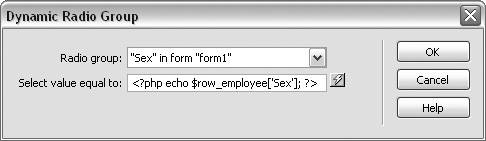
| 9. | From the Radio Group drop-down list, select the radio group. In our case, the group is Sex. Click the lightning bolt button next to the Select Value Equal To field.
The Dynamic Data dialog appears.
| 10. | Click the plus button to expand the employee recordset (Figure 8.20). In the recordset field name list, select the Sex field to bind it to the radio button group.
Figure 8.20. Select the Sex field in the Dynamic Data dialog to bind dynamic data to the radio button group. 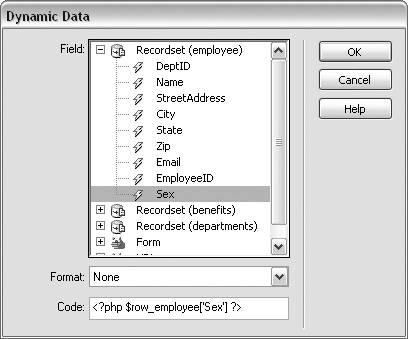
| 11. | Click OK to close the Dynamic Data dialog.
| 12. | Click OK to close the Dynamic Radio Group dialog.
When the page is opened in a browser, one of the radio buttons will be dynamically selected based on the value in the Sex field in the employee table (Figure 8.21).
Figure 8.21. A radio button is automatically selected, based on the value of the Sex field in the database table, when the page is viewed in a browser. 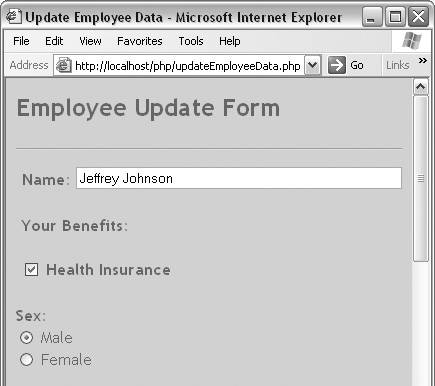
|
Tip You can add radio buttons one at a time rather than as a group by selecting Insert > Form > Radio Button. If you add the buttons one at a time, make sure all the buttons have the same name so that they are treated as a group. Otherwise, a user will be able to select more than one button.
To create a dynamic menu: 1. | Open the updateEmployeeData.php page you saved in the previous exercise.
| 2. | From the Insert menu, select Form > List/Menu to add a menu to your page.
| 3. | In the Design view window, select the List/Menu object.
| 4. | In the Property inspector, select the Menu radio button (Figure 8.22).
Figure 8.22. In the Property inspector, you can select a Menu or a List. 
| 5. | In the List/Menu field, enter a name for the menu. Dreamweaver assigns the name select by default. In our case, we're using the name Department.
The deptInfo table in the sample database includes a DeptName and a DeptID field. We'll define a departments recordset that includes both these fields. The Department menu will be dynamically populated with data from this recordsetthe data in the DeptName field supplies the labels for the menu items, and the data in the DeptID field provides the corresponding value.
The DeptID field in the departments recordset is related to the DeptID field in the employee recordset. When a page for an employee is opened in a browser, the label that displays in the Departments menu is dynamically selected based on the value for DeptID for that employee in the employee recordset.
| 6. | Define a recordset that includes all the fields in the deptInfo table, and name that recordset departments (Figure 8.23). (For more information on defining recordsets, see Chapter 6.)
Figure 8.23. To create the departments recordset, select the All radio button to select all the fields in the deptInfo table. 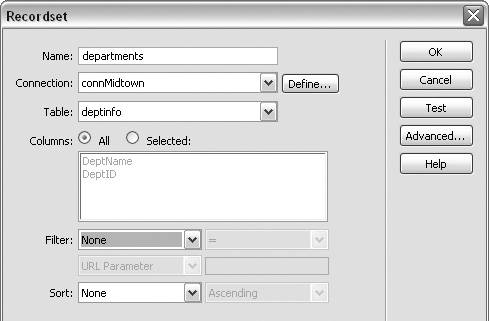
You'll use this recordset to complete the next steps.
| 7. | Click the Dynamic button in the Property inspector. The Dynamic List/Menu dialog appears (Figure 8.24).
Figure 8.24. Use the Dynamic List/Menu dialog to dynamically generate a menu or list from a recordset. 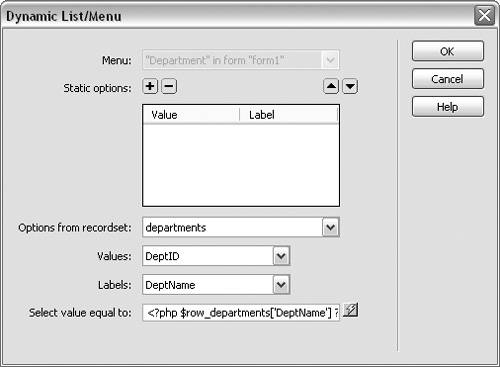
| 8. | In the Menu drop-down list, select Department.
Unless you have more than one list/menu on the page, there will be only one choice.
| 9. | In the Options from Recordset dropdown list, select the departments recordset, which contains the deptInfo table data.
| 10. | In the Values drop-down list, select the recordset field that contains the values of the menu items. In our case, it's the DeptID field.
| 11. | In the Labels drop-down list, select DeptName, which is the recordset field that contains the names to display as menu items.
| 12. | Click the lightning bolt button next to the Select Value Equal To field. The Dynamic Data dialog appears (Figure 8.25). Choose the field you selected in Step 11. This field will be dynamically selected when the page is opened in a browser.
Figure 8.25. Select the DeptName field in the Dynamic Data dialog to bind dynamic data to the menu. 
| 13. | Click OK to close the Dynamic List/Menu dialog and save your changes.
Our final version of the updateEmployee-Data.php page includes an additional dynamic text field (EmployeeID) for the employee ID number and an additional check box (Retirement Savings) in the benefits menu (Figure 8.26).
Figure 8.26. A menu option is automatically selected when the page is viewed in a browser, based on the value of the DeptName field in the database table. 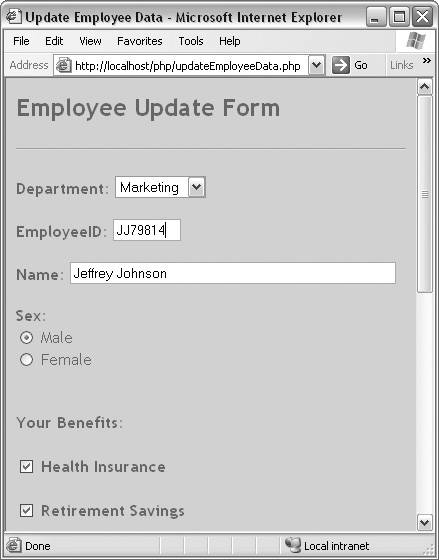
|
Tips If you want to add static items to your list/menu in addition to the dynamic items, use the Static Options area of the Dynamic List/Menu dialog to add values and labels for static items. If you want to add dynamic items to an existing static menu, in the Design view window, select the menu object. In the Property inspector, click the Dynamic button to open the Dynamic List/Menu dialog, and follow Steps 8 through 13. When you display the menu in a browser, both the static and dynamic menu items appear in the menu. To make a list instead of a menu, select List from the Type section in the Property inspector. If you choose List, additional options such as Height and Selections appear in the Property inspector. In the Height field, enter a number to specify how many list items to display at the same time. In the Selections section, check the box if you want to allow multiple selections.
|