Hack 26 Running Your Own Web Radio Station
|
Create private playlists you can stream 24/7 to almost any web-enabled device, inside or outside the home. If you've been paying attention to what's happened with the deregulation of the airwaves, you may have noticed that most of the dial is owned by a few media conglomerates that control most of what you hear. Many of us turned to the Internet to find a tasteful alternative to all of the FM noise. And while the future of webcasting is currently tied up in the muck of figuring out fair music licensing fees, there is no doubt in my mind that the Internet is the last bastion for music. If the idea of having your own radio webcast, for fun or profit, intrigues you, then you've come to the right place. Even if you don't plan on sharing your musical tastes with the world, you can have a lot of fun creating private playlists you can stream 24/7 to almost any web device in your home. Or maybe you just want to be able to tune into your music anywhere, anytime, on any machine. Well, guess what? You've probably got most of what you'll need sitting on your home machine. Moreover, setting up your own station is easy to do and costs nothing to get running. What you'll need:
26.1 Step 1: Calculate BandwidthThe first thing you need to do is calculate the adequate server bandwidth for your station. If you figure to provide your stream at the same rate to all visitors, the basic calculation for this (via Apple's Knowledge Base) is to multiply the maximum number of users you expect by the bit rate you plan to stream. So, for your own private use, if you plan on serving up to three connections at 128 kbps over the Internet, you need an upload connection speed greater than 384 kbps to keep a stutter-free connection. If you plan to run your station over a LAN connection (streaming playlists to multiple terminals in your home), you could probably sustain as many as 50 to 60 connections on a 10Mbps network (not taking network traffic into consideration). As you can see, if you plan on running a commercial or nonprofit station for the public, you'll need a fat pipe. A DSL or cable connection isn't fast enough to support a lot of visitors, but it is usually adequate for serving your personal use. Before you start streaming, be sure that it doesn't violate the service agreement with your ISP. 26.2 Step 2: Install/Configure QuickTime Streaming ServerThe next thing you need to do is download the QT Streaming Server (QTSS) from Apple's site (http://www.apple.com/quicktime/products/qtss/) and install it. Once the install is complete, you'll find the installer placed an icon in your Applications folder that looks like Figure 3-30. Figure 3-30. Apple's QTSS icon Since the server can be configured and controlled through a web browser, this icon will always take you there. Go ahead and configure the server for the first time with the defaults in place. You may need to make some adjustment based on your own network settings or personal preferences. Figures Figure 3-31, Figure 3-32, and Figure 3-33 show various settings being changed in the Setup Assistant. Figure 3-31. Your admin username and password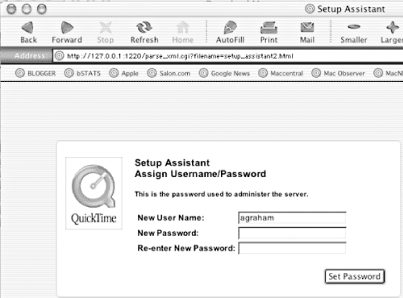 Figure 3-32. Setting an administrator password Figure 3-33. For most people, a SSL connection won't be necessary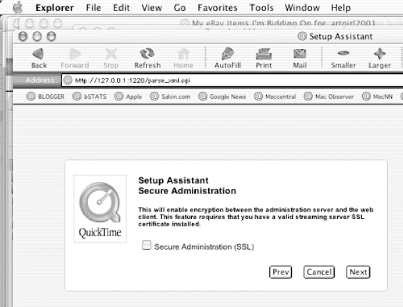 The QTSS requires that you use one folder as the main source of your media. Most people use iTunes and the music is located in the Music folder. You may wish to change the default location, because moving all your media (as shown in Figure 3-34) isn't practical. The path to your iTunes folder should resemble this: /Users/yourusername/Music/iTunes/iTunes Music. Figure 3-35 shows a setting that could interfere with Apache or other web servers running on your machine. Figure 3-34. The location of your music files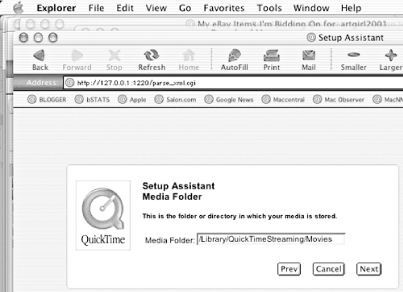 Figure 3-35. A setting that could interfere with Apache or other web servers running on your machine 26.3 Step 3: Create a Promotional SpotDepending on the level of professional spit and polish you want on your station, you may want to put together a promo spot to let people know who you are. There is a really simple way to pull this off using some royalty-free iMovie music, a microphone, and iMovie. You can use some of the free music Apple provides in your iDisk, but of course you must have a .Mac subscription for that. If you don't belong to .Mac, all you really need is a short piece of music in MP3 format, or you can skip the music portion of your spot completely. Open iMovie and import your music clip, then head over to the Audio tab of iMovie (shown in Figure 3-36) and record the vocals of your promo spot. Since I don't have any call letters, I settled for, "You're listening to O'Reilly Radio." Figure 3-36. You'll find the record button in the Audio tab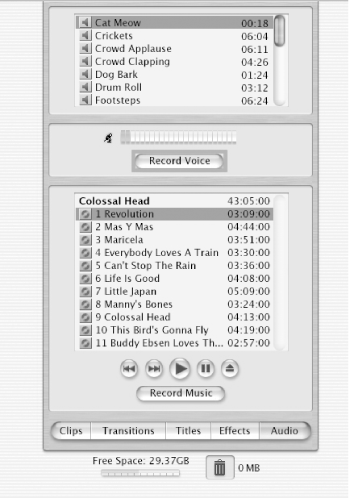 Drag the music clip into one of the music tracks down below. Your vocal spot should already be waiting for you. Then just move the two tracks so that they fit together in a manner that sounds good to you (see Figure 3-37). Figure 3-37. Fitting the audio tracks together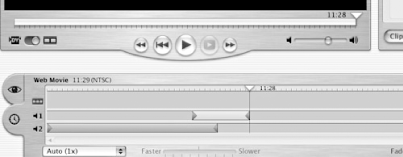 Once you're done editing your audio track, export the movie as QuickTime. We need to make some changes to our file as we export it. When you choose to export the file as QuickTime, you'll get an option to alter the format. Select the Expert setting in this menu (see Figure 3-38). Figure 3-38. Select Expert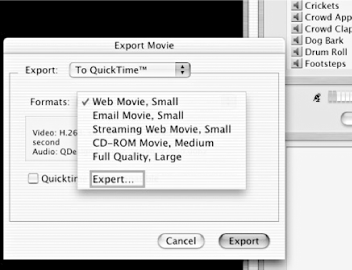 Now click Prepare for Internet Figure 3-39. Prepare for Internet . . .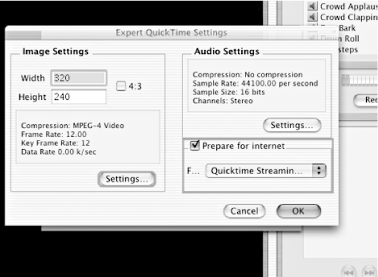 Finally, change the compression settings to MPEG-4 and export (see Figure 3-40). Figure 3-40. Exporting as MPEG-4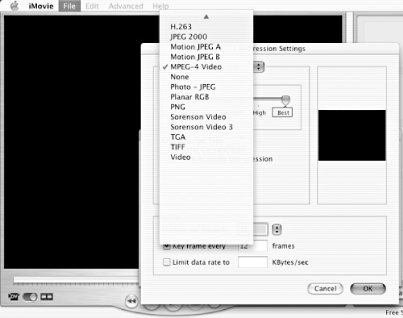 You now need to convert the movie file from MPEG-4 to MP3 before you can use it with the other music files. This is very easy. First open iTunes and drag the file into your library (see Figure 3-41). Figure 3-41. Time to edit the promo song information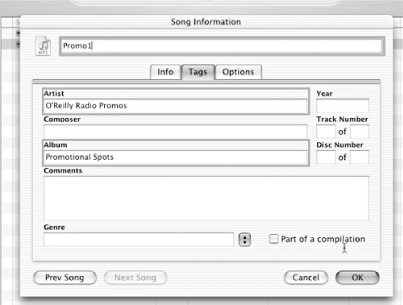 The next step is to edit the promo spot song information, so that when you convert this file to MP3, it will automatically create a promo folder where we can collect future files. Simply highlight the file and select File To convert the file to MP3, highlight it and select Advanced 26.4 Step 4: QTSS General SettingsOpen the server and jump on over to General Settings. Here we want to double-check that our media directory matches our iTunes folder. You can set your maximum number of connections and your maximum throughput. Remember to calculate your required bandwidth. When your traffic exceeds the maximum throughput, the server will not allow any more connections. If you want to run the server 24/7, check "Start Server at System Startup," as shown in Figure 3-42. Figure 3-42. QTSS General Settings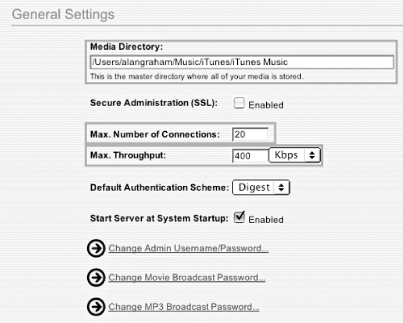 26.5 Step 5: Build a PlaylistYou can create playlists using most text editors, but most people will find it easier to create a playlist through the server's web interface. Our main QTSS screen looks like Figure 3-42. Jump to the Playlists link to the left. At the Playlists screen, click on the button to create a new MP3 playlist, as shown in Figure 3-43. Figure 3-43. Playlist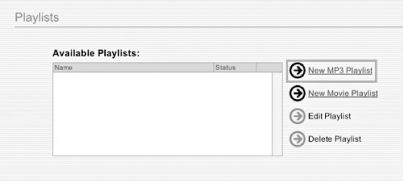 Creating the actual playlist (see Figure 3-44) is quite simple, although there are a few quirks: Figure 3-44. Creating the playlist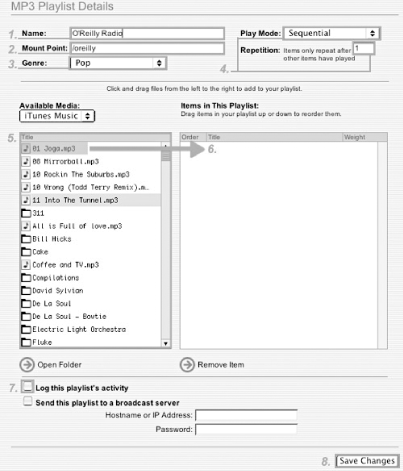
26.6 Step 6: Finish UpYou have a few small items to finish up before you are ready to go. First, go back to the main Playlists menu using the link to the left. Now, make sure that your QTSS is running by clicking the Start button in the upper-lefthand corner (see Figure 3-45). Figure 3-45. The QTSS server is running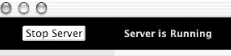 Next, you need to start the playlist. Click on the Play button in the Playlist window (see Figures Figure 3-46 and Figure 3-47). Figure 3-46. Just press the button . . .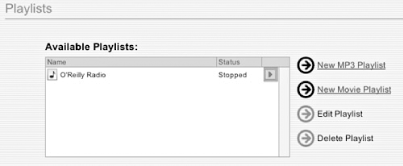 Figure 3-47. Notice the change in status . . .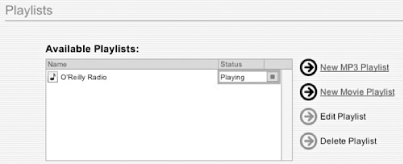 26.7 Step 7: Tune InWe've installed our server, created our promos, configured our server, built our playlists, and started our server. Now it is time to test our station by tuning in. Open up iTunes and select Advanced 26.8 Step 8: Administer RemotelyOne handy feature of the QTSS is remote administration. You can make changes to the server or your playlist regardless of your location. Access the server by typing your IP address or URL and specifying port 1220. 26.9 Step 9: Getting HelpApple has an extensive help file associated with QTSS. You can access it via the server's interface, but you can also find it here:
There are tons of exciting things you can do with the QTSS and Mac OS X. Streaming can be a complicated task, but hopefully this will get you started. Alan Graham |
 Quicktime Streaming Server (see Figure 3-39).
 EAN: 2147483647
Pages: 161