Creating Solutions with the Data Form Wizard
The Data Form Wizard offers you a fast and easy way to build ADO.NET solutions. This speed and efficiency is even more pronounced with Web applications than with Windows applications because the wizard offers fewer options for Web applications. This section walks you through the steps for creating a data-based Web page with the Data Form Wizard. Then, the section demonstrates a couple of programmatic strategies for customizing the code generated by the Data Form Wizard. Follow these samples to stimulate your imagination for ways to customize and extend the data-based Web pages created by the Data Form Wizard.
Building a Solution with the Wizard
Using the Data Form Wizard is one way to prove how easy it is to get started building data-based Web applications. It is common in Web applications to let users display a table or datasheet and browse it. With the Data Form Wizard, creating this kind of application is as easy as making a handful of selections from a succession of dialog boxes. Making these selections creates a dataset and adds Button and DataGrid controls to a Web page. This sample uses the VBDotNetShippers table originally added to the Northwind database in Chapter 9. See the Browsing and Manipulating Data with a Form section in Chapter 9 for step-by-step instructions on adding (or reinitializing) the table to the Northwind database.
| Note | All the samples from this chapter are available in the WebDataSamples project included with this book s sample files. Web projects have two project folders: one resides on the Web server in its Inetpub folder s wwwroot directory, and the other typically is located at the local default directory for storing Visual Studio .NET projects. This second folder contains the .sln file for loading the application into Visual Studio .NET for editing. |
After creating a new ASP.NET Web Application in Visual Studio .NET, you can start the Data Form Wizard by choosing Project, Add New Item. Then, highlight the Data Form Wizard icon in the Templates pane, and click Open. If this is your first use of the wizard in a Web application, the wizard specifies a default name of DataWebForm1.aspx for the Web page. Clicking Open accepts the default name and presents the wizard s Welcome screen. Click Next to arrive at the screen that allows you to designate a dataset for the Web page. Enter DatasetDFW as the name of the dataset in the text box below the radio button with a label of Create A New Dataset Named. The selections from the wizard screens will create a typed dataset with this name and add the dataset to the project folder on the Web server. Clicking Next presents a screen from which you can select from the list of preconfigured database connections in Server Explorer. If the connection that your Web page needs does not appear in the drop-down list on the wizard s second screen, click the New Connection button. This opens the Data Link Properties dialog box. Adapt the instructions in the Adding a Data Connection to Server Explorer sidebar in Chapter 2 to specify your new connection.
After specifying the connection for your dataset, click Next. This lets you pick one or more tables and views to provide data for a member in the dataset. (A member is another name for a DataTable object in a dataset.) For this sample, select the VBDotNetShippers table in the Northwind database. If the table does not already exist (it is a custom table), follow the instructions for creating it in the Adding a Data Connection to Server Explorer sidebar in Chapter 2.
The last screen for this sample lets you pick a subset of columns from the table. This sample uses all the columns in the table. Click Finish to complete the creation of the DataWebForm1.aspx Web page and add it to the project folder on the Web server. Solution Explorer shows the Web page file. Visual Studio .NET also presents the Design view of the page. Figure 11-1 shows this view, which includes a button in a table above a DataGrid control. The tray below the Web page shows the ADO.NET objects created by the Data Form Wizard. The objDatasetDFW variable in the tray points at the DatasetDFW dataset created by the Data Form Wizard selections. In addition, the DataGrid control appears with custom formatting. Notice the formatting for the column headers.
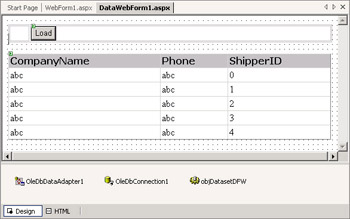
Figure 11-1: The Design view of a Web page automatically created with a few clicks in the Data Form Wizard
Right-clicking DataWebForm1.aspx in Solution Explorer and choosing Build And Browse compiles the page and opens a fresh copy of the page in a Browse window in Visual Studio .NET. This Browse window enables you to preview the operation of the page in a browser. Initially, only the Load button appears. The DataGrid control does not appear because it has no link to a data source. In essence, the control has no data to show. Clicking the Load button fills the objDatasetDFW dataset and binds it to the DataGrid control. This displays the current copy of the VBDotNetShippers table from the Northwind database in the DataGrid control on the page. I reinitialized the VBDotNetShippers table as described in Browsing and Manipulating Data with a Form section of Chapter 9 so that the table resembles Figure 11-2.
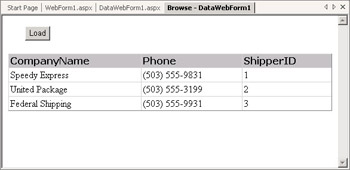
Figure 11-2: The VBDotNetShippers table from the Northwind database showing in the Web page from Figure 11-1
The Load button in DataWebForm1 is good for more than just initially populating the DataGrid control on the page. In a multiuser application (which is what Web applications typically are) users can click Load to refresh the contents of the DataGrid control to reflect the most recent updates to a database application. Therefore, remote users connecting to the database via the Web page can get the latest revisions made by an in-house staff connecting to the same database with both data access and data manipulation capabilities.
| Note | If you receive an error message when you attempt to run DataWebForm1 that indicates either you don t have permission to access the database file or the file cannot be locked, you need to adjust your security settings on the folder that contains the database file. In Windows Explorer, right click on the folder that contains the Northwind.mdb file. By default this is the Samples folder under C:\Program Files\Microsoft Office\Office10 for Access 2002 and C:\Program Files\Microsoft Office\Office for earlier versions of Access. Select Properties from the context menu. In the Samples Properties dialog box, select the Security tab. Click Add to add a group . In the Select Users, Computers, Or Groups dialog box, select the server on which the Northwind.mdb file is located as the location. Enter ASPNET in the Enter The Object Names To Select box and click Check Names. Click OK. Give the new group read and write permissions. |
Editing the HTML Behind a Wizard Page
Notice in Figure 11-1 that the Web page has both Design and HTML views. In fact, the HTML view precisely formats the Web page. Even without an in-depth grasp of HTML, adventurous Visual Basic .NET developers can make minor changes to the HTML behind a Web page to reformat the page in subtle ways. For example, Figure 11-2 shows the column header CompanyName without a space between the two words because the Data Form Wizard creates a column header that matches the data field name for the column in a data grid. However, you can modify the HeaderText property settings for one or more columns after the Data Form Wizard creates the HTML code for the DataWebForm1.aspx page. This approach enables you to benefit from the automatic design interface provided by the Data Form Wizard but still perform some customization beyond the standard page layout.
You can expose the HTML behind a Web page by clicking the HTML button shown in Figure 11-1. The following excerpt shows a segment of the code generated by the Data Form Wizard for the page shown in Figure 11-2. The general format of HTML is to use an opening and closing tag with other tags optionally embedded between them. Within any tag, you can have zero or more attributes. In HTML, tags correspond roughly to Visual Basic .NET objects, and attributes function similarly to properties. Most of the tags in the following excerpt wrap across multiple lines. For example, the opening asp:DataGrid tag extends across four lines.
Within the asp:DataGrid opening and closing tags are Columns tags. Three asp:BoundColumn tags reside within the Columns tags. Each asp:BoundColumn tag has a couple of attributes. One of these attributes has the name HeaderText . For the asp:BoundColumn tag with a DataField attribute of CompanyName , introduce a space between Company and Name in the corresponding HeaderText attribute. After inserting the space, save the page. Then, right-click the page in Solution Explorer, and choose Build And Browse. This opens the page with the new HeaderText attribute setting with the CompanyName column from the VBDotNetShippers table.
<asp:DataGrid runat ="server" DataKeyField="ShipperID" PageSize="5" AutoGenerateColumns="False" Height="50px" Width="100%" DataMember="Shippers" ID="masterDataGrid" CellPadding ="2" DataSource= ˜<%# objDatasetDFW %> ˜> <Columns> <asp:BoundColumn DataField="CompanyName" HeaderText="CompanyName"> </asp:BoundColumn> <asp:BoundColumn DataField="Phone" HeaderText="Phone"> </asp:BoundColumn> <asp:BoundColumn DataField="ShipperID" HeaderText="ShipperID"> </asp:BoundColumn> </Columns> <HeaderStyle Font-Names="Verdana" Font-Bold="True" Height="10px" ForeColor="Black" BackColor="Silver"> </HeaderStyle> </asp:DataGrid>
Editing the Visual Basic Code Behind a Wizard Page
Another way of leveraging the code generated by the Data Form Wizard is to edit the Visual Basic .NET code behind the form. DataWebForm1.aspx does not initially show the DataGrid control until a user clicks the Load button. In many applications, you want the data to be available when the form opens ” especially with a page such as DataWebForm1.aspx, whose sole purpose is to show data. To achieve this functionality, simply move the code behind the click event for the Load button to the load event for the Web page.
If you select the Load button in Design view, you can determine from the Properties window that its ID property is buttonLoad . Therefore, the button click event procedure has the name buttonLoad_Click . Double-clicking the Load button in Design view opens the Code window for DataWebForm1 to the buttonLoad_Click procedure. This window also shows that the Page_Load procedure is empty (except for a default comment). To cause the DataWebForm1.aspx page to open with data showing in its DataGrid control, move the code from the buttonLoad_Click event procedure shell to the Page_Load event procedure shell. The following listing shows how the Page_Load event procedure looks after the move. The buttonLoad_Click procedure is, of course, empty after the move.
Private Sub Page_Load(ByVal sender As System.Object, _ ByVal e As System.EventArgs) Handles MyBase.Load Try Me.LoadDataSet() Me.masterDataGrid.SelectedIndex = -1 Me.masterDataGrid.DataBind() Catch eLoad As System.Exception Me.Response.Write(eLoad.Message) End Try End Sub
After the preceding edit, the page opens with data showing in its DataGrid control. However, there is no code behind the Load button. You have a couple of options at this point. First, you can select the button in Design view and either delete it or set its Visible property to False in the Properties window. Alternatively, you can copy the code in the Page_Load procedure into the click event procedure shell for the buttonLoad_Click procedure, which restores the buttonLoad_Click procedure to its initial state. At this point, it probably makes sense to revise the Text property setting for the Load button to Refresh .
EAN: 2147483647
Pages: 111