Network Scanners
| Network scanners are software tools that probe a network to determine the hosts present on the network. Network scanners also probe the discovered hosts to determine the TCP and UDP ports that are open. Furthermore, based on the response of the probes, scanners can identify the OS, the services that are running, and the associated security vulnerabilities present on the discovered hosts. Some scanners can also display the results in the form of graphical reports. Some of the most popular open source network scanners are as follows:
This chapter covers Nmap and Nessus because both are feature rich and under active development. Furthermore, both of these tools come pre-installed with the live CD-ROM based tool kits. Nmap ScannerNmap is highly versatile tool for scanning and enumerating networks. Nmap also looks for services that are running on hosts by scanning TCP and UDP ports. Often referred to as the Swiss army knife of security tools, Nmap is an integral part of every network security professional's tool kit. Nmap is pre-installed in all the live CD-ROM distributions listed in Table 7-1. The MS-Windows version is also available at the Nmap home page (http://www.Nmap.org). Some of the routine (and cumbersome) Netadmin tasks that Nmap can do are as follows:
In addition to using Internet Control Message Protocol (ICMP) ping scans for network discovery, Nmap can use other scanning techniques using TCP and UDP packets. These techniques enable network scanning even if ICMP traffic is blocked in a network. Caution The Nmap scans can trigger security alarms by intrusion detection systems (IDS). Additionally, Nmap scans can potentially crash certain TCP/IP stacks (or certain applications) of poorly designed systems. Many organizations have security policies that ban the use of network scanners such as Nmap. Always verify with the network operations and network security departments of the organization before using Nmap (or other security-related tools mentioned in this chapter). Nmap is a command-line tool and can be invoked through the command shell. The syntax is as follows: nmap [options] target hostname or ip address Example 7-1 shows Nmap scanning host 192.168.0.1. Example 7-1. Using Nmaproot@0[knoppix]# nmap 192.168.0.1 Starting Nmap 3.48 ( http://www.insecure.org/Nmap/ ) at 2004-11-04 00:26 CET Interesting ports on 192.168.0.1: (The 1656 ports scanned but not shown below are in state: closed) PORT STATE SERVICE 80/tcp open http Nmap run completed -- 1 IP address (1 host up) scanned in 3.900 seconds As highlighted in Example 7-1, Nmap scanned 1656 ports and reported an open port on the scanned target. Nmap also reported that the target is up. Note Some of the advanced Nmap options use special packets that do not conform to the TCP/IP standards. These nonstandard packets can only be created by using the raw socket capabilities of the OS. Hence, Nmap needs root privilege access to use the advanced scanning options. Nmap also provides a fast and efficient means of scanning the entire network. To specify a target network based on the length of the network mask, use the slash (/) option. For example, the nmap 192.168.10.0/24 command scans the entire class C network ranging from 192.168.10.0 to 192.168.10.255. You can also use the wildcard character asterisk (*) to specify matches. For example, the nmap 192.168.*.* command is similar to nmap 192.168.0.0/16. To scan only specific subnets or hosts in a larger network, Nmap allows the use of the hyphen (-) to specify ranges. For example, the nmap 192.168.35-79.0-255 command scans all the class C subnets that range from 192.168.35.0/24 to 192.168.79.0/24. Similarly, the nmap 192.168.35-79.99 command scans all the nodes with 99 as the host address in the subnet range of 192.168.35.0/24 to 192.168.79.0/24 (such as IP addresses 192.168.35.99, 192.168.36.99, 192.168.37.99 and all the way up to 192.168.79.99). Finally, you can use the comma (,) to specify individual hosts or networks. For example, the nmap 192.168.35,38,56.5,31 command scans the following hosts: 192.168.35.5, 192.168.35.31, 192.168.38.5, 192.168.38.31, 192.168.56.5, and 192.168.56.31. For more control and flexibility in scanning various network environments, Nmap provides several options. Some of these options are listed in Table 7-2.
The examples in the sections that follow highlight the utility of nmap as a versatile network scanner. These example are based on the options listed in Table 7-2 and explain nmap usage for routine Netadmin tasks. Scanning a NetworkTo scan a range of networks, you can use special characters, as discussed in the previous section. Consider the following three commands: nmap -v -sP 192.168.*.* nmap -v -sP 192.168.0-255.0-255 nmap -v -sP 192.168.0.0/16 All three commands scan the entire class B range of 192.168.0.0 to 192.168.255.255 and produce the output shown in Example 7-2. The output displays the result of the ping scan sent to each host address within the specified range. By using the v option (for verbose output), the display also reports the hosts that are down. Without using the -v switch, nmap displays only the hosts that are up. The -v option can be used in conjunction with any other nmap option to get more information from the nmap command output. Additionally, without the -v option, nmap displays the summary results after the scan is complete. With the use of the -v option, nmap starts displaying the scan results as they appear, instead of waiting until the end of the scan. You can use the -vv option for even more details. Also, note the -sP option, which specifies using an ICMP ping scan. Without this switch, nmap uses the default method of a TCP connect scan. In Example 7-2, the output is suppressed for the sake of clarity. Example 7-2. nmap Scanning a Class B Networkroot@0[knoppix]# nmap -v -sP 192.168.0.0/16 Starting Nmap 3.48 ( http://www.insecure.org/Nmap/ ) at 2004-11-04 00:26 PST Host 192.168.0.0 appears to be up. Host 192.168.0.1 appears to be up. Host 192.168.0.2 appears to be up. Host 192.168.0.3 appears to be up. Host 192.168.0.4 appears to be up. Host 192.168.0.5 appears to be up. ... Host 192.168.0.34 appears to be down. Host 192.168.0.35 appears to be down. Host 192.168.0.36 appears to be down. ... Host 192.168.2.233 appears to be up. Host 192.168.2.234 appears to be down. ... Host 192.168.12.5 appears to be up. ... Host 192.168.90.236 appears to be up. ... Host 192.168.135.237 appears to be up. ... Host 192.168.220.23 appears to be up. ... Host 192.168.224.139 appears to be up. Host 192.168.224.140 appears to be down. ... Host 192.168.255.1 appears to be up. ... Host 192.168.255.253 appears to be up. Host 192.168.255.254 appears to be up. Note that the version of Nmap in Example 7-2 is 3.48. Higher versions of Nmap also display the message authentication code (MAC) address and the vendor name (based on the MAC address). The remainder of this chapter is based on Nmap version 3.55, which is included with the Knoppix CD. Scanning TCP PortsThe network services running on host machines use TCP or UDP ports to communicate with other machines. For example, web services use TCP port 80 to listen for HTTP requests. The Netadmin can estimate the services running on the target hosts by scanning for open ports. Port scans are useful in discovering unneeded services that are running on the target host and verifying firewall configurations. Armed with the port scan results, the Netadmin can enhance network security through the following methods:
To scan the TCP ports on the hosts or the network, use the sT option, as shown in Example 7-3. You can also use the -sS, -sA, -sF, and -sX options for stealth scanning or when scanning through firewalls. Example 7-3. nmap Scanning TCP Ports root@0[knoppix]# nmap -sT 192.168.0.10 Starting nmap 3.55 ( http://www.insecure.org/nmap/ ) at 2004-11-06 11:19 EST Interesting ports on 192.168.0.10: (The 1657 ports scanned but not shown below are in state: closed) PORT STATE SERVICE 23/tcp open telnet 79/tcp open finger 80/tcp open http MAC Address: 00:50:73:21:D0:67 (Cisco SYSTEMS) Nmap run completed -- 1 IP address (1 host up) scanned in 6.068 seconds Note Unlike regular TCP scans, stealth scanning techniques only send a single TCP datagram to the target and do not establish the three-way TCP handshake. As a result, stealth scans can pass through some firewalls and often do not show up in the IDS logs. Scanning UDP PortsSeveral network services, such as Simple Network Management Protocol (SNMP), Remote Authentication Dial-In User Service (RADIUS), Windows file sharing, and so on, use UDP. But, unlike TCP, UDP is connectionless and does not use the three-way handshake. Therefore, nmap provides limited options for UDP scanning. Nonetheless, UDP scanning using the -sU option provides a list of UDP port numbers in the listening state on the target host. UDP scans also list the name of the services associated with the UDP ports. Similar to the TCP port scan, UDP port scan reports can help Netadmins to enhance network security. Example 7-4 shows a UDP scan on a target with IP address 192.168.0.100. Example 7-4. nmap Scanning UDP Ports root@0[knoppix]# nmap -sU 192.168.0.100 Starting nmap 3.55 ( http://www.insecure.org/nmap/ ) at 2004-11-06 11:13 EST Interesting ports on 192.168.0.100: (The 1475 ports scanned but not shown below are in state: closed) PORT STATE SERVICE 137/udp open netbios-ns 138/udp open netbios-dgm 445/udp open microsoft-ds MAC Address: 00:0D:56:DF:86:A6 (Dell PCBA Test) Nmap run completed -- 1 IP address (1 host up) scanned in 3.065 seconds Scanning a Port RangeBy default, Nmap scans all the ports from 1 through 1024. Nmap also scans ports that are listed in the nmap-services file. Therefore, scanning a large number of ports, especially for a larger subnet, is a time-consuming process. Moreover, the Netadmin might prefer to avoid scans on certain ports to prevent application malfunctions. (Nmap scans are known to crash certain applications and OSs.) Fortunately, similar to the options for scanning a range of IP addresses, Nmap also provides a method to specify port ranges, through the -p range option. You can specify the range using the starting and ending port numbers. Multiple ports or ranges can be separated by a comma. Example 7-5 shows nmap performing a TCP and UDP port scan. The ports to be scanned range from 25 to 50 and 51 to 120. Example 7-5. nmap Scanning a Range of Ports root@0[knoppix]# nmap -sT -sU -p 20-25,51-120 192.168.0.30 Starting nmap 3.55 ( http://www.insecure.org/nmap/ ) at 2004-11-06 11:17 EST Interesting ports on 192.168.0.30: (The 141 ports scanned but not shown below are in state: closed) PORT STATE SERVICE 21/tcp open ftp 22/tcp open ssh 23/tcp open telnet 25/tcp open smtp 53/tcp open domain 53/udp open domain 79/tcp open finger 80/tcp open http 110/tcp open pop3 111/tcp open rpcbind 111/udp open rpcbind MAC Address: 00:D0:59:17:77:46 (Ambit Microsystems) Nmap run completed -- 1 IP address (1 host up) scanned in 76.177 seconds Scanning Common PortsAs seen in the previous example, Nmap provides the option to scan a range of ports. However, it is difficult to efficiently summarize the port range through the CLI options. To address this issue, Nmap includes the nmap-services file, which contains a list of commonly used TCP and UDP port numbers along with the names of the associated services. Note that the nmap-services file is part of the Nmap installation and needs no user input. To perform a quick scan on common TCP ports listed in the nmap-services file, use the nmap command in conjunction with the -F option, as demonstrated in Example 7-6. Example 7-6. nmap Scanning Common Ports knoppix@ttyp0[knoppix]# nmap -F 192.168.0.100 Starting Nmap 3.55 ( http://www.insecure.org/Nmap/ ) at 2004-11-06 10:40 EST Interesting ports on 192.168.0.100: (The 1213 ports scanned but not shown below are in state: closed) PORT STATE SERVICE 135/tcp open msrpc 139/tcp open netbios-ssn 445/tcp open microsoft-ds 1025/tcp open NFS-or-IIS 3389/tcp open ms-term-serv MAC Address: 00:0D:56:DF:86:A6 (Dell PCBA Test) Nmap run completed -- 1 IP address (1 host up) scanned in 1.003 seconds By default, nmap always uses TCP scans. To scan common UDP ports, add the -sU option, as shown in Example 7-7. Example 7-7. nmap Scanning Common UDP Ports knoppix@ttyp0[knoppix]# nmap -sU -F 192.168.0.100 Starting Nmap 3.55 ( http://www.insecure.org/Nmap/ ) at 2004-11-06 10:40 EST Interesting ports on 192.168.0.100: (The 1005 ports scanned but not shown below are in state: closed) PORT STATE SERVICE 137/udp open netbios-ns 138/udp open netbios-dgm 445/udp open microsoft-ds MAC Address: 00:0D:56:DF:86:A6 (Dell PCBA Test) Nmap run completed -- 1 IP address (1 host up) scanned in 3.875 seconds Remote OS DetectionWhen probed by network scans, the TCP/IP stack of every OS replies with a signature response unique to that OS. The process of comparing the response against the known signature to determine the OS of the target device is called OS fingerprinting. nmap sends prebuilt probe packets to the target host and analyzes the signature to estimate the OS. To invoke the OS fingerprinting function, use the -O option. (Note: This is the letter O and not the number zero.) Example 7-8 shows nmap scanning a target with IP address 192.168.0.20 and correctly diagnosing it as a Cisco PIX Firewall running PIX OS 6.2 or higher. Example 7-8. OS Fingerprinting Using nmaproot@0[knoppix]# nmap -O 192.168.0.20 Starting nmap 3.55 ( http://www.insecure.org/nmap/ ) at 2004-11-06 11:44 EST Interesting ports on 192.168.0.20: (The 1656 ports scanned but not shown below are in state: closed) PORT STATE SERVICE 22/tcp open ssh 23/tcp open telnet 443/tcp open https 1467/tcp open csdmbase MAC Address: 00:07:50:57:E2:69 (Cisco Systems) Device type: firewall Running: Cisco PIX 6.X OS details: Cisco PIX Firewall running PIX 6.2 - 6.3.3 Nmap run completed -- 1 IP address (1 host up) scanned in 5.389 seconds Detailed OutputsBy default, Nmap shows the output onscreen after completing the scanning process. If the scan takes a long time, there might be no output for a while. By using the -v (verbose) option, Nmap shows the output onscreen as soon as the scanning begins. Also, the use of the -v option provides more details in the output. Users can specify the option more than once (-vv) to obtain even more details for the accompanying option. Like the other options, the verbose option can be used in conjunction with all other options. Example 7-9 shows the detailed output of guessing the OS of target 192.168.0.20. When compared to Example 7-8, the output provides more information. Example 7-9. Detailed nmap Outputroot@0[knoppix]# nmap -vv -O 192.168.0.20 Starting nmap 3.55 ( http://www.insecure.org/nmap/ ) at 2004-11-06 11:49 EST Host 192.168.0.20 appears to be up ... good. Initiating SYN Stealth Scan against 192.168.0.20 at 11:49 Adding open port 23/tcp Adding open port 1467/tcp Adding open port 443/tcp Adding open port 22/tcp The SYN Stealth Scan took 0 seconds to scan 1660 ports. For OSScan assuming that port 22 is open and port 1 is closed and neither are firewalled Interesting ports on 192.168.0.20: (The 1656 ports scanned but not shown below are in state: closed) PORT STATE SERVICE 22/tcp open ssh 23/tcp open telnet 443/tcp open https 1467/tcp open csdmbase MAC Address: 00:07:50:57:E2:69 (Cisco Systems) Device type: firewall Running: Cisco PIX 6.X OS details: Cisco PIX Firewall running PIX 6.2 - 6.3.3 OS Fingerprint: TSeq(Class=TR%IPID=I%TS=U) T1(Resp=Y%DF=N%W=1000%ACK=S++%Flags=AS%Ops=M) T2(Resp=Y%DF=N%W=800%ACK=S%Flags=AR%Ops=WNMETL) T3(Resp=Y%DF=N%W=1000%ACK=S++%Flags=AS%Ops=M) T4(Resp=N) T5(Resp=Y%DF=N%W=800%ACK=S++%Flags=AR%Ops=WNMETL) T6(Resp=Y%DF=N%W=400%ACK=S%Flags=AR%Ops=WNMETL) T7(Resp=Y%DF=N%W=C00%ACK=S++%Flags=UAPR%Ops=WNMETL) PU(Resp=N) TCP Sequence Prediction: Class=truly random Difficulty=9999999 (Good luck!) TCP ISN Seq. Numbers: DBDE7435 91F6251F DDED40C8 EAFD9725 5F5B10D8 94B552C6 IPID Sequence Generation: Incremental Nmap run completed -- 1 IP address (1 host up) scanned in 5.363 seconds Tip nmap commands can be difficult for new users to remember. Knoppix-STD also includes a graphical front end for nmap called nmapfe. This front end is found in the Vulnerability Assessment menu. Nessus ScannerNessus is an open source network scanner with the additional capability of scanning known vulnerabilities present on the target hosts. Vulnerabilities are the weaknesses in an operating system or software that can potentially be exploited by malicious users with an intent to cause system damage. Network vulnerability scanners such as Nessus provide security vulnerability detection and reporting for networks and host systems. The Nessus operation can be summarized in the following four steps:
Nessus uses a client/server architecture with the server (nessusd) listening for incoming connections from the clients. The clients instruct the server to perform security tests. The following features have led to the popularity of Nessus:
Nessus comes preinstalled on all the live CD-ROMs listed in Table 7-1. This discussion is based on Nessus that is included with the Knoppix CD-ROM, but it should be applicable to the Knoppix-STD and NST CDs as well. The steps involved in assessing the vulnerability of a network using Nessus are as follows:
Running the Nessus Server and ClientThe Knoppix CD-ROM provides a single-click option to start the Nessus server and client. To launch Nessus, click K menu > System > Security > Nessus Security Tool. While the server, nessusd, launches in the background, the Nessus Setup page appears on-screen, as shown in Figure 7-2. For ease of configuration and usage, the setup page is organized into several tabs. This page is used for configuring the client to specify the target and scanning options. The server is listening on TCP port 1241 for an active connection from the Nessus client. Figure 7-2. Nessus Setup On the Nessusd host tab of the Nessus Setup page, enter the username knoppix and the password knoppix; then click the Log in button. The Plugins tab, as shown in Figure 7-3, provides a range of security checks, grouped by vendor and services. The Enable all option includes the dangerous tests that can crash the target host or create a DoS situation in a network. For nondestructive testing in a production network, always click the Enable all but dangerous plugins button. Figure 7-3. Nessus Setup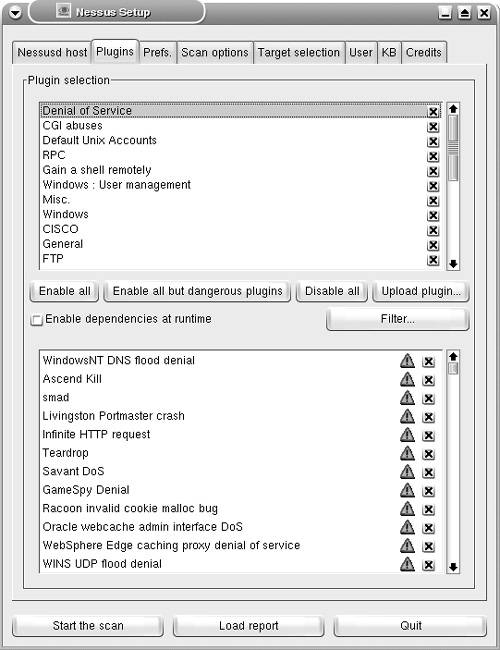 The Prefs. tab on the setup page provides fine-tuning for your scanning preference. By default, Nessus uses an Nmap TCP connect scan. You can specify a SYN or a FIN scan because they are less likely to be detected by intrusion detection systems. Next, you can use the Scan options tab on the setup page to specify the port range to be scanned on the target host. Specifying this range is important for Nessus to recognize services running on nonstandard ports. The default range of 1-8000 works well for most situations. You should also select the Safe checks check box when testing in a production environment. Selecting this check box forces Nessus to use less intrusive scans. The reports can be less accurate, but the chances of disrupting services are minimized. The Port scanner section provides the port scan options to be used by Nessus. The Ping the remote host check box should be deselected when scanning hosts behind a firewall, if ICMP is blocked. Figure 7-4 shows the Scan options tab with the settings discussed in this paragraph. Figure 7-4. Nessus Setup Note For more information on any option on the setup page, hover your mouse pointer over that option to reveal a popup box with the embedded comments. The Target selection tab allows you to specify the target to be tested. You can specify a host name or IP address. Multiple hosts can be specified by separating them with commas, as shown in Figure 7-5. You can also specify a range of IP addresses separated by a hyphen, such as 192.168.10.10-25. To start the scanning, click the Start the scan button. Figure 7-5. Nessus Setup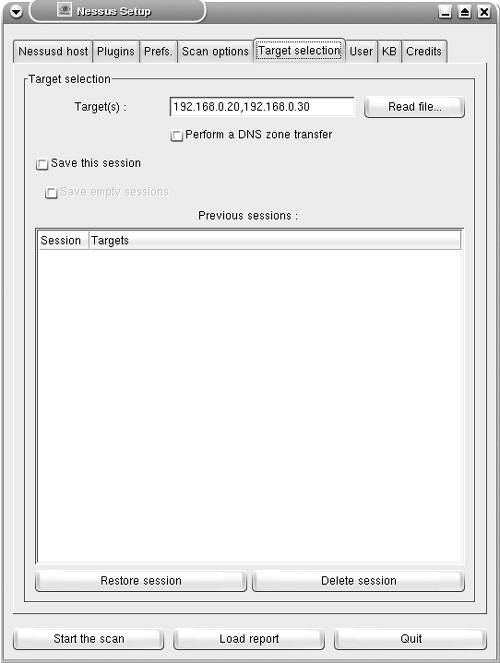 Generating Nessus ReportsAfter finishing the scan, Nessus generates reports with a list of vulnerabilities. Details for each reported vulnerability are presented as security warnings and security notes, as shown in Figure 7-6. Figure 7-6. Nessus Report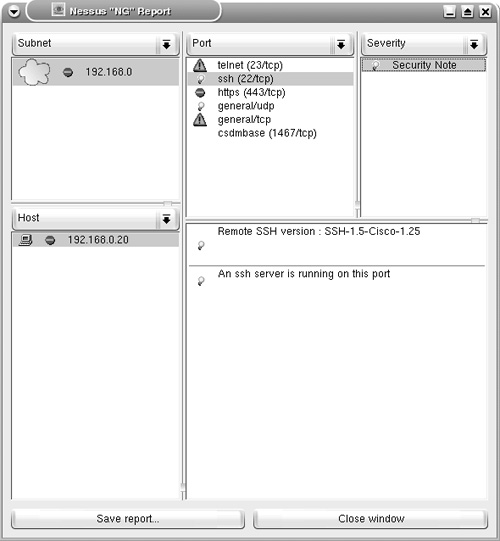 The reports are not saved and are lost after closing the program. To save the reports for future use, click the Save report button. In the Report file format drop-down list, choose HTML with Pies and Graphs to save the reports in HTML format with pie charts and graphs, as shown in Figure 7-7. Additionally, you can specify the location of the destination folder to store the HTML reports. Figure 7-7. Saving Nessus Reports The HTML reports are saved in web-server-ready format and can be viewed using a standard web browser, as shown in Figure 7-8. Figure 7-8. Nessus HTML Report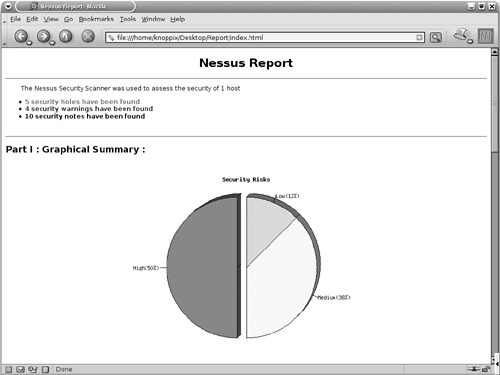 Note Live CD-ROMs such as Knoppix automatically detect and mount the local hard drives present on the host computer. Newer versions of Knoppix allow writing on the NTFS partition of the local drives. You can benefit from this feature to save the Nessus reports directly to the hard drive. You can also start the SAMBA server on Knoppix or use the Lin Neighborhood tool in Knoppix to transfer reports to a Windows machine. A Word of Caution about NessusNessus users should be careful about the following items:
Finally, good Netadmin practices suggest the following:
The suggested good practices are equally applicable to Nmap scans. On the other hand, various security mechanisms, such as firewall access lists, rate limiting, private VLANs, and so on, can adversely affect the capability of both Nmap and Nessus. |


EAN: 2147483647
Pages: 106