Securing Remote Connections to Cisco Devices Using Secure Shell (SSH)
| Telnet has been around since the early days of TCP/IP. Hence, it is the most widely used remote connection method; however, Telnet is inherently insecure because the packets are sent in clear text. This results in vulnerability to the capture of usernames and passwords through commonly available packet analyzer (popularly known as sniffer) programs. Note For more information on packet analyzer programs, refer to Chapter 7, "Network Security Testing." Secure Shell (SSH) was created to overcome this inherent weakness. SSH provides encryption of the session using a cryptographic mechanism, making the session more secure against man-in-the-middle attacks and IP spoofing. SSH uses TCP port 22. Cisco products support only SSH version 1.0, although limited support for version 2.0 was introduced in Cisco IOS Release 12.1(19)E and higher. Beginning with IOS Release 12.3(4)T, the SSH version 2.0 server is supported. Note A Cisco Security Advisory has reported multiple SSH vulnerabilities. Refer to the following SSH Security Advisory page for more information: http://www.cisco.com/en/US/tech/tk583/tk617/tech_security_advisories_list.html Establishing an SSH connection from a PC to a Cisco device involves the following tasks:
Cisco Device Configuration for SSHCisco devices offer support for the SSH protocol, but the factory default configuration is not SSH ready. Use the following steps to enable SSH on routers with Cisco IOS Release 12.1 and later:
The router configuration snippets shown in Example 1-5 detail the relevant commands for starting an SSH server on an IOS device. Example 1-5. IOS Configuration for SSHhostname Router-Dallas username stevepope password cisco123 ip domain-name admin.stevepope.com ! crypto key generate rsa ip ssh time-out 60 ip ssh authentication-retries 2 ! line vty 0 4 transport input ssh Note Refer to the Tech notes section of the SSH technology page on Cisco.com for more details on specific hardware platforms. You can find this information at the following URL: http://www.cisco.com/en/US/tech/tk583/tk617/tech_tech_notes_list.html SSH Client InstallationTo connect to a Cisco device using the SSH protocol, an SSH client should be installed on the PC. Table 1-4 lists the popular and widely used SSH clients based on the operating system used.
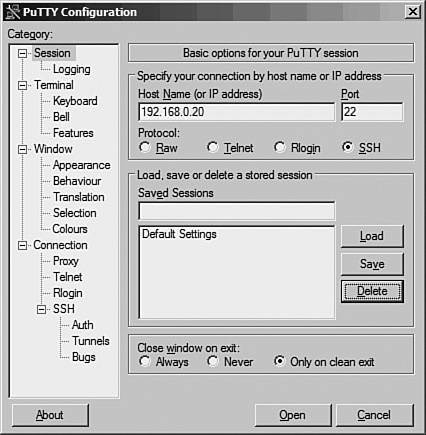
Windows-Based SSH Client: PuTTYPuTTY is one of the popular SSH clients for Windows 9X/Me/2000/XP. To configure PuTTY, perform the following steps:
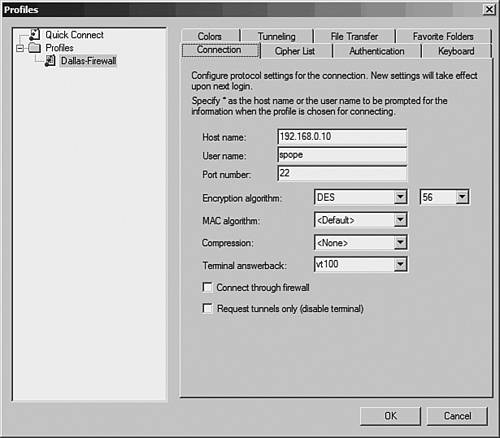
Windows-Based SSH Client: SSH Secure Shell ClientThe noncommercial version of SSH Secure Shell Client for Windows is available at http://www.ssh.com. Be sure to read the licensing terms before using the product. Before using the SSH Secure Shell Client for Windows, you must download the installation files from the website (http://www.ssh.com) and install them in MS-Windows. To configure the SSH Secure Shell Client, perform the following steps:
SSH Using the Linux ClientMost of the Linux distributions come prebundled with the command-line SSH client utility. It can also be downloaded freely from http://www.openssh.com or http://www.ssh.com. To configure the SSH Linux client, open a command shell and enter the following command to connect to a Cisco IOS-based router or switch: ssh -l username -c 3DES ip-address Note Replace 3DES with DES if the IOS only supports DES encryption. For example, to connect to a router as user stevepope with IP address 192.168.0.10, you would enter the following code: [user@linuxbox]$ ssh -l -c 3DES stevepope 192.168.0.10 To connect to a PIX Firewall with IP address 192.168.0.20, you would enter the following code: [user@linuxbox]$ ssh -l pix -c 3DES 192.168.0.20 SSH Using the Cisco IOS Device as an SSH ClientAfter the IOS based device is configured for accepting inbound SSH connections, it can also be used as an SSH client to initiate an SSH connection to other Cisco devices. For example, to connect to a remote router 10.10.10.46 with username stevepope, you would enter the following code: Router-Dallas# ssh -l stevepope -c 3des 10.10.10.46 |
EAN: 2147483647
Pages: 106