Connecting to Cisco Devices for Configuration
| The first step in configuring any Cisco device is to physically connect the device and the configuring computer. This connectivity can be accomplished through one of the following mechanisms:
Note In-band Versus Out-of-band: Out-of-band signaling involves using control signals to access a path outside the one used by the data signal. For example, console ports use a separate cable from the Cisco device to the configuring computer's serial port. This port does not carry LAN/WAN traffic that flows through the router. In-band signaling uses the same path for data and control signals. For example, when a computer establishes a Telnet session with the router for configuration, the Telnet traffic is part of the LAN/WAN traffic that flows through the router. Local Connection Using a Console InterfaceThe console connection consists of the following items:
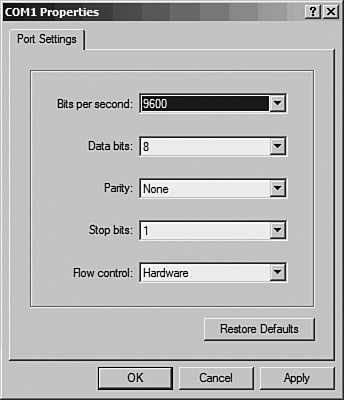
Some older Cisco devices that have a non-RJ-45 port require the use of a connector (also called an adapter or converter). Likewise, newer laptops do not have COM ports. You should use a USB to serial port adapter to connect the laptop to the console cable. At the terminal end, the console cable goes into the serial port adapter (DB9 to RJ-45 adapter), which in turn connects to the serial port. Figure 1-1 depicts console cable details. Figure 1-1. Cisco Console Cable Connection Note For more information on cabling for console ports, refer to the article "Cabling Guide for Console and AUX Ports," which you can find at the following URL: http://www.cisco.com/en/US/products/hw/routers/ps332/products_tech_note09186a0080094ce6.shtml The connection through the console port, Telnet, or SSH provides a text-based interface called the command-line interface (CLI) for configuring the device. This CLI can be used to view device statistics and parameters. To use a PC or laptop computer as a terminal, it should be loaded with terminal emulation software for serial communication. The configuration settings on the software should correspond to those on the Cisco device. Table 1-1 shows the default console settings for most Cisco devices.
To use the COM port on your computer, you need a software application. Such software application tools are also referred to as terminal emulation software. Although the choice of the terminal emulation software depends on the operating system and your preference, Table 1-2 lists the more popular terminal emulation software packages.
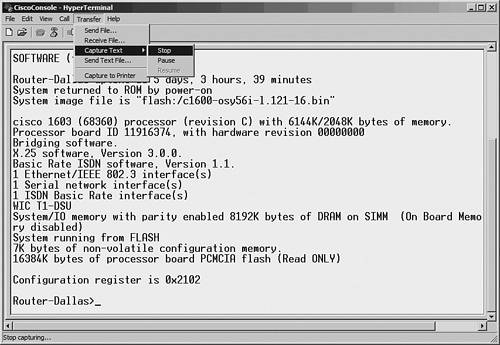
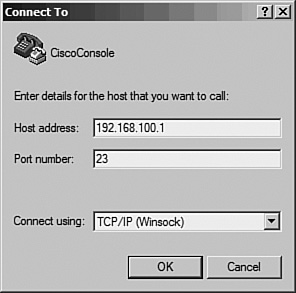
Using Windows-Based Console ToolsHyperTerminal, by Hilgraeve Inc.(http://www.hilgraeve.com), as shown in Figure 1-2, comes preinstalled with Windows 95/98/Me/2000/XP. HyperTerminal is the terminal emulation software most commonly used for console connections. Figure 1-2. HyperTerminal Software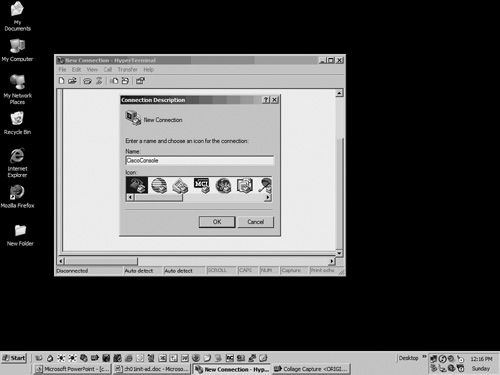 Assume that COM1 of the Windows-based PC is connected to the console port of the device. To configure the PC for a Cisco console connection, follow these steps:
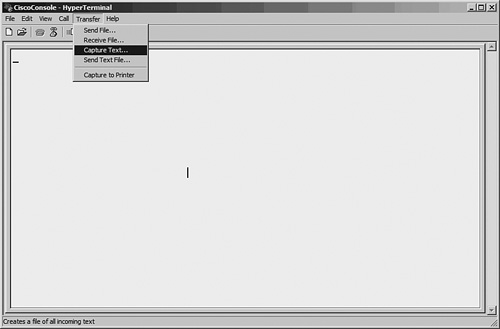
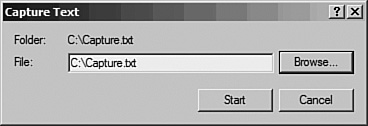
It is common networking practice to document the configuration process or record the output of a command. The copy-and-paste method is a quick and easy way to accomplish this. However, this method can be cumbersome for copying a large quantity of data. Hyper-Terminal has a built-in feature, called Capture Text, that allows you to save the entire session directly to a text file. The following steps are involved in using Capture Text:
Caution Securing a Console Connection: In addition to enforcing physical security, always secure the console and AUX port by using nondictionary and difficult-to-guess passwords. Also, use the exec-timeout command for automatic termination of inactive console connections. Using Linux-Based Console ToolsThe Linux community is more inclined to use CLI-based tools. For a new Linux user, the CLI can be challenging. Fortunately, Linux features both CLI- and GUI-based tools for terminal emulation. This section features the following Linux-based terminal emulation tools:
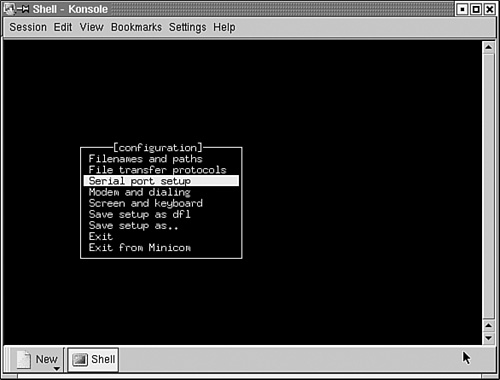
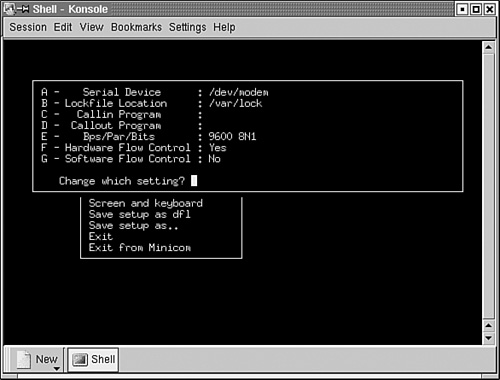
Minicom for Console ConnectionsMinicom is often called HyperTerminal for Linux. Although Minicom is CLI-based, its ease of use and flexibility make it popular open source terminal emulation software. Minicom is included with most Linux distributions; it can also be downloaded from the following website:
The configuration steps for Minicom are as follows:
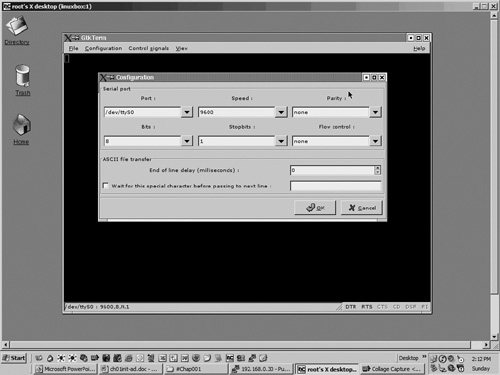
Example 1-1. Console Session Through Minicom Welcome to minicom 2.1 OPTIONS: History Buffer, F-key Macros, Search History Buffer, I18n Compiled on May 18 2003, 22:13:42. Press CTRL-A Z for help on special keys Router>show ? backup Backup status cca CCA information cdapi CDAPI information cef Cisco Express Forwarding class-map Show QoS Class Map clock Display the system clock compress Show compression statistics controllers Interface controller status crypto Encryption module --More-- To begin capturing data, press Ctrl-a and then press l. The system prompts you for the destination file. Then press Enter to choose the default filename of minicom.cap. To end the capture, press Ctrl-a, l again. To exit the program, press Ctrl-a, q. Note minicom: cannot open /dev/ttySO: Permission denied This error message in Minicom indicates that the user has insufficient permission. While the user is logged in as root, issuing the following command gives the required permission: chmod 666 /dev/ttyS0 The same solution applies to a Permission denied or Line in use error message while using the cu tool, which is discussed in next section. Using cu for Console ConnectionsAnother serial communication software tool for Linux is cu, which is part of the UUCP (UNIX-to-UNIX Copy Program). To connect to the Cisco device through the console connection, open a terminal session on the Linux PC and enter the following command: cu -l /dev/ttyS0 -s 9600 To exit, enter ~. (a tilde followed by a period). Example 1-2 shows the console session using cu on the Linux computer with the console cable connected to COM1. Example 1-2. Console Session Through cuanand@linuxbox:~$ cu -l /dev/ttyS0 -s 9600 Connected. Router>show ip interface brief Interface IP-Address OK? Method Status Protocol BRI0 unassigned YES NVRAM administratively down down BRI0:1 unassigned YES unset administratively down down BRI0:2 unassigned YES unset administratively down down Ethernet0 unassigned YES NVRAM administratively down down Serial0 unassigned YES NVRAM administratively down down Router> Router>~. Disconnected. anand@linuxbox:~$ Using GtkTerm for Serial CommunicationsGtkTerm is another Linux-based serial communication software tool that has a GUI similar to HyperTerminal. The steps for using GtkTerm are as follows:
Remote Connection Using TelnetTelnet, a TCP-based protocol using port 23, is most commonly used for remote connectivity. While console connection provides a simple way to configure the device, it has one major limitation the length of the console cable. The Telnet protocol overcomes this limitation with its quick and easy functionality, allowing remote logins to the device for viewing or changing configurations. You can initiate a Telnet session from the MS-Windows, Linux, Cisco CatOS, or IOS command shells. To connect to a remote device through the network, enter the following command at the command prompt: telnet ip-address-of-the-remote-device Tip If a remote host you are trying to Telnet to is unreachable, your Telnet session will hang until the timeout value is reached. To save time, check the network connection to the target before initiating a Telnet connection. You can use the ping utility to do this. You can also use the host name instead of the IP address to Telnet or ping to the remote host, provided that the host is listed under the DNS. Most Cisco devices are not Telnet ready with the out-of-the-box default configuration. Each hardware platform has different command and configuration parameters for enabling the built-in Telnet daemon. Refer to the Cisco documentation CD-ROM (also known as the UniverCD) that is shipped with every Cisco product. You can also refer to the Cisco documentation website (http://www.cisco.com/univercd/home/home.htm), which provides information similar to that found on the UniverCD. Tip Cisco IOS has a built-in Telnet client, too. To connect to a different device from the IOS CLI, enter telnet ip-address or simply type the IP address without the word telnet. In the scenario shown in Figure 1-11, the network administrator is trying to access a remote router with IP address 192.168.100.1 from her laptop with IP address 10.1.1.26. Figure 1-11. Network Administrator Accessing a Remote Router The network administrator opens a command-line session on the Linux laptop and enters telnet 192.168.100.1 to connect to the remote router with IP address 192.168.100.1. To end the Telnet session, the network administrator uses the exit command. Example 1-3 shows the output of the Telnet session. Note the output in the fourth line. In this case, pressing ^] (pressing the Ctrl and ] keys together) can help the user temporarily leave the current session without disconnecting. Example 1-3. Telnet Sessionnetadmin@linuxbox:~$ telnet 192.168.100.1 Trying 192.168.100.1... Connected to 192.168.100.1. Escape character is '^]'. User Access Verification Password: Router>exit Logoff Connection closed by foreign host. Tip Linux users can log Telnet sessions by using the tee command with the pipe options, as follows: telnet host-ip-address 2>&1 | tee text-file For example: telnet 192.168.10.10 2>&1 | tee routerlog.txt MS-Windows users can use the set logfile filename option within the Telnet utility, as follows: c:\windows\system32>telnet Welcome to Microsoft Telnet Client Escape Character is 'CTRL+]' Microsoft Telnet> set logfile routerlog.txt Log file : routerlog.txt Client logging on Microsoft Telnet> open 192.168.10.10 Connecting To 192.168.10.10... After the Telnet session is over, you can read the text file (routerlog.txt, in this example) using any text editor. The following software allows you to use a GUI-based Telnet client in MS-Windows:
Linux does not offer a good GUI client for Telnet. This section discusses HyperTerminal Private Edition (HTPE). The HTPE (http://www.hilgraeve.com) is a freely available software tool that has more functionality than the one preinstalled with Windows 9X/Me/XP/2000. HTPE features a built-in Telnet client that facilitates remote logins to network devices. This feature simplifies device configuration because the network administrator can access multiple devices through the same window. HTPE also provides the network administrator with advanced tools, such as file capture and macros (as discussed later in this chapter in the "Windows-Based Macro Tools" and "Linux-Based Macro Tools" sections). To use HTPE to establish a Telnet session, follow these steps:
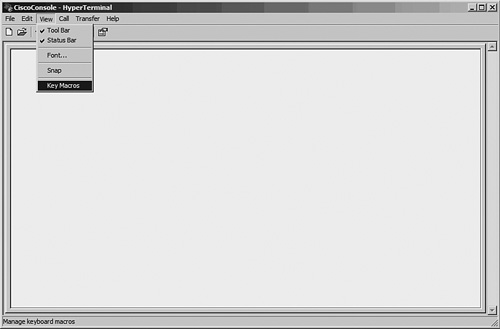
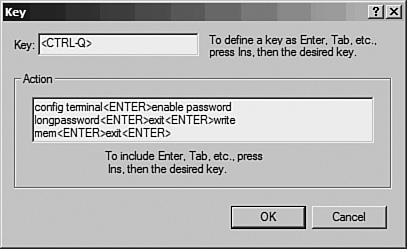
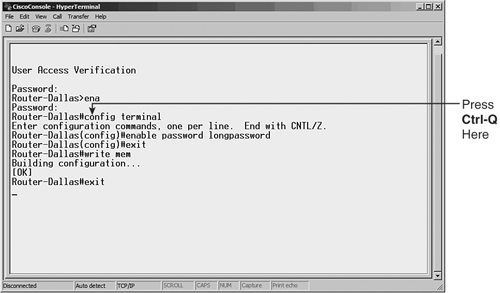
Automating Tasks Using MacrosThe routine tasks performed by Netadmins often consist of similar steps and commands. Netadmins can save time by automating such repetitive tasks. Consider a typical case of a network administrator trying to change enable passwords on all the remote routers for security reasons. The steps involved are similar for all the routers, as shown in Example 1-4. In this example, the enable password for the router was changed from password1 to longpassword. Example 1-4. Telnet SessionC:\WINNT>telnet 192.168.100.1 User Access Verification Password: Router>enable Password: Router#config terminal Enter configuration commands, one per line. End with CNTL/Z. Router(config)#enable password longpassword Router(config)#exit Except for the first part of the Telnet connection and authentication, the remaining steps (as highlighted) would be the same for all remote routers. These identical configuration steps can be automated using a script or a macro tool. Windows-Based Macro ToolHyperTerminal Private Edition has a powerful, easy-to-use scripting feature called macro. This feature can help the network administrator automate repetitive tasks. The process of creating a macro in HTPE is simple and does not require knowledge of a scripting language or syntax. It allows the creation of multiple macros, which can be invoked by pressing different key combinations. To configure HTPE and define a new macro, perform the following steps:
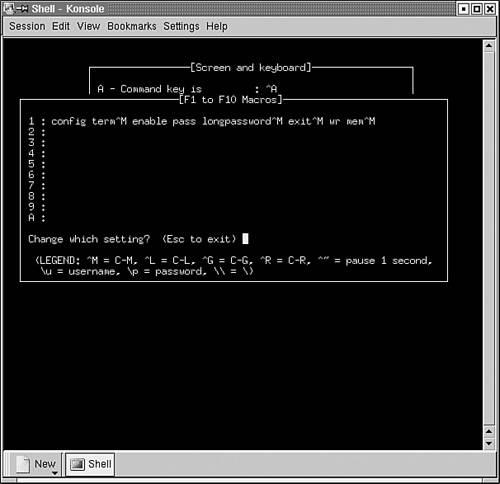
Linux-Based Macro ToolsLinux-based terminal emulation tools provide macro functionality, too. However, the configuration steps for Minicom and GtkTerm are different than those for the Windows operating systems. Macros in MinicomLinux-based Minicom also provides macro functionality. However, Minicom is limited to ten macros; these macros are invoked by pressing the function (F1 F10) keys. To configure a macro, perform the following steps:
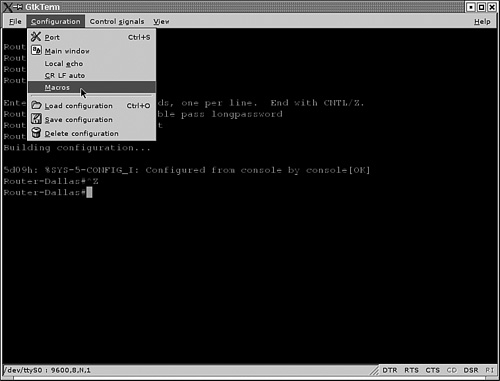
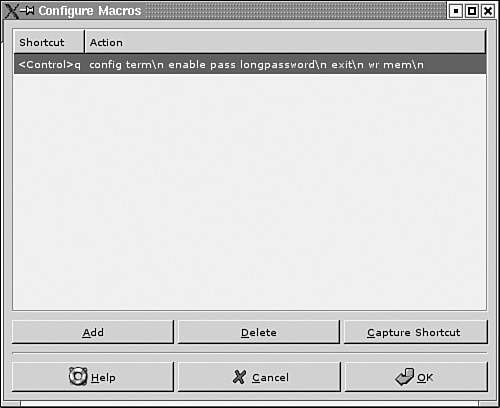
Macros in GtkTermGtkTerm also provides easily configurable macros. To create a GtkTerm macro based on Example 1-4, follow these steps:
Warning Exercise caution when choosing the shortcut key combination for invoking macros. Both MS-Windows and Linux have predefined shortcut keys such as Ctrl-V or Alt-F2. Using one of the predefined shortcut keys can create unwanted results or misconfigurations. |


EAN: 2147483647
Pages: 106