Creating a COM Add-in for Visio
3 4
You can create your own Component Object Model (COM) add-ins in essentially two ways:
- From within Microsoft Visio or a Microsoft Office application, use Microsoft Visual Basic for Applications (VBA) with Microsoft Office Developer (version 2000 or later).
- Use an external development tool, such as MicrosoftVisual Basic or MicrosoftVisual C++ (versions 5.0 and later).
Note
This chapter covers implementing COM add-ins using add-in designers in VBA and Visual Basic. For information about implementing COM add-ins in C++, see the Microsoft Developer Network (MSDN) Web site at msdn.microsoft.com.
Working with Add-in Designers
An add-in designer is file included with the template project that helps you create and register a COM add-in. You can create a COM add-in without including an add-in designer, but it simplifies the process of creating and registering the add-in. You can use an add-in designer to specify important information for your COM add-in:
- The name and description of the COM add-in
- The application the COM add-in will run in
- How the COM add-in loads in the application
Similar to forms in a Visual Basic or VBA project, an add-in designer has a user interface component and an associated class module. The user interface component is visible only to the developer at design time; it is never visible to the user when the add-in is running. You can think of the add-in designer as a sort of dialog box where you specify settings for an add-in.
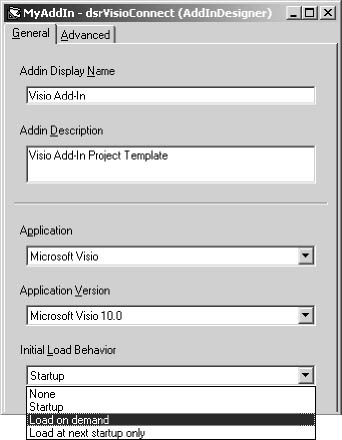
Figure 23-1 The Visio add-in designer template.
The class module contains the events that occur when the add-in is loaded or unloaded. You can use these events to integrate the add-in into the application.
When you compile your add-in, the information you provide to the add-in designer is used to properly register the DLL as a COM add-in. The add-in's name, description, and initial load behavior setting are written to the Windows registry. The add-in's host application reads these registry entries and loads the add-in accordingly.
Note
Ifyou intend to create a COM add-in that works with more than one Office application, you will need to configure a designer for each host application. For more information on creating add-ins that work in multiple Office applications, see "Creating COM Add-ins for Multiple Applications" in the Microsoft Office XP Developer's Guide, Microsoft Press, 2001.
Configuring an add-in designer
To create your add-in, you first must specify the options you want on the General tab of the add-in designer, as described in the following table.
General tab options for the add-in designer
| Option | Description |
| Addin Display Name | The name that will appear in the COM Add-Ins dialog box in Visio and Microsoft Office applications. The name you supply should be descriptive to the user. If the name will be taken from a resource file specified in the Satellite DLL Name box on the Advanced tab, it must begin with a number sign (#), followed by an integer specifying a resource ID within the file. |
| Addin Description | Descriptive text for a COM add-in, available from VBA in the Description property of the COMAddIn object. If the description is to come from a resource file specified in the Satellite DLL Name box on the Advanced tab, it must begin with a number sign (#), followed by an integer specifying a resource ID within the file. |
| Application | The application in which the add-in will run. This list displays applications that support COM add-ins. |
| Application Version | The version of the application in which the add-in will run. |
| Initial Load Behavior | The way that the add-in loads in the application. The list of possible settings comes from the Windows registry. Commonly used behaviors include Startup and Load on demand. |
The Advanced tab of the add-in designer makes it possible for you to specify a file containing localized resource information for the add-in, and to specify additional registry data.
Advanced tab options for the add-in designer
| Option | Description |
| Satellite DLL Name | The name of a file containing localized (translated) resources for an add-in; the file must be located in the same folder as the registered add-in DLL. |
| Registry Key for Additional Add-in Data | The registry subkey to which additional data is to be written. |
| Add-in Specific Data | The names and values to be stored in the registry subkey. Only String and DWORD type values are permitted. |
Using add-in designers in VBA
One way to create your own COM add-ins in Microsoft Visio is to use VBA with Microsoft Office Developer (versions 2000 or later).
COM add-ins created with Office Developer are packaged as dynamic-link libraries (DLL files) and are registered so that they can be loaded by Office applications.
To add an add-in designer to your VBA project
- On the File menu, click New Project.
- In the New Project dialog box, select Add-In Project.
The add-in designer provides several properties that can be set to define the attributes of your add-in, including Name, Description, and Load Behavior. It also provides several events that can be used to add code, such as OnConnection, OnStartupComplete, and OnDisconnection.
The code you write for your COM add-in depends on what you want the add-in to do, as well as which application the add-in is for. Each of the applications that can use COM add-ins exposes its extensibility structure using its object model; you can view the object model for your particular application in the Object Browser.
Using the Visio add-in designer template in Visual Basic
If you plan to use Visual Basic, you can use the Visio add-in designer template to create your COM add-in. Files for the Visio add-in designer template are provided on the Developing Microsoft Visio Solutions CD. When you copy these files into your Projects folder for Visual Basic, the Visio Addin project becomes available to you in the New Projects dialog box.
Like the other add-in designers in Visual Basic or Office Developer, the Visio add-in designer template provides several properties that can be set to define the attributes of your add-in, including Name, Description, and Load Behavior. It also provides several events that can be used to add code, such as OnConnection, OnStartupComplete, and OnDisconnection.
To install the Visio add-in designer template for use in Visual Basic
- Copy the following files from the Developing Microsoft Visio Solutions CD: VisioAddin.dsr, VisioAddin.dca, and Visio Addin.vbp.
- Paste the files into the Projects folder in the following path on your hard disk: \Program Files\Microsoft Visual Studio\VB98\Template\Projects.
To use the Visio add-in designer template in Visual Basic
- Open Visual Basic.
- On the File menu, click New Project.
- In the New Projects dialog box, choose Visio Addin.
The Visio add-in designer template is added to your project. By default, the project is named MyAddIn and a designer class module named dsrVisioConnect appears in the project.
Note
You can choose the Addin project in the New Projects dialog box; however, it will contain code for developing a COM add-in for Visual Basic that you will need to edit to make the add-in work in Visio. If you use the Visual Basic Addin project, be sure to set a reference to the Microsoft Office 10.0 object library and use the COMAddIn object from the library.
The following code is provided for you in the Visio add-in designer template to help you get started:
Option Explicit Public VisioApp As Visio.Application 'This method is called when Visio loads the add-in. Private Sub AddinInstance_OnConnection(ByVal Application As Object, _ ByVal ConnectMode As AddInDesignerObjects.ext_ConnectMode, _ ByVal AddInInst As Object, custom() As Variant) On Error GoTo error_handler 'Save the Visio instance. Set VisioApp = Application 'Set a breakpoint and test various add-in 'objects, properties and methods. Debug.Print VisioApp.ProductName Exit Sub error_handler: MsgBox Err.Description End Sub 'This method is called when Visio unloads the add-in. Private Sub AddinInstance_OnDisconnection(ByVal RemoveMode As _ AddInDesignerObjects.ext_DisconnectMode, custom() As Variant) On Error Resume Next Set VisioApp = Nothing End Sub
Specifying Load Behavior
When a COM add-in has been properly registered, it is available to whatever applications are specified in the add-in designers that the project contains. The registered COM add-in display name appears in the COM Add-Ins dialog box; if it does not, click Add to browse for the add-in DLL and add it to the list.
Selecting the check box next to an add-in in the COM Add-Ins dialog box loads (connects) the add-in and makes it available to the user; clearing the check box unloads (disconnects) the add-in, and it cannot be run.
As the developer, you specify the default setting for loading a COM add-in. You do this in the Initial Load Behavior list in the add-in designer.
Initial Load Behavior settings
| Setting | Behavior |
| None | The COM add-in is not loaded when the application starts. It can be loaded in the COM Add-Ins dialog box or by setting the Connect property of the corresponding COMAddIn object. The value for None is 0. |
| Startup | The add-in is loaded when the application starts. Once the add-in is loaded, it remains loaded until it is explicitly unloaded. The value for Startup is 3. |
| Load on demand | The add-in is not loaded until the user clicks the button or menu item that loads the add-in, or until a procedure sets its Connect property to True. In most cases you won't set the initial load behavior to Load on demand directly; you'll set it to Load at next startup only, and it will automatically be set to Load on demand on subsequent starts of the host application. The value for Load on demand is 9. |
| Load at next | After the COM add-in has been registered, it loads when the startup only user runs the host application for the first time, and it creates a button or menu item for itself. Remember to set the OnAction property for any toolbar buttons or menu items that are created. When the add-in has been loaded once, its load behavior is changed to Load on demand. Each subsequent time the user starts the application, the add-in is loaded on demand—that is, it doesn't load until the user clicks the button or menu item associated with the add-in. The value for Load at next startup only is 16. |
Writing Code in the Add-in Designer
After you have specified general information for a COM add-in in the add-in designer, you can begin writing code in the designer's class module. To view the add-in designer's class module, right-click the add-in designer in the Project Explorer, and then click View Code on the shortcut menu.
Code that is in the add-in designer handles the add-in's integration with the host application. For example, code that runs when the add-in is loaded or unloaded resides in the add-in designer's module. If the add-in contains forms, the add-in designer might contain code to display the forms.
Events for controlling your add-in
A COM add-in has events that you can use to run code when the add-in is loaded or unloaded, or when the host application has finished starting up or is beginning to shut down.
The events that are required for control of your COM add-in are available through the IDTExtensibility2 interface, which provides a programming interface for integrating COM add-ins with their host applications.
Add-in projects in VBA or Visual Basic automatically implement the IDTExtensibility2 library in the add-in designer's class module.
To access these events in the add-in designer's class module, open the Code window for the add-in designer, and then select AddinInstance in the Object box. The events appear in the Procedures/Events box.
Note
This chapter covers implementing COM add-ins using add-in designers in VBA and Visual Basic. For information about creating a COM add-in from scratch, manually implementing the IDTExtensibility2 interface, or the Microsoft Add-in Designer library (Msaddndr.tlb), see the Microsoft Developer Network (MSDN) Web site at msdn.microsoft.com.
Events in the IDTExtensibility2 interface
The IDTExtensibility2 interface provides five events that you can use to manipulate your add-in and the host application: OnConnection, OnDisconnection, OnStartupComplete, OnBeginShutdown, and OnAddInsUpdate.
Events provided by IDTExtensibility2 interface
| Event | Description |
| OnConnection | Occurs when the COM add-in is loaded (connected). An add-in can be loaded in one of the following ways:
|
| OnDisconnection | Occurs when the COM add-in is unloaded. You can use the OnDisconnection event procedure to run code that restores any changes made to the application by the add-in and to perform general clean-up operations. An add-in can be unloaded in one of the following ways:
|
| OnStartupComplete | Occurs when the host application completes its startup routines, in the case where the COM add-in loads at startup. If the add-in is not loaded when the application loads, the OnStartupComplete event does not occur—even when the user loads the add-in in the COM Add-ins dialog box. When this event does occur, it occurs after the OnConnection event. You can use the OnStartupComplete event procedure to run code that interacts with the application and that should not be run until the application has finished loading. For example, if you want to display a form that gives users a choice of documents to create when they start the application, you can put that code in the OnStartupComplete event procedure. |
| OnBeginShutdown | Occurs when the host application begins its shutdown routines, in the case where the application closes while the COM add-in is still loaded. If the add-in is not loaded when the application closes, the OnBeginShutdown event does not occur. This event occurs before the OnDisconnection event. You can use the OnBeginShutdown event procedure to run code when the user closes the application. For example, you can run code that saves form data to a file. |
| OnAddInsUpdate | The OnAddInsUpdate event occurs when the set of loaded COM add-ins changes. When an add-in is loaded or unloaded, the OnAddInsUpdate event occurs in any other loaded add-ins. For example, if add-ins A and B both are loaded currently, and then add-in C is loaded, the OnAddInsUpdate event occurs in add-ins A and B. If C is unloaded, the OnAddInsUpdate event occurs again in add-ins A and B. If you have an add-in that depends on another add-in, you can use the OnAddInsUpdate event procedure in the dependent add-in to determine whether the other add-in has been loaded or unloaded. |
For more information on each on these event procedures, see "Working with the IDTExtensibility2 Event Procedures" in the Microsoft Office XP Developer's Guide.
Hooking a COM Add-in into a Command Bar Control
If your COM add-in has a user interface, it must be integrated with the host application in some way so the user can interact with it. For example, the user interface for your COM add-in most likely includes a form. At some point, code in the add-in must be run to display the form.
One way to integrate your add-in with an application's user interface is to include code in the OnStartupComplete event procedure that creates a new command bar control (toolbar button or menu item) in the host application. When your add-in is loaded, the user can click the button or menu item to work with the add-in. You can use the OnConnection event procedure, but it does not guarantee that the command bar object has been loaded. Similarly, you can add code to unload your add-in in the OnBeginShutdown event procedure or the OnDisconnection event procedure.
The critical aspect of integrating an add-in through a command bar control is the process of setting up the event sink. You must create a command bar control that is event-ready, so its Click event is triggered when the user clicks the control. You can use the WithEvents keyword to create an event-ready command bar control.
If you set the load behavior for your add-in to Load at next startup only, you also must set the OnAction property for the command bar control. If you do not set the OnAction property, the add-in will load the first time the application starts. The next time you start the application, however, the load behavior for the add-in will be set to Load on demand, and the command bar control that you have created for the add-in will not load the add-in unless the OnAction property has been set.
Even if your add-in is not demand-loaded, it is a good idea to set this property in your code, in case you later change the load behavior for the add-in. The syntax for setting the OnAction property for a COM add-in is:
ctlButton.OnAction = "!<ProgID>"
where ctlButton is the CommandBarButton object and ProgID is the programmatic identifier for the add-in. The programmatic identifier is the subkey that is created for the add-in in the Windows registry. Each add-in designer or class module that implements the IDTExtensibility2 library in the COM Add-in project adds its own programmatic identifier to the registry, beneath the AddIns subkey for the host application in which it will run. The programmatic identifier for a COM add-in consists of the name of the project followed by the name of the add-in designer or class module (for example, MyCOMAddin.Connect).
To return the programmatic identifier for an add-in, you can use the AddInInst argument that is passed to the OnConnection event procedure. This argument provides a reference to the add-in designer or class module that the code is currently running in. The AddInInst argument is an object of type COMAddIn, which has a ProgId property that returns the programmatic identifier. Note that you must concatenate the !< and > delimiters before and after the programmatic identifier string to properly set the OnAction property.
Note
Because the Tag property provides you with additional information about the control, it is a good idea to set the Tag property for a command bar button that loads a COM add-in in any host application. For more details about the Tag property, see the Microsoft Office Visual Basic Reference.
Creating a command bar control
In some cases, you might want to provide access to your add-in through a menu command or toolbar, as described in the following procedure.
To create a command bar control that displays the add-in's form
- In the add-in designer's module, use the WithEvents keyword to declare a module-level variable of type CommandBarButton. This creates an event-ready CommandBarButton object.
- In the same module, create the Click event procedure template for the CommandBarButton object by clicking the name of the object variable in the Object box and then clicking Click in the Procedure dialog box.
- Write code within the event-procedure template to open the form when the Click event occurs.
- In the OnConnection event procedure, check to see whether the command bar control already exists, and return a reference to it if it does. If it does not exist, create the new command bar control, and return a reference to it. You must check whether the command bar control exists, so you do not create a new control each time your code runs.
- When you create the new command bar control, do the following:
- Set the Tag property for the CommandBarButton object to a unique string.
- Set the OnAction property for the command bar control if the COM add-in is to be loaded on demand. If you fail to set the OnAction property, the command bar button will load the add-in the first time the application starts, but it will not load the add-in when the application is closed and reopened.
- Within the OnConnection event procedure, assign the reference to the command bar control to the event-ready CommandBarButton object variable.
- Add code to the OnDisconnection event to remove the command bar control when the add-in is unloaded.
Writing Code for a COM Add-in: an Example
The following example shows code for a COM add-in that loads when Visio opens (on Startup). The add-in then listens for the DocumentOpened or DocumentCreated events in Visio. When a user opens the specified Visio template or drawing created from the template, the add-in displays its user interface in a Visio stencil window. The code for the add-in lives in a designer file called VisioCOMAddin.dsr, which is based on the Visio add-in designer template.
Option Explicit 'Use WithEvents in the COM add-in to hook 'into the DocumentOpened and DocumentCreated 'Visio events in the application. Public WithEvents g_VisioApp As Visio.Application Public g_visWindow As Visio.Window 'This method is called when Visio loads the add-in. Private Sub AddinInstance_OnConnection(ByVal Application As Object, _ ByVal ConnectMode As AddInDesignerObjects.ext_ConnectMode, _ ByVal AddInInst As Object, custom() As Variant) 'Dim op_Win As Visio.Window Dim cbar As CommandBar On Error GoTo error_handler 'Get the Visio instance. Set g_VisioApp = Application Exit Sub error_handler: MsgBox Err.Description End Sub 'This method is called when Visio unloads the COM add-in. Private Sub AddinInstance_OnDisconnection(ByVal RemoveMode As _ AddInDesignerObjects.ext_DisconnectMode, custom() As Variant) On Error Resume Next Set g_VisioApp = Nothing Set g_visWindow = Nothing End Sub Private Function AddStencilWindow() As Visio.Window Dim op_Win As Visio.Window On Error GoTo eHandler If Not g_VisioApp.ActiveWindow Is Nothing Then If g_VisioApp.ActiveWindow.Type = VisWinTypes.visDrawing Then 'Add a dockable stencil window to the drawing window. Set op_Win = g_VisioApp.ActiveWindow.Windows.Add(, , _ VisWinTypes.visDockedStencilAddon) Else 'Add a nondockable stencil window to the application. Set op_Win = g_VisioApp.Windows.Add(, , _ VisWinTypes.visStencilAddon) End If Else 'Add a nondockable stencil window to the application. Set op_Win = g_VisioApp.Windows.Add(, , _ VisWinTypes.visStencilAddon) End If Set AddStencilWindow = op_Win Exit Function eHandler: Set AddStencilWindow = Nothing End Function Private Sub g_VisioApp_DocumentCreated(ByVal doc As Visio.IVDocument) 'Add the stencil window add-in whenever a new document 'is created from my template. Dim szTemplate As String 'Get the template name; return the full path. szTemplate = doc.Template 'Check for template name within the full path. If InStr(1, szTemplate, "COMAddin.vst", vbTextCompare) Then Set g_visWindow = AddStencilWindow If Not (g_visWindow Is Nothing) Then Dim myfrm As New frmMyForm LoadForm myfrm, g_visWindow.WindowHandle32 'Pass the Visio instance to the form. Set myfrm.frmVisio = g_VisioApp 'Display the form. ShowForm myfrm End If End If End Sub Private Sub g_VisioApp_DocumentOpened(ByVal doc As Visio.IVDocument) 'Add the stencil window add-in whenever an existing document 'based on my template opens. Dim szTemplate As String 'Get the template name; return the full path. szTemplate = doc.Template 'Check for the template name within the full path. If InStr(1, szTemplate, "COMAddin.vst", vbTextCompare) Then Set g_visWindow = AddStencilWindow If Not (g_visWindow Is Nothing) Then Dim myfrm As New frmMyForm LoadForm myfrm, g_visWindow.WindowHandle32 'Pass the Visio instance to the form. Set myfrm.frmVisio = g_VisioApp 'Display the form. ShowForm myfrm End If End If End Sub
Making the DLL and Registering the COM Add-in
After debugging your COM add-in to your satisfaction, you can package it as a DLL.
To package a COM add-in as a DLL in VBA or Visual Basic
- On the File menu, click Make projectname.dll.
- The process of making the DLL creates the COM add-in, registers it on the client computer, and makes the COM add-in available for use in Visio.
The Make Project dialog box appears; you can enter a name for the DLL that is different from the suggested name.
When you make the DLL, the information in the add-in designer is used to add a subkey to the Windows registry, indicating which applications can host the add-in. The COM add-in then appears in the COM Add-Ins dialog box in those applications for which it is registered.
Add-in registration
Before you can use a COM add-in in Visio, the add-in DLL must be registered, just as any other COM DLL on the computer. The DLL's class ID is registered beneath the HKEY_CLASSES_ROOT subtree in the Windows registry. The DLL can be registered on a user's computer by using a setup program, such as those created by the Packaging Wizard or by running the Regsvr32.exe command-line utility that is included with Microsoft Windows. Adding a COM add-in by using the COM Add-Ins dialog box also registers the DLL.
Registering the DLL beneath the HKEY_CLASSES_ROOT subtree informs the operating system of its presence, but additional information must be added to the registry for the add-in to be available to Visio. This is the information that you can specify in the add-in designer—the add-in's name, description, target application, target application version, and initial load behavior. The add-in designer makes sure this application-specific information is written to the correct place in the registry at the same time that the add-in DLL is registered. The COM Add-Ins dialog box displays the information contained in the subkey for the corresponding application.
This subkey must be added to the following registry subkey:
HKEY_CURRENT_USER\Software\Microsoft\Visio\Addins\ YourProgId
The new subkey itself must be the programmatic identifier of the COM add-in, which consists of the name of the project followed by the name of the class module or add-in designer (for example, MyCOMAddin.Connect).
The following table describes the entries that you can add beneath this subkey.
Entries for the subkey
| Name | Type | Value |
| Description | String | Optional. Name to appear in COM Add-ins dialog box. |
| FriendlyName | String | Optional. String returned by Description property. |
| LoadBehavior | DWORD | Required. Integer indicating load behavior: 0 (None), 3 (Startup), 9 (Load on demand), or 16 (Load at next startup only) |
Distributing COM add-ins
If you are planning to distribute your COM add-in to other users, you must install all the necessary files on each user's system and register the add-in. How you do this depends on the environment in which you are developing the add-in.
Distributing COM Add-ins created with Office Developer
If you are developing in Microsoft Office Developer (version 2000 or later), the easiest way to distribute a COM add-in is to create a setup program for the add-in. The user can install and register the add-in by running the setup program.
Before you can create the setup program, you must compile the COM add-in project to a DLL.
To create the setup program, run the Packaging Wizard on the add-in project that was compiled to a DLL. The Packaging Wizard creates a setup program that installs and registers the add-in DLL and any other necessary files, but not the code.
Distributing COM add-ins created with Visual Basic 6.0
If you are developing in Microsoft Visual Basic 6.0, the easiest way to distribute a COM add-in is to include the add-in designer in the add-in project and then create a setup program for the add-in. The user can install and register the add-in by running the setup program.
To create the setup program, run the Visual Basic 6.0 Package and Deployment Wizard on the Add-in project. When the user runs the setup program, all the files required for the add-in to run will be copied to the user's computer and registered.
For more information about using the Visual Basic 6.0 Package and Deployment Wizard, see the documentation included with Visual Basic 6.0.
EAN: 2147483647
Pages: 180