You can add a unique edge, mat, or frame to your photo to jazz it up. This adds a scrapbook look to your photos and makes them even more personal. As you add edges, mats, and frames to your picture, you can add them individually or layer them for a unique look.
Be sure to install the Content disc that came with Roxio Easy Media Creator to get all of the templates for the following tasks and projects. If you have not installed the content CD, your choices are meager.
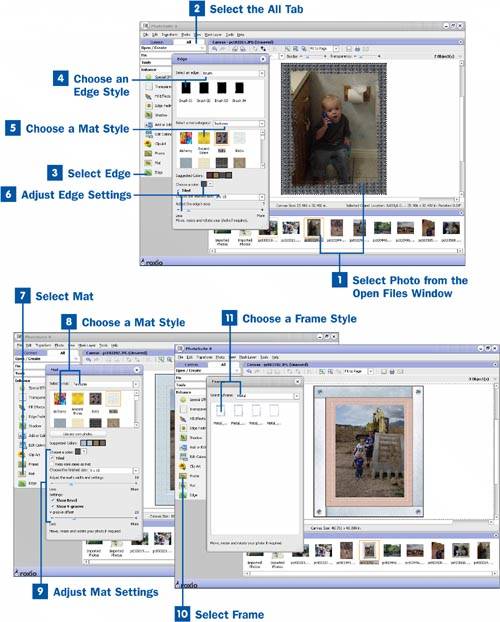
 Select Photo from the Open Files Window
From within PhotoSuite, choose the photo from the Open Files window at the bottom of the screen to which you would like to add an edge, mat, or frame.
 Select the All Tab
Select the All tab at the top of the tasks pane to open all of your editing options.
 Select Edge
Select the Edge button from the Enhance menu to bring up the Edge window.
 Choose an Edge Style
From the Edge window you can click on an album to open up the type of style you want, or you can choose from the drop-down menu. When the style samples are shown in the window, double-click on the one you want to apply to the photo.
 Choose a Mat Style
You can choose a mat style in the Edge window. This gives the edge a specific texture or color. Open an album or choose from the drop-down menu and click on a mat style.
 Adjust Edge Settings
You can choose the color of the edge by clicking on a suggested color or by using the Choose a color menu. Use the dropper tool to sample a color on the screen to create a color. If you have chosen a textured mat, the color combines with the style to create a unique look.
The Tiled check box determines whether the texture is tiled together tightly to create a uniform look or used on a large scale. For example, if you choose the brick texture, checking the Tiled check box gives the mat hundreds of bricks, but unchecking the Tiled check box means only a few large bricks are in the edge.
Change the finished size of the edge by choosing from the Choose the finished size drop-down menu. The finished size setting does not actually change the size of the edge, but it does adjust the proportion. In other words, if your picture is larger than 8x10, changing the size of the edge to 8x10 does not make it smaller than the picture; it only sets it to an 8x10 proportion so that if you print your picture as an 8x10, it fits into an 8x10 frame.
Change the size of the edge itself by using the Adjust the edge's size slider at the bottom of the window. This adjusts the proportion of the edge to your photo. After you are satisfied with the look of your edge, close the window.
 Select Mat
You can add mats to your photo to give it a three-dimensional look. Whereas the mat style in the Edge window only allowed you choose a color or texture for the edge, the Mat enhancement creates a differently colored core to add the three-dimensional look and allows you to adjust the bevel and V-groove of the core. Click on the Mat button in the Enhance menu to bring up the Mat window.
 Choose a Mat Style
When the Mat window is open, you can choose a color or a texture for your mat by opening the appropriate album or using the Select a mat drop-down menu. Double-click on the mat you want to apply it to your picture. You can also select your own photo to use as your mat by choosing it in the Media Manager.
 Adjust Mat Settings
You can choose the color of the mat by clicking on a suggested color or by using the Choose a color menu. Use the dropper tool to sample a color on the screen. If you have chosen a textured mat, the color combines with the style to create a unique look.
The Tiled check box determines whether the texture is tiled together tightly to create a uniform look or used on a large scale. For example, if you choose the brick texture, the mat has hundreds of bricks if it is tiled, but if you uncheck the Tiled check box, only a few large bricks are in the mat.
Change the finished size of the mat by choosing from the Choose the finished size drop-down menu. The finished size setting does not actually change the size of the edge, but it does adjust the proportion. In other words, if your picture is larger than 8x10, changing the size of the mat to 8x10 does not make it smaller than the picture; it only sets it to an 8x10 proportion so that if you print your picture as an 8x10, it fits into an 8x10 frame.
Change the size of the mat itself by using the appropriate slider. This adjusts the proportion of the mat to your photo.
Check the Show Bevel and Show V-groove check boxes if you would like a bevel and V-groove and set the offset setting for the V-groove using the V-groove offset slider. After you are satisfied with the look of your edge, close the window.
 Select Frame
Click on the Frame button in the Enhance menu to bring up the Frame window.
 Choose a Frame Style
Choose the style of frame you want by clicking on an album or use the Select a frame drop-down menu. The frames in the style are all the same except for their size. When you choose the frame size, it does not actually change the size of the frame, but it does adjust the proportion. In other words, if your picture is larger than 8x0, changing the size of the frame to 8x0 does not make it smaller than the picture; it only sets it to an 8x10 proportion.
When you are happy with the look of your picture, close the window.
Tip
Remember that you can use the selection box around each of your objects (picture, edge, mat, or frame) to change the size or rotate it to change the look of your finished product.