Managing Media Files
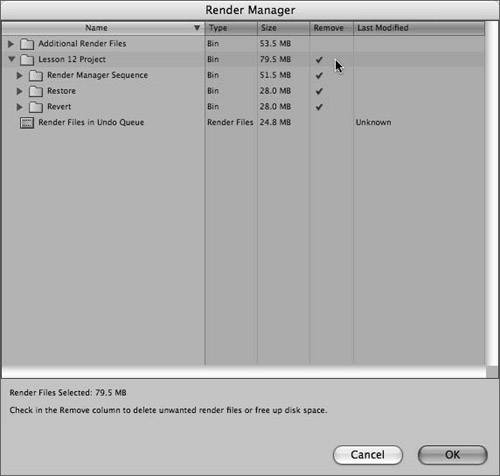
| In Final Cut Pro, media is defined as video, audio, still images, and motion graphics. Some of your media will have timecode that connects it to external sources; other media will have been created on a computer; or in the case of stock footage, music, and sound effects libraries, the media will come from non-timecode-based sources. You need to develop a system to keep track of your files and effectively manage each resource. FCP contains a number of tools to help you manage media assets, and you need to develop routines to preserve others. Captured MediaCaptured media files are automatically stored in the Scratch Disk directory or directories you defined in the System Settings window. The most appropriate place to store your media is determined by your system configuration and the specific requirements of your workflow. (Refer to Lesson 3 for suggestions on how to organize your media files.) For the most part, you can manage captured media within FCP, and there's very little need to work with the files in the Finder. However, if you do need to locate the media file for a particular clip, you can always Cntrl-click a clip in FCP and choose Reveal In Finder from the contextual menu. FCP places captured files into a defined directory structure in which each project is assigned a separate subfolder within the Capture Scratch directory.  Rendered MediaFCP also stores render files in designated directories that you assign in System Settings. As with captured media, the exact location of your rendered media is determined by your workflow. The Constant Frames subfolder inside the Render Files directory is new to Final Cut Pro 5. Its purpose is to improve performance by providing a designated storage area for still image and generator render files. Another new feature in Final Cut Pro 5 is the ability to control the render quality of motion effects. In earlier versions of FCP, there is only one standard setting, which is now identified as the Fastest option. In Final Cut Pro 5, you can also select Normal and Best settings to increase the quality of your render files. Every time you render a clip, Final Cut Pro generates a new media. Over time, the number of render clips can build up and will need to be purged. You can manually delete the files in the Finder, as you can with captured media, but it's often more convenient to use the Render Manager in FCP.
Archiving MediaIt's rare to want to back up media that already exists on tape or other timecode-based format, but most workflows usually involve media from other sources such as sound effects, music, and stock footage, or files that have been created on the computer, such as motion graphics. You need to develop a system to organize such media and take steps to ensure that they're archived along with your project files. Non-timecode media will not be deleted when you perform Make Offline operations in the Media Manager, but you need to exercise caution when you use the Make Offline command in the Browser because your files will be deleted from your system. This may be an inconvenience if you need to capture media again, but it could create a bigger problem if you delete the only version of a file you generated on the computer. To avoid the problem of deleting important media, gather all non-timebased files and include every item in your backups and permanent project archives. Also make sure you keep track of changes to the file, and use incremental saves to preserve different versions. With stock footage, sound effects, and music, it's vital that you keep comprehensive records of the sources and other descriptive information about the media, especially if you need clearance on some of the files. Note Before you install Soundtrack Pro on your system, make a backup of the original Soundtrack loops since some of the loops have been changed and others renamed as part of the update. Working with Media ManagerThe Media Manager in Final Cut Pro provides a powerful and versatile alternative to working in the Finder when you want to move, copy, and delete timecode-based media files. Non-timecode media is not affected by Media Manager operations and still needs to be organized manually. (Refer to Lesson 5 for specific instruction on using the Media Manager.) Whenever you complete a project, you can easily drag the folder to the Trash. If you want to be certain that you've removed every file, it's much easier to use the Media Manger or to Ctrl-click clips in the Browser and choose Make Offline from the contextual menu. |

EAN: N/A
Pages: 205