| If you create a long document with headings and subheadings, such as an annual report or a catalog that has several sections, you might want to add a table of contents to the beginning of the document to give your readers an overview of and the document's contents and to help them navigate to specific sections. In a document that will be printed, you can indicate with a page number the starting page of each section; if the document will be distributed electronically, you can link each heading and subheading in the table of contents to the section in the document, so that readers can jump directly there with a click of the mouse. By default, Word expects to create a table of contents based on paragraphs within the document that you have formatted with the standard heading styles (Heading 1, Heading 2, and so on). (Word can also create a table of contents based on outline levels or on fields that you have inserted in the document.) When you tell Word to create the table, Word identifies the table of contents entries and inserts the table at the insertion point as a single field. You can modify the elements on which Word bases the table at any time. 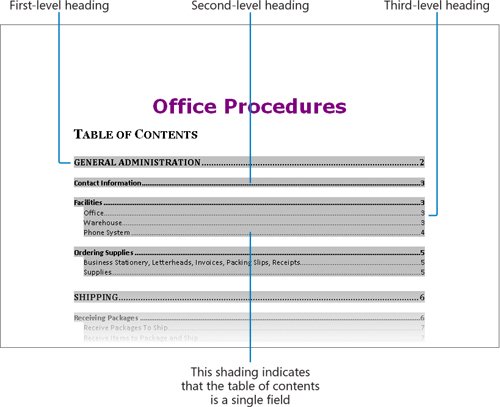 See Also For information about applying styles, see "Working with Templates" in Chapter 4, "Changing the Look of a Document."
The Table Of Contents gallery (available from the References tab) offers three standard table options: Automatic Table 1. This option inserts a table of contents with the heading Contents. Automatic Table 2. This option inserts a table of contents with the heading Table of Contents. Manual Table. This option inserts a table of contents with placeholders that you replace manually.
The formatting of the entries in a table of contents is controlled by nine levels of built-in TOC styles (TOC 1, TOC 2, and so on). By default, Word uses the styles that are assigned in the template attached to the document. If you want to use a different style, instead of clicking one of the standard options in the Table Of Contents gallery, you can click Insert Table Of Contents below the gallery to display the Table Of Contents dialog box, where you can choose from several variations, such as Classic, Fancy, and Simple. Tip If you create a table of contents based on the document's template, you can customize the TOC styles during the creation process. On the References tab, in the Table Of Contents group, click the Tables Of Contents button, and then in the list, click Insert Table Of Contents. In the Table Of Contents dialog box, click Modify. The Style dialog box opens, displaying the nine TOC styles. You can modify the font, paragraph, tabs, border, and other formatting of these styles the same way you change any other style.
After you create a table of contents, you can format it manually by selecting text and then applying character or paragraph formatting or styles. You can edit the text of a table of contents, but it is much easier to click the Update Table button and have Word do the work for you. You have the option of updating only the page numbers, or if you have changed, added, or deleted headings, you can update (re-create) the entire table. In this exercise, you will create a table of contents for a document based on heading styles. Then you will alter the document by inserting page breaks, and update the table of contents to reflect your changes. USE the 02_Contents document. This practice file is located in the Chapter08 subfolder under SBS_Word2007. OPEN the 02_Contents document.
1. | Position the insertion point to the left of GENERAL ADMINISTRATION, and then on the References tab, in the Table of Contents group, click the Table of Contents button.
 | 2. | In the Table of Contents gallery, click Automatic Table 1. Then press  to return to the beginning of the document. to return to the beginning of the document.
Word inserts a table of contents with predefined styles at the insertion point.
 | 3. | In the Table of Contents group, click the Table of Contents button, and then below the gallery, click Remove Table of Contents.
| 4. | Position the insertion point to the left of GENERAL ADMINISTRATION, type Table of Contents, press the  key, and then on the Insert tab, in the Pages group, click the Page Break button. key, and then on the Insert tab, in the Pages group, click the Page Break button.
 | 5. | Press the  key to position the insertion point in the empty page break paragraph. key to position the insertion point in the empty page break paragraph.
Tip If you want to see this paragraph, display non-printing characters. | 6. | On the References tab, in the Table of Contents group, click the Table of Contents button, and then below the gallery, click Insert Table of Contents.
The Table Of Contents dialog box opens.
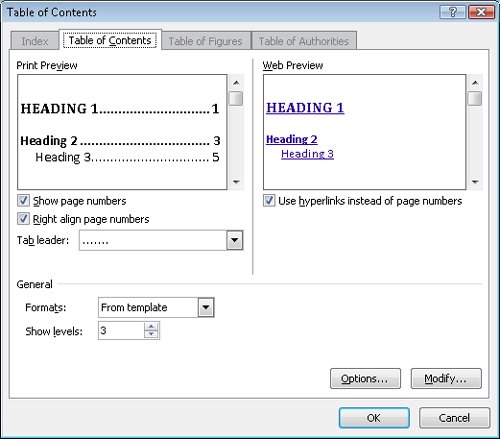 | 7. | On the Table of Contents tab, under General, click the Formats arrow, and then in the list, click Classic.
Examples of the Classic table of contents format appears in the preview boxes.
| 8. | Click the Tab leader arrow, and then in the list, click the dotted line.
The Print Preview box changes to display dotted tab leaders.
| 9. | Click OK to insert the table of contents, and then press to return to the beginning of the document.
| 10. | Point to any entry in the table.
A ScreenTip appears, notifying you that you can hold down the Ctrl key and click any entry in the table of contents to jump to that heading in the document.
| 11. | Click anywhere in the table.
The entire table is selected, because it consists of only one field.
| 12. | Move to the top of the third page, click at the beginning of the Contact Information heading, and then press  to insert a page break. to insert a page break.
The Contact Information heading is now on Page 4.
| 13. | Scroll down to the Ordering Supplies heading, and insert a page break before that heading.
| 14. | On the References tab, in the Table of Contents group, click the Update Table button.
 The Update Table Of Contents dialog box opens.
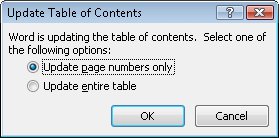 | 15. | Select the Update entire table option, and click OK. Then press .
Word has updated the table of contents to reflect the new page numbers.
|
CLOSE the 02_Contents document without saving your changes.
Creating Other Types of Tables If a document includes figures or tables that have descriptions, or captions, you can tell Word to create a table of figures. If a legal document contains items such as regulations, cases, and statutes that are identified as legal citations, you can tell Word to create a table of authorities. Word uses the captions or citations to create these types of tables the same way it uses headings to create a table of contents. To insert a caption: 1. | Position the insertion point where you want the caption to appear (usually directly after the figure), and then on the References tab, in the Captions group, click the Insert Caption button.
The Caption dialog box opens.
| 2. | If you want to change the designator shown in the Caption box (the default is Figure), click New Label, type the caption you want, and then click OK.
| 3. | In the Caption box, click to the right of the default text and number, press  , type the caption, and then click OK. , type the caption, and then click OK.
Word adds the caption to the document.
|
To create a table of figures: 1. | Position the insertion point where you want to insert the table of figures, and then on the References tab, in the Captions group, click Insert Table of Figures.
The Table Of Figures dialog box opens.
| 2. | If you want to change the default type of caption to be included in the table, under General, click the Caption label arrow, and then in the list, click the type of caption you want.
| 3. | If you want to change the default table format, click the Formats arrow, and then in the list, click the format you want.
| 4. | Select any additional options you want, and then click OK.
Word inserts the table in the specified format above the insertion point.
|
To insert a legal citation: 1. | Select the first legal reference that you want to mark with a citation.
| 2. | On the References tab, in the Table of Authorities group, click the Mark Citation button.
The Mark Citation dialog box opens.
| 3. | In the Selected text box and the Short citation box, edit the citation to reflect the way you want it to appear in the table.
| 4. | If you want to change the category, click the Category arrow, and then in the list, click the category that applies to the citation.
| 5. | To mark a single citation, click Mark. To mark all citations that match the selected citation, click Mark All.
|
To create a table of authorities: 1. | Position the insertion point where you want the table of authorities to appear, and then on the References tab, in the Table of Authorities group, click the Insert Table of Authorities button.
The Table Of Authorities dialog box opens.
| 2. | In the Category list, click the category of citations that you want to appear in the table, or click All to include all categories.
| 3. | Select formatting options for the table, and then click OK.
Word inserts the table in the specified format before the insertion point.
|
|
|