Creating and Modifying an Index
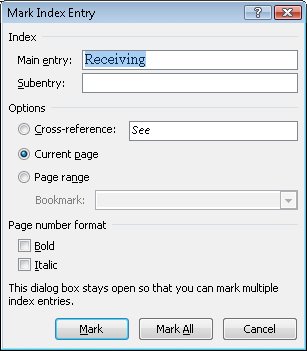
| To help readers find specific concepts and terms that might not be readily located by looking at a table of contents, you can include an index at the end of a document. Word creates an index by compiling an alphabetical listing with page numbers based on index entry fields that you have marked in the document. As with a table of contents, an index is inserted at the insertion point as a single field. Tip You don't need to create indexes for documents that will be distributed electronically because readers can use the Find feature or Windows Desktop Search to go directly to search terms. In the index, an index entry might apply to a word or phrase that appears on a single page or is discussed for several pages. The entry might have related subentries. For example, the main index entry shipping might have below it the subentries supplies, procedures, and packing. An index might also include cross-reference entries that direct readers to related entries. For example, the main index entry shipping might have below it a cross-reference to warehouse. 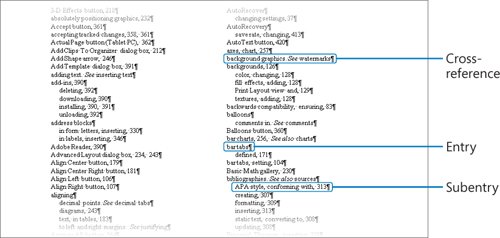 To insert an index entry field in the document, you select the text you want to mark, and click Mark Entry in the Index group on the References tab to open the Mark Index Entry dialog box, where you can do the following:
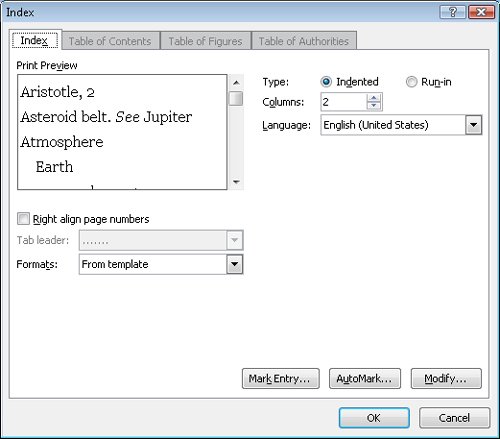
After you have set the options in the dialog box the way you want them, you can insert an index entry field adjacent to the selected text by clicking Mark, or adjacent to every occurrence of the selected text in the document by clicking Mark All. The Mark Index Entry dialog box remains open to simplify the process of inserting multiple index entry fieldsyou don't have to click the Mark Entry button for each new entry. You can move the dialog box off to the side so that it doesn't block the text you're working with. Tip When building an index, you should choose the text you mark carefully, bearing in mind what terms readers are likely to look up. One reader might expect to find information about cell phones by looking under cell, whereas another might look under mobile, another under phones, and another under telephones. A good index will include all four entries. Index entry fields are formatted as hidden; you cannot see them unless you click the Show/Hide ¶ button in the Paragraph group on the Home tab. When the field is visible, it appears in the document enclosed in quotation marks within a set of braces, with the designator XE and a dotted underline. 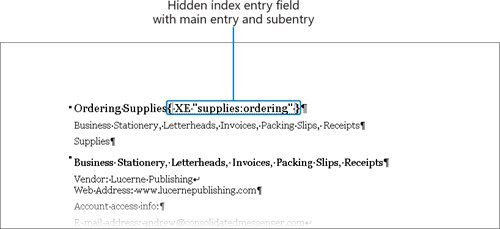 Tip You can hide any text in a document by selecting it, clicking the Font Dialog Box Launcher on the Home tab, selecting the Hidden check box, and clicking OK. When you print the document, Word will not include the hidden text unless you click Options in the Print dialog box and then under Printing Options, select the Print Hidden Text check box. You can change the text of an index entry by editing the text within the quotation marks in the index entry field as you would any other. (You could also edit the text in the inserted index, but that change would not be permanent; regenerating the index or pulling index entry fields for another purpose would restore the original entry.) To delete an index entry, you select the entire hidden field and then press the Delete key. You can also move and copy index entries using the techniques you would use for regular text. Tip Dragging through any part of an index entry field that includes one of the enclosing braces selects the entire field. To create an index based on its index entries, you position the insertion point where you want the index to appear and then click the Insert Index button in the Index group on the Reference tab to open the Index dialog box, where you can specify the following:
When you click OK in the Index dialog box, Word calculates the page numbers of all the entries and subentries, consolidates them, and inserts the index as a single field in the specified format at the specified location in the document. If you make changes to the document that affect its index entries or page numbering, you can update the index by clicking it and then clicking the Update Index button in the Index group on the References tab. Tip You can also update the index by right-clicking it and then clicking Update Field. In this exercise, you will first mark a few index entries and a cross-reference entry. Then you'll create and format an index, delete an index entry from the document, and update the index.
USE the 03_Index document. This practice file is located in the Chapter08 subfolder under SBS_Word2007. BE SURE TO display non-printing characters before starting this exercise. OPEN the 03_Index document.
CLOSE the 03_Index document without saving your changes. |

EAN: 2147483647
Pages: 129
- Structures, Processes and Relational Mechanisms for IT Governance
- Measuring and Managing E-Business Initiatives Through the Balanced Scorecard
- A View on Knowledge Management: Utilizing a Balanced Scorecard Methodology for Analyzing Knowledge Metrics
- Technical Issues Related to IT Governance Tactics: Product Metrics, Measurements and Process Control
- The Evolution of IT Governance at NB Power