| Word provides several tools for navigating long documents, two of whichbookmarks and cross-referencesenable you to jump easily to designated places within the same document. Both tools require you to mark locations in the document and name them. See Also For information about using hyperlinks to jump to other locations, see "Adding Hyperlinks" later in this chapter. For information about using the Document Map to jump to any paragraph styled as a heading, see "Displaying Different Views of a Document" in Chapter 1, "Exploring Word 2007."
Whether the document you are reading was created by you or by someone else, you can insert bookmarks to flag information to which you might want to return later. Like a physical bookmark, a Word bookmark marks a specific place in a document. After inserting a bookmark, you can quickly jump to it by displaying the Bookmark dialog box, clicking the bookmark you want to locate, and then clicking Go To. Tip Alternatively, you can display the Go To tab of the Find And Replace dialog box, click Bookmark in the Go To What list, and then select the bookmark you want from the Enter Bookmark Name list.
If you are developing a long document, you can create cross-references to quickly move readers to associated information elsewhere in the document. You can create cross-references to two types of elements: Headings, figures, and tables, for which Word automatically creates pointers Manually created bookmarks
If you later delete an item you have designated as the target of a cross-reference, you will need to update the cross-reference. In this exercise, you will insert a bookmark and then jump to it. You will also create a cross-reference, edit the referenced item, and then update the cross-reference. USE the 04_Bookmarks document. This practice file is located in the Chapter08 subfolder under SBS_Word2007. OPEN the 04_Bookmarks document.
1. | On the Home tab, in the Editing group, click the Find arrow, and in the list, click Go To.
 The Find And Replace dialog box opens, with the Go To tab active.
 | 2. | With Page selected in the Go to what list, in the Enter page number box, type 8. Then click Go To, and click Close.
| 3. | On Page 8, position the insertion point to the left of the Checking the credit of new customers heading, and then on the Insert tab, in the Links group, click the Bookmark button.
 The Bookmark dialog box opens.
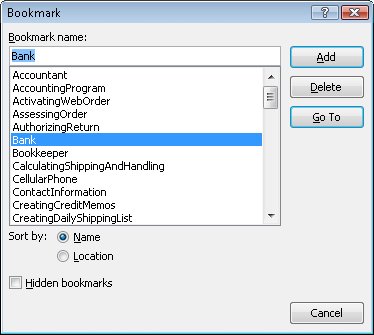 | 4. | Move the dialog box to the right side of the screen, and then scroll the list of predefined bookmarks.
Word has already created bookmarks for headings down to the fourth level by removing articles (a and the), spaces, and punctuation and initial capping words. For example, notice the DoesCustomerAlreadyHaveAccount bookmark for the fourth-level Does the customer already have an account? heading on this page.
 The name that already appears in the Bookmark Name box is the name of the bookmark selected in the list below, not a suggested name for your new bookmark. Replacing it will not delete that existing bookmark. The name that already appears in the Bookmark Name box is the name of the bookmark selected in the list below, not a suggested name for your new bookmark. Replacing it will not delete that existing bookmark.
| 5. | In the Bookmark name box, type CreditCheck, and then click Add.
Troubleshooting Bookmark names cannot contain spaces. If you enter a space and then type a character, the Add button becomes inactive. To name bookmarks with multiple words, either run the words together and capitalize each word or replace the spaces with underscores for readability. The Bookmark dialog box closes, and although you can't see it, a bookmark named CreditCheck is inserted into the document.
Tip To know whether a document contains bookmarks, display the Bookmark dialog box. You can sort the bookmarks alphabetically or in the order in which they are located. | 6. | Press  to move to the beginning of the document. Then on the Home tab, in the Editing group, click the Find arrow, and click Go To. to move to the beginning of the document. Then on the Home tab, in the Editing group, click the Find arrow, and click Go To.
| 7. | In the Find and Replace dialog box, in the Go to what list, click Bookmark.
The dialog box changes so that you can specify the bookmark you want to jump to.
 | 8. | Click the Enter bookmark name arrow, click CreditCheck in the list, and then click Go To.
The insertion point moves to the location of the bookmark. The dialog box remains open in case you want to move somewhere else.
| 9. | Close the Find and Replace dialog box.
Tip To delete a bookmark, click Bookmark in the Links group on the Insert tab, click the bookmark's name, and then click Delete. | 10. | At the top of Page 7, position the insertion point at the right end of the Step 1 paragraph, press  , type For more information, see, and then press again. , type For more information, see, and then press again.
| 11. | On the Insert tab, in the Links group, click the Cross-reference button.
 The Cross-Reference dialog box opens.
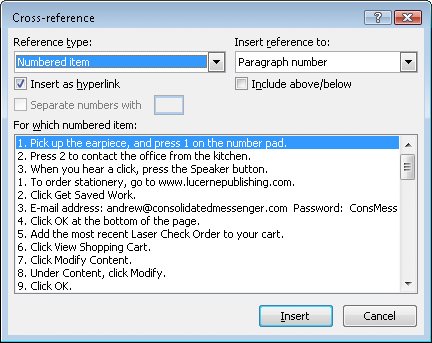 | 12. | Click the Reference type arrow, and in the list, click Heading. Then with Heading text selected in the Insert reference to box, scroll the For which heading list, and click Does the customer already have an account?.
| 13. | Click Insert, and then click Close.
The text Does the customer already have an account? appears in the document at the insertion point. Although it is not obvious, the text is inserted as a single field and formatted as a cross-reference.
| 14. | Hold down the  key, and then click the cross-reference to move to that heading. key, and then click the cross-reference to move to that heading.
| 15. | In the heading, click to position the insertion point after the word account (before the question mark), press , and then type with us.
| 16. | Move back to the top of Page 7, and at the end of the Step 1 paragraph, click Does the customer have an account? to select the cross-reference field.
Troubleshooting Don't select the For more information, see introductory text. | 17. | Right-click the selected cross-reference, and then click Update Field.
Word inserts the words with us at the end of the cross-reference to reflect the change you made to the heading.
| 18. | Hold down , and click the cross-reference to return to the associated heading.
|
CLOSE the 04_Bookmarks document without saving your changes.
|