Identifying Overallocations
|
|
A resource is overallocated when the total of its timephased work for a period exceeds the resource’s maximum units. Left uncorrected, overallocated resources pose a serious threat to project success. A resource typically can’t work 8 hours on one task and then 8 hours on a second task. When a project includes accidentally overallocated resources, the project manager will have to adjust the schedule or change resource assignments when the overallocation is finally noticed.
Task slippage is a common cause of overallocation as a resource’s work from last week moves into this week. If the resource is already scheduled to work on a different task, the resource may become overallocated. Because you can’t tell from the Gantt chart that you have overallocated resources, check your resources in other views as the project moves into the development phase. In every resource view, overallocated resources are formatted in red so you know immediately that a resource is overallocated. Figure 11.1 shows the Resource Sheet for the XYZ-BOT project that you saw in earlier chapters.
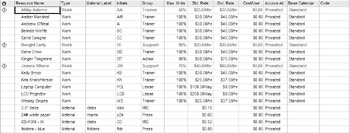
Figure 11.1: Overallocated resources stand out in every view.
In the Resource Sheet, Project displays a caution icon in the Indicators column of overallocated resources. Hover the mouse over the icon, and Project displays a screen tip that suggests one way to correct the overallocation:
![]()
You can choose to delay a task until the assigned resource is available, split the task so only a portion is delayed, or assign additional resources. All three options are valid now, before the project plan is finalized and distributed. If you decide to use Project’s leveling feature, discussed later in this chapter, to adjust for the overallocation, you are limited to delaying or splitting tasks. If you prefer to add resources to compensate for the overallocation, you must do so manually—leveling can’t add resources to a task.
Locating the Overallocated Segments
When you have overallocations, there are several ways to identify the timeframe where the overallocation occurs, and the task or tasks that are causing the overallocation. The Overallocated Resources report lists each of the overallocated resources and the assignments that contribute to the overallocation. To print the Overallocated Resources report:
-
Choose View Ø Reports to open the Reports dialog box.
-
Double-click Custom to open the Custom Reports dialog box.
-
Choose Overallocated Resources, and click Print or Preview.
The report, shown in preview in Figure 11.2, lists each overallocated resource and all their assignments. It does not identify which assignments result in an overallocation.
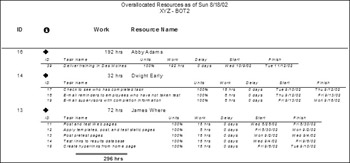
Figure 11.2: The Overallocated Resources report
There is, unfortunately, no view that shows overallocated assignments, so you have to work on the problem from the point of view of the resource. The Resource Graph (View Ø Resource Graph), which displays assigned timephased hours for the selected resource, shows when the overallocation occurs. The default Resource Graph for one of our overallocated resources, James Where, is shown in Figure 11.3.
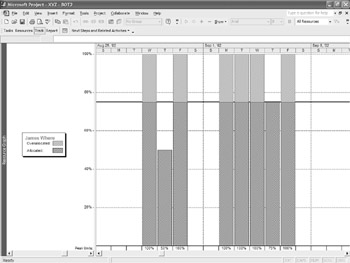
Figure 11.3: The Resource Graph
You can spend a long time scrolling the Resource Graph. To make the graph more useful, select View Ø Zoom to display the Zoom dialog box. Select the Entire Project option to condense the Resource Graph.

The Resource Graph shows peak hours in each time segment, with overallocated hours in red. To see the resource’s tasks, split the window and then open the Resource Form (Window Ø Split) or Resource Name Form (View Ø More Views Ø Resource Name Form). The Resource Form and Resource Graph are shown in Figure 11.4. The Resource Form shows the max units for the resource, which may be the problem in this case. On several days, the resource is assigned at 100% levels, which causes an overallocation because the resource max units are 75%.
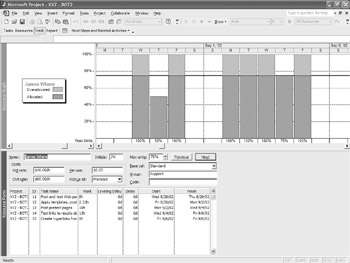
Figure 11.4: Combine the Resource Graph with the Resource Form.
Viewing Potential Solutions for the Overallocation
The combination of the Resource Graph and Resource Form is the portal to a host of solutions to overallocation. To view other graphic information, right-click in the graph to open the shortcut menu:
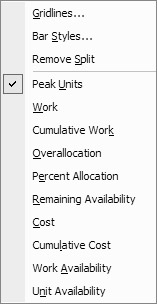
Choose Overallocation to see the periodic overallocation in hours and then check out some of the other options on this menu. One way to resolve an overallocation is to move an assignment to a point in time when the resource is available. The Remaining Availability option, shown in Figure 11.5, clearly shows that James has time available prior to and immediately after his overallocation.
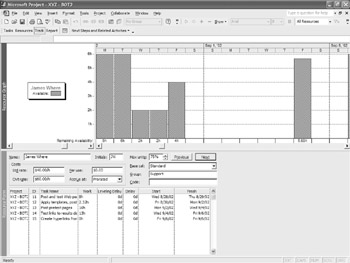
Figure 11.5: Display remaining availability in the Resource Graph.
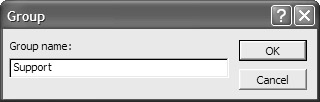
Another way to resolve an overallocation is to assign different or additional resources. The overallocated resource is a member of the Support group. (Group information is displayed in the Resource Name Form.) With the Remaining Availability displayed, choose Group from the Filter drop-down list to open the Group dialog box. Enter the group in which you’re looking for an available resource:
Use the horizontal scroll bar under the resource name in the Resource Graph to scroll though the resources in the Trainers group to find a trainer who is available to assign to the task.
| Tip | To focus on overallocated resources in any table view that includes resources, choose Overallocated Resources from the Filter list on the formatting toolbar. |
Viewing Overallocations by Time Period
The Resource Graph and Resource Form help you locate the overallocations and potential solutions, but it’s a difficult place to adjust resource assignments. To see each resource and their assignments in an editable view, display the Resource Usage view (View Ø Resource Usage). Choose Group from the Group drop-down list on the Standard toolbar to arrange resources in groups:
In this view, shown in Figure 11.6, it’s easy to see that there’s only one other member of the Support group (Dwight Early), and that, with the exception of a few days early in the project, he’s as overallocated as James Where. That means Dwight won’t be able to pick up James’s tasks that cause the overallocation.
| Tip | If you’re considering changing resource assignments as the project progresses, another useful grouping is Standard Rate, which allows you to see the cost of the current resource and the resource you’re considering as a substitute so you can stay within budget. |
If you have a minor overallocation problem, you can enter new hours for a task in the appropriate cell in the time grid—changing 2 hours on Monday and 5 hours on Tuesday to 5 hours on Monday and 2 hours on Tuesday, for example. Editing the timephased values in the grid creates a custom contour for the assignment (see Chapter 10), which has implications if the assignment is moved later.
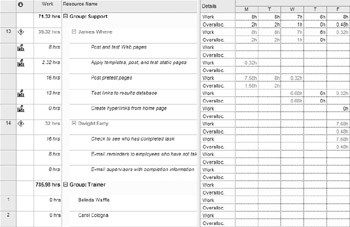
Figure 11.6: The cells of the Resource Usage view are editable.
You can’t reschedule the start date or finish date of a task in this view: The indented list under each resource is the assignment, not the task. If you double-click an assignment, the Assignment Information dialog box opens:
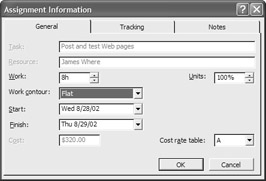
Note that changing the Start setting in this dialog box changes the assignment, not the task start date. The task will appear in the Gantt chart as scheduled. To change the task to eliminate the overallocation, switch to a task view, such as Task Sheet view or Gantt Chart view.
Viewing Tasks with Overallocations
Resources get overallocated, but the possible solutions are constrained by the nature of the tasks involved in the overallocation. The resource overallocation we’ve been examining in this chapter is the result of too much work in one time period for the available resources in the Support group. Our choices are to hire or contract another support person, or reschedule some or all of the support-related tasks. The best place to assign resources to tasks is in a task view such as the Gantt chart. We can move the training automatically by leveling the resources, which we’ll discuss in the next section. Delaying tasks is the method used by leveling to handle overallocations.
To view overallocated tasks, switch to any task view (we’ll use the Gantt Chart view) and then turn on the Resource Management toolbar (View Ø Toolbars Ø Resource Management). Click the Go To Next Overallocation button to move to the next task with an overallocated resource assigned to it. Use the Resource Allocation View button to switch to a combination view with the Resource Usage grid and a Leveling Gantt; the Task Entry view displays a Gantt chart and the Task Form with the Resource Assignments. In either view, display the Assign Resources dialog box to add or remove resources.
![]()
|
|
EAN: 2147483647
Pages: 241
- Chapter V Consumer Complaint Behavior in the Online Environment
- Chapter IX Extrinsic Plus Intrinsic Human Factors Influencing the Web Usage
- Chapter XII Web Design and E-Commerce
- Chapter XIII Shopping Agent Web Sites: A Comparative Shopping Environment
- Chapter XIV Product Catalog and Shopping Cart Effective Design
- Cell-Mode MPLS
- Case Study-Hub and Spoke MPLS VPN Network Using BGP PE-CE Routing for Sites Using Unique AS Numbers
- VPLS Overview
- Case Study 2: Implementing Multi-VRF CE, VRF Selection Using Source IP Address, VRF Selection Using Policy-Based Routing, NAT and HSRP Support in MPLS VPN, and Multicast VPN Support over Multi-VRF CE
- Case Study 4: Implementing Layer 3 VPNs over Layer 2 VPN Topologies and Providing L2 VPN Redundancy