Resource Leveling
|
|
Project’s leveling feature is used to resolve resource overallocation by delaying or splitting tasks. You can level tasks within a range of dates, or level the entire project. Project uses a number of factors to select tasks to delay or split:
-
Available slack time
-
Task priority, dependencies, and constraints
-
Task ID
-
Scheduling dates
Before leveling a project, you should make sure that these factors are already set, particularly for critical tasks. See Chapter 8 if you need information about any of these task settings. Make a backup copy of the project file before proceeding.
Using Project’s Leveling Feature
Select any task. Choose Tools Ø Level Resources to open the Resource Leveling dialog box, shown in Figure 11.7. The settings in the dialog box determine when and how Project levels resources.
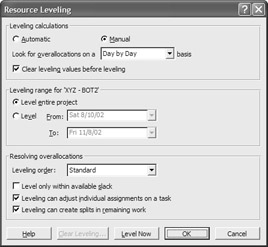
Figure 11.7: The Resource Leveling dialog box
Setting Automatic or Manual Leveling
The first option you have in the Resource Leveling dialog box is whether to enable Automatic or Manual leveling calculations.
With Automatic leveling calculations enabled, resource leveling takes place automatically, in the background. Tasks are adjusted as soon as you change a task, or assign a resource that results in an overallocation. Project checks for overallocations after each entry, so with a large project, automatic leveling can slow down overall performance while you’re assigning resources or working with the schedule. Also, remember that Project will level by delaying or splitting tasks—if you’re really attached to your project’s finish date, don’t choose automatic leveling.
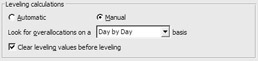
When you choose the default calculation option, Manual, you control when Project levels resources. Now, you might infer that manual means you’ll have to grab a shovel and roll up your sleeves. That isn’t the case in Project; all the Manual setting really means is that you’ll have to open the Resource Leveling dialog box, and click Level Now to make the leveling happen.
The next step is to tell Project what time period you want leveled. You do this via the Look For Overallocations drop-down list. Pull down the list and then choose the time period that is an overallocation in this project. Project ignores overallocations with shorter durations than the sensitivity you select. If, for example, you check overallocations on a week-by-week basis, a person can be scheduled to work 16 hours two days in a row, and still work fewer than the 40 hours in a week. If you look for overallocations on a day-by-day basis, the person is overallocated on both 16-hour days, so the tasks on those days would be adjusted during leveling.
Here are the five resource sensitivity settings available in the Look for Overallocations drop-down list
Minute by Minute levels resources that are overallocated by a minute or more.
Hour by Hour levels resources that are overallocated by an hour or more.
Day by Day levels resources that are overallocated by a day or more.
Week by Week levels resources that are overallocated by one week or more.
Month by Month levels resources that are overallocated by a month or more.
| Note | Finally, if you turn on Automatic Leveling, you should disable the default Clear Leveling Values Before Leveling check box. When the check box is enabled, Project clears delays created by previous leveling operations, and the leveling delays that you entered manually, before it levels resources. |
Setting a Leveling Range
The default leveling range is the entire project. To level overallocations in a specific time frame, select the Level From/To option and then use the drop-down calendar controls in the Resource Leveling dialog box to select the beginning and ending dates between which Project should search for overallocations:

Determining How Overallocations are Resolved
When Project levels resources, it makes two passes through the project. On the first pass, it identifies overallocations. On the second pass, it delays tasks based on the leveling order you select.
There are some tasks that Project will not delay, however. Project will not delay tasks that have the following constraints:
-
Must Finish On
-
Must Start On
-
As Late As Possible (for projects scheduled from the start date)
-
As Soon As Possible (for projects scheduled from the finish date)
Project also won’t delay tasks with a priority of 1000, nor will it delay a task that has already started. It will, however, split a task that has an actual start date.
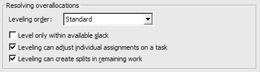
There are three leveling orders: ID Only, Standard (the default), and Priority/Standard. With ID Only, leveling delays tasks with larger ID numbers; for example, if a resource assigned to Tasks 27 and 31 is overallocated, Project will delay Task 31. If you use ID Only, you’d better be sure that your tasks were entered in order of importance.
With the Standard leveling order selected, the task(s) to be leveled are chosen based on a number of factors:
-
Dependencies: Tasks without successors are delayed before tasks with successors.
-
Slack: Tasks with slack (tasks not on a critical path) are delayed before tasks that have 0 slack.
-
Task priority and, if the project includes shared resources, project priority: Lower-priority tasks are delayed before higher-priority tasks.
-
Constraints: Constrained tasks are delayed after non-constrained tasks.
-
Start Date: Tasks with later start dates are delayed before tasks with earlier start dates (which makes the end of the project even more interesting!).
When you select the Priority/Standard leveling order, Project gives primary consideration to the relative priority of two tasks when determining which task to delay. The other factors in the previous list are given secondary consideration. If you haven’t assigned priorities to the tasks in your project, other than setting the priority for some tasks at 1000, stick with the Standard leveling order.
| Tip | Task priority (0 to 1000) is set on the General tab of the Task Information Form. If you don’t want Project to delay a task, set the priority to 1000, and use the Standard or Standard/Priority leveling order. |
The settings of the three check boxes in this section of the Resource Leveling dialog box determine what Project can and can’t do to level resources.
-
To prevent Project from moving the project finish date, enable the Level Only Within Available Slack check box. This check box is turned off by default. If you don’t have much slack in your project, enabling this check box means that Project won’t be able to handle many overallocations through leveling.
-
The Leveling Can Adjust Individual Assignments On a Task check box is on by default. When this check box is enabled and multiple resources are assigned to a task, Project can delay the start of one resource’s assignment without adjusting other resources who are assigned to the task.
-
Leveling Can Create Splits in Remaining Work is on by default. When this check box is enabled, Project can delay a task that’s already in progress. Turn this check box off to prevent split delays on tasks where completion is greater than 0%.
The Leveling Can Adjust Individual Assignments check box in the Resource Leveling dialog box enables or disables assignment leveling for the entire project. You can set assignment leveling for specific tasks rather than selecting it here for the entire project. There are some tasks that use resources that work at the same time. The Play in the World Series or Mixed Doubles, Second Set tasks, for example, shouldn’t assign half of the resources to start hours or days after the others.
The Level Assignments field is a task property that isn’t on the Task Information Form or displayed in any of Project’s standard views. To set assignment leveling, switch to a task view such as Gantt Chart view, right-click a column header, and choose Insert Column from the shortcut menu to open the Column Definition dialog box:
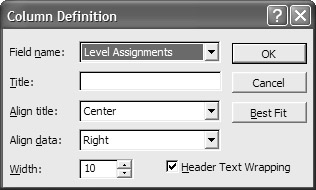
Select the Level Assignments column and then add it to the view. This is a Yes/No field. Yes allows Project to level individual assignments for the task. No keeps the entire team together for the World Series. Summary tasks allow Assignment Leveling. You can’t change this setting for summary tasks.
The Leveling Can Create Splits in Remaining Work field is another Yes/No field available at the task level. Add the Leveling Can Split column to a task view. Choose Yes to enable splitting, or No to prevent split delays of tasks that are already in progress.
Launching the Leveling Process
After you set the time period, click the Level Now button. Project now displays a dialog box asking whether you want to level the entire pool of resources or only the selected resource; make your selection and then click OK. If you elect to level the entire pool, Project will determine which resources are overallocated, and will then delay or split and delay tasks to reduce or eliminate the overallocation by using the settings you specified in the dialog box. The progress meter in the status bar shows the leveling effort.
Resolving Leveling Conflicts
Some overallocations can’t be leveled. If Project can’t resolve an overallocation unrelated to a specific task, a message box lets you know which resource it is unable to level and the date for the overallocation conflict. The message box prompts you to either stop leveling or skip this task.
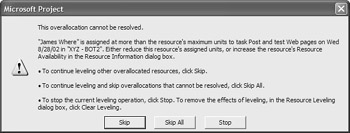
If the task assignment was a mistake, note the summary task with the resource assigned, and click Stop to stop the leveling operation. Edit the task assignment, and start leveling again.
If the task assignment was intentional, click the Skip button to continue. Click Skip All, and Project won’t notify you when other overallocations can’t be leveled.
When there aren’t any irresolvable overallocations, leveling only takes a few seconds. After leveling, you can see the changes made by leveling by choosing View Ø More Views Ø Leveling Gantt to display the Leveling Gantt, shown in Figure 11.08. Green bars indicate the original, preleveled schedule for each task; the gap, if any, between a task’s green Gantt bar and the blue Gantt bar is the delay added by leveling.
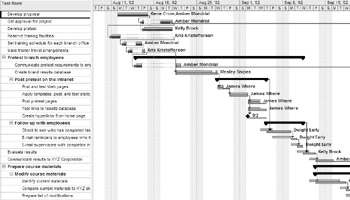
Figure 11.8: The Leveling Gantt shows delays designed to eliminate overallocations.
Clearing Leveling Delays
To remove leveling delays, select the tasks for which you want to remove leveling and open the Resource Leveling dialog box (Tools Ø Level Resources). Click the Clear Leveling button. Select Entire Project or Selected Tasks, and click OK to remove delays.
| Note | Project will remove almost all leveling delays. If you assign a priority of 1000 to a task after leveling, Project won’t clear the delay. |
Leveling Resources On Your Own
You don’t have to rely on Project’s leveling feature to level resources. You may want to level some of the overallocated resources one at a time so that you can consider the implications before adding a delay. You can delay a task or an assignment.
When you delay a task, the task’s start date moves. Apply assignment delay when you want to delay one or more resources, but not all resources assigned to a task, or when you want to use different delays for each resource.
Configuring the View
The view used to assign leveling delays is the Resource Allocation Form with a couple of additions. As shown in Figure 11.9, the Detail Gantt uses the Delay table, and the Resource Usage table includes the Assignment Delay column. You’ll set assignment delays in the upper pane and task delays in the table in the lower pane.
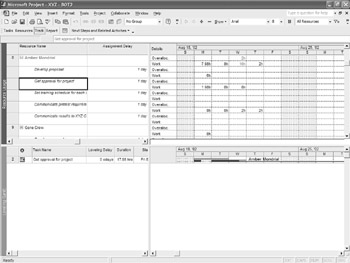
Figure 11.9: Use the Detail Gantt and Resource Usage Form to add delays manually.
To display the Resource Allocation view with assignment delay and task delay fields visible, follow these steps:
-
Choose View Ø More Views Ø Resource Allocation.
-
Click in the Gantt chart in the lower pane.
-
Choose View Ø Table Ø More Tables to open the More Tables dialog box.
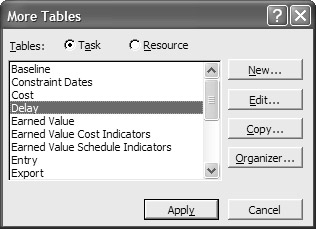
-
Select Delay, and click Apply.
-
In the Resource Usage table in the upper pane, right-click on the Work column heading.
-
Choose Insert Column from the shortcut menu.
-
Select the Assignment Delay column in the Column Definition dialog box.
-
Click OK.
Delaying a Task
When you delay a task you also delay all the resource assignments for the task. To add delay to a task, follow these steps:
-
In the upper pane of the Resource Allocation view, select any assignment for the task you want to delay.
-
In the Leveling Delay field in the lower pane, enter the duration for the delay.
Note Clicking the Clear Leveling button at the bottom of the Resource Leveling dialog box clears the task delays.
You can also delay individual resource assignments—that is, the amount of time after the task’s start date that the resource begins work on the assignment. (This is called Assignment delay.) To delay an assignment, follow these steps:
-
Select the assignment you want to delay in the Resource Usage table.
-
Enter the duration for the delay in the Assignment Delay field.
Note Resource delay can’t be cleared from the Resource Leveling dialog box; you must reverse the delay manually.
Tip To find tasks or assignments with delays, switch to or modify a view to include the delay field you want to see; then select Project Ø Filtered For Ø More Filters. When the More Filters dialog box appears, click the New button to open the Filter Definition dialog box. Use this dialog box to create a new filter to search for any delay greater than 0. Select the Show in Menu option to have this filter appear in the AutoFilter drop-down list and then click OK.
|
|
EAN: 2147483647
Pages: 241