Preparing for Project Sign-Off
|
|
The project design is complete, leveled, and ready to present to stakeholders so they can give you the green light to move the project into implementation. The final form of the presentation depends on the relative importance of the project in the life of the organization, the comparative cost of the project, your organization’s culture, documentation provided by previous project managers, and other factors too numerous to mention. As the project manager, your task is to make sure that stakeholders understand the proposed project as outlined, and are in agreement with the plan or can provide specific information to help you modify the plan to gain their agreement.
The sign-off meeting is also shaped by corporate culture and your project’s position in the organization’s life. Sign-off meetings range from a major sales presentation with multimedia and glossy brochures to relatively dull contractual meetings in which the loudest noise is pen scratching on signature lines. Depending on how involved stakeholders have been in the design process and the amount of momentum and support the project already has, you’ll prepare a variety of documents for the sign-off meeting. Materials created with software other than Microsoft Project are often included in the project presentation materials for the sign-off meeting, such as the following. (We’ll return to some of these project documents later in this chapter.)
-
Narrative documents: project summary, business systems analysis, needs analysis, statement of intent, cover letter, risk/contingency analysis, force-field analysis
-
Contractual documents: project contract, project charter, phase charter, letter of understanding, letter of agreement
-
Supporting documents: brochures for vendors for contracted phases, references for vendors, comparison charts for material resources
-
Electronic documents: electronic slide presentations, web content
-
Project management documents: change request forms
-
Product demonstrations: live or video
A wide variety of materials, topics, and activities can be included in a project’s sign-off meeting. For the project team, this can be the occasion for a celebration of a well-constructed plan, as well as the kick-off of a grand new project. We forgot to mention denim shirts with the project’s logo, but they’re a nice touch. (Feel free to send us a couple. We’re also fond of those really cool-looking low-profile baseball caps.) Microsoft Project can’t embroider shirts yet, but it can provide many of the other documents you may want to include in the presentation materials for the sign-off meeting:
-
Summary reports: Critical Tasks report, summary Gantt charts, Top Level Tasks report, Milestones report, Project Summary report
-
Proposed timelines: Gantt charts, calendars
-
Budget information: Budget report, Cash Flow report, Crosstab report
-
Staffing: Task Usage report, Resource Usage report
In this list, the reports outnumber the views. If you don’t see information you need to present in a report, you’ll usually be able to provide it by customizing and printing a view. Examine the complete list of views and reports in Chapters 16 and 17 where you’ll also find help on customizing views to meet your stakeholders’ information requirements.
Project’s reporting capabilities might be somewhat limited (at least compared to other Microsoft applications), but its exporting and importing functions are fabulous. For example, if you’re comfortable working in Excel, consider exporting tables to Excel to create tables, charts, and summary reports. See Chapter 18 for detailed information on importing and exporting in Project 2002.
Tools to Avoid Scope Creep
Scope management begins with the project definition, and continues through the entire project; however, it should be a primary consideration as you prepare for the project sign-off. The scope management plan is a tool to help you manage expectations.
The scope management plan has two parts: the change assessment and a description of the change process. The change assessment is an estimate of how likely the project’s scope is to change. The scope management plan isn’t a list of measurable potential, but management’s best guess about how the risk assessment and slack in the plan compare to the changing environment that the project plan operates within. If, for example, you used PERT to estimate durations (see Chapter 13 for more about using PERT), the plan is less likely to change than if all durations were entered without analysis. If the environment is relatively static during the life of the project, the scope is less likely to change than if business rules are in flux and the organization is trying to respond. The scope is also less likely to change if the stakeholders have a clear understanding of the project.
To complete a change assessment, list the potential sources of scope change during the life of the project. For each source, use a three-point scale to indicate whether change from that source is likely, unlikely, or unknown. As the project progresses, pay close attention to the likely and unknown sources of scope change.
The second section of the scope management plan is the change request process. The process outlines the steps for handling change requests subsequent to the sign-off meeting. Typically, when change requests are received, they are evaluated to determine whether the change falls within the current scope as defined in the project documents provided in the sign-off meeting. If it does not, the project manager determines the following:
-
The cost to implement the request
-
The amount of delay, if any, if the request is implemented
-
Other areas of the project impacted by implementing the request
The change request process includes an authorization process for requests that don’t fall within the project scope. In most organizations, requests that don’t increase the budget, extend the timeline, or delay deliverables can be approved by the project manager. The PM may also have authority within a range. For example, the PM might be authorized to approve change requests that delay the project less than one day if the total scope change delay is less than one week or costs less than $1,000 to implement—provided that the total project cost overrun is less than ten thousand dollars. The change request process outlines the handling of requests that exceed the PM’s discretion.
Experienced project managers report that their secret to avoiding scope creep is to manage expectations— specifically, to manage stakeholders’ expectations of the project deliverables. Whether your project’s deliverables are soft goods, services, or durable goods, the project manager needs to clearly communicate the process for collecting, evaluating, and accepting recommended additions or modifications to the project plan.
The sign-off meeting has three key scope-related deliverables for the project manager. They aren’t physical deliverables, so it’s harder to know whether you’ve actually delivered, but the goal is that at the end of the sign-off process, you want stakeholders to understand the following:
-
What they’re going to get: the deliverables included in the project
-
What they’re not going to get: the deliverables that are not included in the project
-
How to get something different: the change request process
At the end of the sign-off meeting, summarize these three items. In the packet of materials for the sign-off meeting, include an outline of the change process and change request forms (or directions for accessing online change forms). Communicate with team members to make sure they understand the process for handling change requests that they receive directly from stakeholders.
And here’s a final tip for managing change requests. If you use Microsoft Outlook (with Exchange Server), you can set up a public folder with a simple post form for stakeholders and team members to suggest changes.
Capturing Baseline Data to Track Progress
After the project plan has been finalized—everyone who needs to has signed off and last minute adjustments have been made—the project is now ready to go. To track progress on the project, however, you need to have something to which you’ll compare the actual results. When you enter actual experience into the plan—Actual Start and Actual Finish dates, for example—Project has nothing to compare it to. To calculate variance from the plan, you first have to save the project plan with a baseline.
A baseline is a project plan that contains the original estimates for tasks, resources, assignments, and costs. A baseline plan includes the data displayed in Table 11.1.
| Data Fields | Type of Data |
|---|---|
| Start and Finish Dates | Tasks, Assignments |
| Duration | Tasks |
| Splits | Tasks |
| Work | Tasks, Resources, Assignments |
| Costs | Tasks, Resources, Assignments |
| Timephased Work | Tasks, Resources, Assignments |
| Timephased Costs | Tasks, Resources, Assignments |
With a baseline, you preserve the plan and use variances to judge your progress. You can compare task, resource, assignment, and cost updates to the plan as well as actual information as the project work is completed. These variances are helpful for identifying potential problems in the project, and in planning future projects.
When Project saves a baseline, it does not save a separate file. Rather, it saves key project data into Baseline fields within the existing project. The best time to save a baseline is after you have entered all of your estimates for start and finish tasks, duration, and costs, but before anyone has started work on the project.
Saving a Baseline
When should you save a baseline? Not at the very beginning of a project, to be sure. At this point in your project planning, it’s probably too early to save a baseline. It’s best to wait until you’ve completed entering the project parameters, so you’ll have some real information in the baseline plan.
To save a baseline, follow these steps:
-
Select Tools Ø Tracking Ø Save Baseline to open the Save Baseline dialog box, shown in Figure 11.10.
-
Pull down the Save Baseline list and then select which baseline you want to save. The initial baseline is titled Baseline; you can save up to 10 baselines over the course of a project.
-
Select the Entire Project option.
-
Click OK to create the baseline.

Figure 11.10: Save a baseline with the Save Baseline dialog box.
Viewing the Baseline
After you saved the project with a baseline, you can view the baseline data by switching to the Tracking Gantt with the Baseline View, (View Ø Tracking Gantt and View Ø Tables Ø More Tables Ø Baseline), as shown in Figure 11.11.
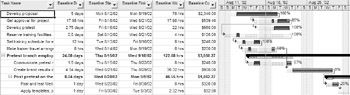
Figure 11.11: The Tracking Gantt with Baseline view
The Tracking Gantt displays gray bars to reflect the baseline. Red bars indicate critical tasks (see “Viewing the Critical Path” in Chapter 13), and blue bars show non-critical tasks. The baseline table contains the Baseline Duration, Baseline Start, Baseline Finish, Baseline Work, and Baseline Costs fields.
Switch to the Variance table (View Ø Table Ø Variance) to see how your current plan differs from the saved baseline. If you have just saved the baseline, you should not see any variance. As you make changes to the plan and update actual task, resource, and assignment data, the Variance table is the best place to see how things are going. In Chapter 12, we explore tracking project changes in more depth.
Editing the Baseline
After you save a baseline, you may find that you need to update certain data that you want included in the baseline. For example, after you saved a baseline, you find out that a group of tasks that were going to be contracted out can now be handled in-house. To incorporate this change into the project, you need to add some additional subtasks, adjust fixed costs, and add resources. Rather than include the changes as exceptions to the plan, you decide to include them in the baseline.
After you make the required changes to the project, you can follow these steps to revise the baseline for these tasks:
-
Select the changed and added tasks from the Gantt Chart Entry table.
-
Choose Tools Ø Tracking Ø Save Baseline.
-
From the Save Baseline list, select the baseline you want to edit.
-
Select the Selected Tasks option.
-
Click OK.
If you decide that the changes to the project are pervasive enough to reset the entire project’s baseline, choose Entire Project from the Save Baseline dialog box. This replaces the existing baseline data for the project with the new data.
Clearing a Baseline
To save a copy of a finished project without the baseline or to reverse the action of saving a baseline, you can clear the baseline from the entire project or from selected tasks. To clear the baseline, choose Tools Ø Tracking Ø Clear Baseline. When the Clear Baseline dialog box appears (shown in Figure 11.12), select the Clear Baseline Plan option and then click OK.
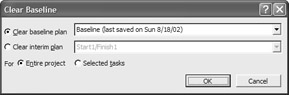
Figure 11.12: Clear the entire baseline from the Clear Baseline dialog box.
If you want to clear the baseline data only from some tasks, select the tasks first, choose Tools Ø Tracking Ø Clear Baseline, and then choose Selected Tasks from the Clear Baseline dialog box. Click OK to clear these tasks.
Tracking Interim Plans
When you save a baseline, you save a full set of project estimates that you can use to track changes in your project. After you save a baseline, and as your project progresses, you may also want to save interim plans along the way that record changes to the start and finish dates of current tasks.
Let’s say, for example, that you have a task in your project that is scheduled to start on 3/17/03. When you save the baseline, the baseline records this as the original start date. You receive a call from your client who indicates that they cannot release any more funds for this task until the start of the second quarter; therefore, the start date of the task has to be postponed to 4/1/03. To record this change in the project, you can change the start date of the task to 4/1/03, which automatically adds a Start No Earlier Than constraint on the task. You can then save an interim plan based on the new start date of 4/1/03. Next week, your client again contacts you and gives you the nod to start the task on 3/20/03. Because the assigned resources have been on hold, you seize the opportunity to get started and enter the actual start date of 3/20/03 in the project. You can now track the history of the task by showing the baseline (original plan) date of 3/17/03, the interim plan date of 4/1/03, and the actual date of 3/ 20/03.
| Note | Because of the Start No Earlier Than constraint on the task, you introduce a conflict when you enter the Actual Start Date of 3/20/03. If the Planning Wizard alerts you, you can click Continue to allow the conflict. |
Figure 11.13 shows the actual dates (Actual Start/Finish), the current plan (Start/Finish), interim plan dates (Start1/Finish1), and baseline dates (Baseline Start/Finish). See “Viewing an Interim Plan” later in this chapter to set up this view in your project.
![]()
Figure 11.13: Track multiple dates with an interim plan.
| Tip | You may not want to apply the Start No Earlier constraint to the task in every situation. In that case, you can save the interim plan based on the current start/finish dates and then edit the interim start date directly to reflect the desired date. For information about how to do this, see “Updating an Interim Plan,” later in this chapter. |
Saving an Interim Plan
You can save up to 10 interim plans during the course of a project, which you can then compare to the project baseline and the current plan. To save an interim plan, follow these steps:
-
Choose Tools Ø Tracking and then choose Save Baseline.
-
Select Save Interim Plan.
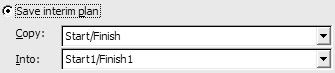
-
From the Copy drop-down list, select the fields that contain the start and finish fields you want to save in the interim plan. In our earlier example, you would choose Start/ Finish Dates.
-
From the Into drop-down list, select the fields you want to use as the interim plan fields.
-
Select whether you want the plan to apply to the entire project or only to selected tasks.
-
Click OK to save the plan.
Viewing an Interim Plan
To view an interim plan, you must insert the interim start/finish date columns into a sheet view such as the Tracking Gantt view. Follow these steps to view an interim plan:
-
Switch to a sheet view such as Tracking Gantt view—we recommend this view because it already contains all the other start/finish date columns you might want to compare to.
-
Right-click any column head and then choose Insert Ø Column.
-
In the Column Definition dialog box, select the Interim Plan Start field.
-
Click OK.
-
Repeat steps 2–4 to add the Interim Plan Finish field.
To insert columns for the baseline start and finish, repeat steps 2–4 and then select the columns titled Baseline Start and Baseline Finish. The result, with the proper column ordering, is shown in Figure 11.13.
Updating an Interim Plan
After you have added the interim plan fields to a sheet view such as the Tracking Gantt view, you can edit the dates directly in the Interim Plan Start and Finish fields. Click in the Interim Plan Start/Finish cell for the task you want to edit.
|
|
EAN: 2147483647
Pages: 241