Understanding Assemblies
Now that we've seen how to organize our code into a logical grouping of namespaces and/or source files during the design phase, we can turn our attention to the way we translate this into a physical set of files for deployment. To do this, we need to understand assemblies.
What Is An Assembly?
An assembly is a term coined by Microsoft to describe a set of one or more logically-related files containing type definitions and/or resources. Strictly speaking, each physical file in an assembly is known as a module, and may have been compiled from one or more of your source files.
Single-File Assemblies
If you are using Visual Studio .NET, then you will only ever produce single-file (isingle-module) assemblies. In this scenario, each project in a solution will produce exactly one assembly as its main output – which (leaving aside ASP.NET for one moment) will be an .exe or a .dll. In a Visual Studio .NET solution, all of these assemblies – which may be a combination of .exe's and .dll's – form an application.
Each assembly includes an assembly manifest, which contains versioning and security information. For this reason, an assembly is the smallest unit of reuse.
Multi-File Assemblies
If you are not using Visual Studio .NET, it is possible to produce a multi-file assembly, which is a collection of modules, each in its own file. Also, each module may have been produced by a different .NET language compiler.
In this scenario, only one of the modules in the assembly holds the assembly manifest, which in this case also lists the other files (modules) that make up the assembly. The module that holds the manifest will typically have an .exe or .dll extension, while the remaining modules will (by default) have the extension .netmodule. We'll see an example of exactly how to do this later.
Logical vs. Physical Organization
Whichever way you choose to compile your code, all of the above files – .exe's, .dll's, and .netmodule's – must be deployed on the end-user's machine when you distribute your application.
Note also that there is absolutely no relationship between the logical structure of your source code and the physical structure of your deployed application. Multiple source files may be compiled into one module, which may or may not form part of a larger assembly. Namespaces may span multiple assemblies and a module may contain multiple namespaces, each with a number of types. You could (although it certainly wouldn't be recommended) compile the same source file into more than one module, perhaps with different conditional compilation options, then combine them into a single assembly!
This is probably immediately confusing. Apart from the familiar file extensions, there's really no parallels in terms of other development tools. Coming from a C++ background you might think that .netmodule's are similar to .obj files – except that a module can be built from more than one source file! But, there's more to come.
Metadata
Every assembly – whether single-file or multi-file – contains metadata. Metadata is generated by all of the .NET language compilers and describes the types and members defined in our code. This is what replaces C++ header files, Interface Definition Language (IDL), and type libraries, which have kept COM developers occupied for a decade. This information is all held in the compiled .exe or .dll. The metadata also lists the types and members that we reference in our code, but that are defined in other assemblies.
Metadata gives the Common Language Runtime all the information it needs to load types and invoke methods at run time. The CLR also uses metadata to help it enforce security. The security system uses permissions to deny code access to resources that it does not have authority to access.
In this section, we'll see how to view all the available metadata for a single-file assembly. Then we'll see how to create a multi-file assembly, and how it is useful.
Viewing Metadata in a Single-File Assembly
The easiest way to view metadata is by using the MSIL Disassembler tool, ildasm.exe. We've used this tool a lot already, and we'll use it much more throughout this chapter.
Let's look at the metadata for a simple assembly, for a simple console application. The source code for this example is located in simple_console.cs:
using System; namespace MetadataSimpleApp { class SimpleConsole { public static void Main() { Console.WriteLine("Wrox Rocks!"); } } } Build this application, giving it a namespace of MetadataSimpleApp as shown, and open the MSIL Disassembler tool using the /adv or /advanced command line switch as follows:
C:\> ildasm /adv simple_console.exe
The MSIL Disassembler tells us the following:
-
The MANIFEST entry provides manifest information. As we'll see later in this chapter, the manifest lists the files and types in our assembly, plus the types used from other assemblies.
-
Our assembly has a namespace called MetadataSimpleApp.
-
The MetadataSimpleApp namespace has a class called SimpleConsole.
-
SimpleConsole has a compiler-generated constructor, plus a Main method that we wrote ourselves.
This is just a small part of the information available in the MSIL Disassembler tool. Because we used the /adv switch, we have access to advanced information including full metadata for our assembly. To view this metadata, click on View, select MetaInfo, and then select Show!. A window appears, showing comprehensive metadata for our assembly:
Let's look at the important parts of this metadata:
-
Metadata about this .NET module.
-
Metadata about this assembly. At this moment, the assembly only contains one .NET module.
-
Metadata about the types defined in this assembly.
-
Metadata about referenced types that reside in other assemblies.
-
Metadata about other referenced assemblies.
Metadata about this .NET Module
The first two lines in the metadata listing give us information about this .NET module. As we mentioned earlier, a .NET module is a Portable Executable (PE) format file, such as an .exe or .dll file, or a stand alone module with the file extension .netmodule. All the C# examples we've seen so far have been single-module assemblies, which means the assembly only comprises a single file. Later in this chapter we'll see how to create an assembly that comprises multiple .NET modules; we'll also discuss why this might be a useful thing to do.
Getting back to our discussion on .NET module metadata, the following module metadata is available:
ScopeName : simple_console.exe MVID : {9271A944-5B7E-4F7B-BA3C-97EDA8302130} Note the following points in the .NET module metadata:
-
ScopeName is the name of the .NET module, excluding the path.
-
MVID is the module version ID, which is a Globally Unique ID (GUID) for the .NET module generated by the compiler. The compiler generates a different MVID every time we build the module.
Metadata about this Assembly
Near the end of the metadata listing, we find the following metadata about this assembly (we've abbreviated this information slightly, by removing metadata about custom attributes):
Assembly ------------------------------------------------------- Token: 0x20000001 Name : simple_console Public Key : Hash Algorithm : 0x00008004 Major Version: 0x00000000 Minor Version: 0x00000000 Build Number: 0x00000000 Revision Number: 0x00000000 Locale: <null> Flags : [SideBySideCompatible] (00000000)
Here is a selective description of some of the assembly metadata:
-
Token is a 4-byte metadata token. Each item of metadata is uniquely identified by a different token. The top byte of the token indicates what kind of metadata this is: for example, 0x20 denotes an assembly definition, 0x23 denotes an assembly reference, 0x02 denotes a type definition, and so on. For a full list of token types, open the C++ header file CorHdr.h (located in the FrameworkSDK\include sub-folder) and find the CorTokenType enumerated type.
-
Name is the name of the assembly, excluding the path and extension.
-
PublicKey indicates the public key that was used to sign the assembly. It's blank here because we haven't signed the assembly. We'll see how to sign an assembly later in the chapter, when we discuss how to install shared assemblies into the Global Assembly Cache (GAC) on the computer.
-
Major Version, Minor Version, Build Number, and Revision Number identify the precise version of this assembly. This four-part version number differentiates this assembly from other versions of the assembly, and enables other .NET applications to specify precisely which version of the assembly they want to use.
Each piece of the four-part version number has a particular meaning to the CLR, so that it can decide which version of an assembly to load. Imagine an assembly A references a particular version number of another assembly B. The runtime uses the following rules to load an appropriate version of assembly B:
-
If there is a version of B with exactly the same version number as requested by A, the runtime will load this version of B.
-
If there is a version of B with a different Build Number, this indicates a compatible change to the assembly (such as a security fix). The runtime will load this version of B, in the absence of an exact match.
-
If there is a version of B with a different Revision Number, this indicates an incremental change to the assembly (such as a Service Pack). The runtime considers this assembly is probably compatible with the version requested by A, so the runtime will load this version of B in the absence of a better match.
-
If there is a version of B with a different Major Version or Minor Version, this indicates a major difference to previous versions of the assembly (such as major new product release). The runtime will not load this version of B.
Metadata about the Types Defined in this Assembly
When we define types (such as classes and structures) in an assembly, the assembly will contain metadata for each of these types. Our simple C# application defines a single type, which is a class called SimpleConsole. Therefore, the assembly's metadata contains a single type definition as follows:
TypeDef #1 - ------------------------------------------------------- TypDefName: MetadataSimpleApp.SimpleConsole (02000002) Flags : [NotPublic] [AutoLayout] [Class] [AnsiClass] (00100000) Extends : 01000001 [TypeRef] System.Object Method #1 [ENTRYPOINT] -------------------------------------------------------- MethodName: Main (06000001) Flags : [Public] [Static] [HideBySig] [ReuseSlot] (00000096) RVA : 0x00002050 ImplFlags : [IL] [Managed] (00000000) CallCnvntn: [DEFAULT] ReturnType: Void No arguments.
Note the following points in this metadata:
-
TypeDefName is the name of the type. The name of this type is MetadataSimpleApp.SimpleConsole. The value in parentheses is the metadata token for this piece of metadata (remember, the value 0x02 in the top byte indicates this is a type definition).
-
Flags provides more information about MetadataSimpleApp.MyModule. Here's a brief synopsis: [NotPublic] indicates MyModule is not a public type; [AutoLayout] indicates the layout of its members is handled automatically by the CLR; [Class] indicates this is a class; and [AnsiClass] indicates LPTSTR string types will be treated as ANSI strings (rather than Unicode strings).
-
Extends indicates that our type inherits from System.Object.
-
Method #1 provides metadata about the first method in our type. This metadata indicates the name of the method (Main), its arguments (none), its return type (void), and other information such as the fact it's a public and static method. As we only defined one method, the only other method you'll find listed in the metadata is the compiler-generated constructor.
Metadata about Other Referenced Assemblies
Our assembly contains metadata about all the other assemblies referenced by our assembly. This information is clearly needed by the CLR, so that it can load these assemblies when needed. Our assembly references several assemblies, for example:
AssemblyRef #1 ------------------------------------------------------- Token: 0x23000001 Public Key or Token: b7 7a 5c 56 19 34 e0 89 Name: mscorlib Major Version: 0x00000001 Minor Version: 0x00000000 Build Number: 0x00000ce4 Revision Number: 0x00000000 Locale: <null> HashValue Blob: Flags: [none] (00000000)
Note the following points in the metadata for the referenced assembly:
-
Public Key or Token indicates the public key that was used to sign the referenced assembly.
-
Name indicates that the name of the referenced assembly is mscorlib.
-
Major Version, Minor Version, Build Number, and Revision Number identify precisely which version of the assembly we want to reference. This ensures we always reference the correct version of the assembly, even if later versions of the assembly are subsequently installed on the computer.
-
Locale facilitates localization of assemblies. It's possible to have several assemblies that contain copies of the same data in different languages (such as English and French). We can assign a different locale to each assembly. The Locale metadata in our assembly indicates which locale-specific assembly we want to reference.
Metadata about Types Used in Referenced Assemblies
As well as the details of the assemblies referenced, we also have details of the types in those assemblies that are used by our code. For example:
TypeRef #4 (01000004) ------------------------------------------------------- Token: 0x01000004 ResolutionScope: 0x23000001 TypeRefName: System.Console MemberRef #1 ------------------------------------------------------- Member: (0a000003) WriteLine: CallCnvntn: [DEFAULT] ReturnType: Void 1 Arguments Argument #1: String
This indicates that we not only reference the type System.Console, but that we also reference a particular overload of this type's WriteLine method. In a more comprehensive application, we could see from the metadata exactly which types and type members are used from other assemblies.
Creating Multi-File Assemblies
All the examples we have presented in this book so far have used single-file assemblies. A single-file assembly comprises a single PE file (or .NET module). The PE file is typically a .dll or .exe file, with a manifest and with metadata that describes the types in the assembly.
It is also possible to create an assembly that comprises multiple .NET modules (hence the name, ‘assembly’). When we compile each .NET module, we get a separate PE file that contains MSIL code and metadata for that module. One of the .NET modules in the assembly must be identified as the ‘main’ module. This .NET module will also have a manifest that identifies all of the other .NET modules in the assembly. The main module will normally have an .exe or .dll extension and the remaining modules will have a .netmodule extension.
There are several reasons for implementing an assembly as a collection of separate .NET modules:
-
We can write each module in a different .NET programming language. This might be useful for companies that use a variety of languages and/or people to implement different parts of the system.
-
We can organize our types into separate modules, to optimize how our code is loaded into the Common Language Runtime. We can place related types into the same module, so that they are loaded together when the module is loaded into the runtime. Seldom-used types can be placed in a separate module; the runtime will only load this module when these types are required in the application. This way, we can minimize the footprint of our application and reduce load time too.
-
We can include data-only modules that contain resources such as images, XML documents, music clips, and so on. The .NET Framework SDK includes a tool called the Assembly Linker (AL.exe) to link these non- MSIL modules into our assembly.
Example of a Multi-File Assembly
In this section, we'll see how to create an assembly containing three separate modules. The modules will be written in different .NET programming languages, and will then be linked together to create a single logical assembly. This is a typical reason for creating an assembly out of separate modules (rather than creating an assembly from just one module).
Here's a description of the three modules in this example:
-
The first module will be called CSMod, and will be written in Visual C#. This module will have a class named DistanceConverter, to convert distances between miles and kilometers.
-
The second module will be called VBMod, and will be written in Visual Basic .NET. This module will have a class named TempConverter, to convert temperatures between Celsius and Fahrenheit.
-
The third module will be called MainMod, and will be written in Visual C#. We're going to make this the main module in the assembly, which means the file will contain a manifest that identifies all the other modules in the assembly.
This is how the modules will work together to form a multi-file assembly:
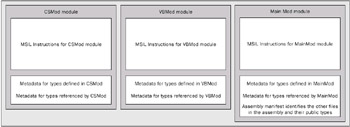
Figure 2
Each module in the assembly contains MSIL instructions and metadata; the metadata describes the types defined in and referenced by the module. The main module in the assembly is MainMod; this module will contain the manifest for the assembly. The manifest identifies all the other modules in the assembly (CSMod and VBMod), and the public types defined in these modules. We'll see what this metadata looks like as we work through the example.
This manifest information is required by the CLR, so that it can load the appropriate module when one of these types is used in the application.
Let's see how to implement what we've just described. There are three steps:
-
Write the source code for CSMod.cs, and compile it into a .NET module.
-
Write the source code for VBMod.vb, and compile it into another .NET module.
-
Write the source code for MainMod.cs, and compile it into the main .NET module in the assembly. At this stage, we'll need to specify which other modules we want in the assembly (that is, CSMod and VBMod).
Creating the CSMod Module
Here is the C# source code for CSMod.cs. The source code for this module (and all the other modules we're going to see in this example) is located in the download folder MultiFileAssembly.
public class DistanceConverter { public static double MileToKm(double miles) { return (miles * 1.6093); } public static double KmToMile(double km) { return (km / 1.6093); } } To compile this file into a module (as opposed to a standalone assembly), we must use the Visual C# .NET command-line compiler. We can't use Visual Studio .NET to create a .NET module; Visual Studio .NET always creates a standalone assembly for our project (the exception to this rule is for Managed Extensions for C++ projects, where we can set the /NOASSEMBLY option to create a module rather than an assembly).
Open a .NET Framework Command Prompt window and compile the code as follows:
C:\> csc /target:module CSMod.cs
The /target:module compiler switch tells the compiler to generate a module (in this case CSMod.netmodule) rather than an assembly. The module contains the compiled MSIL instructions for our code, and contains metadata to describe the types defined and referenced in our code. Later, we'll link this module to other modules to create a multi-file assembly.
The /target compiler switch can be abbreviated to /t.
Creating the VBMod Module
Here is the Visual Basic .NET source code for VBMod.vb:
Public Class TempConverter Public Shared Function CelsiusToFahr(ByVal C As Double) As Double Return (C * 9.0 / 5.0) + 32 End Function Public Shared Function FahrToCelsius(ByVal F As Double) As Double Return (F - 32) * 5.0 / 9.0 End Function End Class
To compile this file into a separate module, run the Visual Basic .NET compiler as follows:
C:\> vbc /target:module VBMod.vb
This generates a .NET module named VBMod.netmodule. Note that at this stage, there is no linkage whatsoever between this module and the one we created earlier (CSMod.netmodule).
Creating the Main Module in the Assembly
Here is the source code for MainMod.cs. Notice that this source code uses the types defined in the other two modules:
using System; public class MyClass { public static void Main() { Console.WriteLine("Select an option: "); Console.WriteLine(" 1 C to F"); Console.WriteLine(" 2 F to C"); Console.WriteLine(" 3 Miles to Km"); Console.WriteLine(" 4 Km to Miles"); Console.Write("=>"); string input = Console.ReadLine(); int opt = Int32.Parse(input); Console.Write("Value to convert: "); input = Console.ReadLine(); double value = Double.Parse(input); double result; switch (opt) { case 1: result= TempConverter.CelsiusToFahr(value); break; case 2: result= TempConverter.FahrToCelsius(value); break; case 3: result= DistanceConverter.MileToKm(value); break; case 4: result= DistanceConverter.KmToMile(value); break; default: Console.WriteLine("Invalid option"); return; } Console.WriteLine("Result: {0}", Math.Round(result, 2)); } } This is how we compile this source file:
C:> csc /addmodule:CSMod.netmodule /addmodule:VBMod.netmodule MainMod.cs
This command compiles MainMod.cs into MainMod.exe. MainMod.exe is the main module in the assembly. The /addmodule compiler switch adds entries to the assembly's manifest, to indicate CSMod.netmodule and VBMod.netmodule are part of this assembly.
| Note | If we forget the /addmodule switch, we'll get a compiler error every time we try to access a type defined in one of the other (unspecified) modules. This is because the compiler doesn't know it's meant to look in these other modules to resolve the type definitions. |
Open MainMod.exe in the MSIL Disassembler, using the /adv (or /advanced) option, and view the manifest information in the assembly by double-clicking on the manifest icon. Here are the important parts of the manifest information:
.module extern VBMod.netmodule .module extern CSMod.netmodule ... .assembly MainMod { .hash algorithm 0x00008004 .ver 0:0:0:0 } .file CSMod.netmodule .hash = (6C CB 79 30 7E D2 C0 E8 F2 57 4A 3F 0F 84 EC FC 75 7D A9 B0 ) .file VBMod.netmodule .hash = (B3 F0 2D E0 C0 34 AC 48 50 76 CA 72 FC 9C 59 85 16 C1 2A D7 ) .class extern public DistanceConverter { .file CSMod.netmodule .class 0x02000002 } .class extern public TempConverter { .file VBMod.netmodule .class 0x02000002 } .module MainMod.exe // MVID: {43979DDE-E7E8-41C0-BD07-3718B82ECC9A} .imagebase 0x00400000 .subsystem 0x00000003 .file alignment 512 .corflags 0x00000001 // Image base: 0x03090000
Notice the following points in this manifest:
-
The manifest references the other modules in the assembly (VBMod.netmodule and CSMod.netmodule).
-
The manifest also lists the public types defined in these modules. This information tells the Common Language Runtime which module to load when a user of the assembly uses one of our classes.
| Important | When we create a multi-file assembly, we must remember to deploy all the modules in the assembly. In the example we've just considered, we must deploy VBMod.netmodule and CSMod.netmodule along with the main module in the assembly, MainMod.exe. |
EAN: 2147483647
Pages: 90