Structuring Applications with Namespaces
All the types in a .NET application are logically defined in namespaces. The .NET Framework class library is itself logically organized into a hierarchical namespace structure. The following table describes some of the namespaces defined in the .NET Framework class library:
| Namespace | Description |
|---|---|
| System | Contains fundamental classes, structures, interfaces, delegate types, and events that are used extensively in .NET applications. For example, the System namespace contains the Object class, from which all other types inherit. Object provides basic methods such as Equals, ToString, and Finalize. |
| System.Windows | Contains classes and other types for creating Windows-based GUIs. |
| System.Web | Contains classes and other types for creating ASP.NET pages and server controls. |
| System.Data | Contains basic ADO.NET classes and types for querying, updating, and managing databases. |
| System.Xml | Contains classes and types for creating and processing XML documents. |
If we create a new C# project, Visual Studio .NET assigns a default namespace for the project. To illustrate this, open Visual Studio .NET and create a new project (for example, a Windows application). Now, if you right-click on the project icon in the Solution Explorer, and select Properties from the Shortcut menu, then the Property Pages dialog box appears as follows:
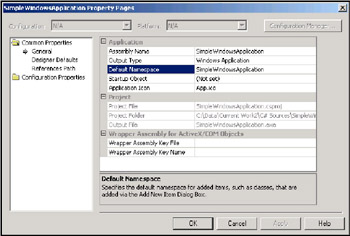
Our project has the default namespace SimpleWindowsApplication. By default, this is the same as the project name, but we can change this namespace if we want a different one. For example, if we create several different projects and we want them all to inhabit the same namespace, we can change the default namespace in each project to what is required. This will ensure that any classes we add using the Visual Studio .NET wizards will be placed in the correct namespace. The wizards achieve this by inserting a namespace declaration into any files they generate. The namespace name for these directives is obtained from this property. Changing the value here won't change the namespace of any classes that already exist in the project, however. Also, make sure you don't delete the default namespace entry in the project properties dialog; if you do, rather than leaving out a namespace directive, Visual Studio .NET will add a blank namespace around any classes you add with the wizard, and this will result in a compilation error unless you fill in a namespace yourself.
| Note | If you come across Visual Basic .NET code, you may be surprised to find no namespace declarations in the code itself, yet discover that the compiled types all belong to namespaces. VB.NET has a similar project-level namespace property, but rather than using it to insert default namespace declarations, it uses it at compile-time to wrap all the types in the specified namespace. So by default, all VB.NET types belong to a namespace with the same name as the project in which they are declared. |
It's also possible to write namespace statements explicitly into our code ourselves. For example, we can edit Form1.cs in our simple application and add an additional namespace declaration around the Form1 class as follows:
namespace SimpleWindowsApplication { namespace MyNamespace { public class Form1 : System.Windows.Forms.Form { ... } } } So it's possible to define a nested namespace. In this example, the namespace declaration for MyNamespace is now nested within the declaration of another namespace called SimpleWindowsApplication. Therefore, the fully qualified name of the Form1 class is SimpleWindowsApplication.MyNamespace.Form1.
You can build the application directly from Visual Studio .NET, but if you want to compile this application on the command line, then the minimum code needed to create a simple form is shown below, and is contained in the download material for this book, in the file Form1.cs:
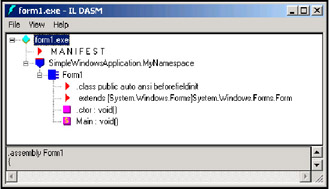
// form1.cs using System; using System.Windows.Forms; namespace SimpleWindowsApplication { namespace MyNamespace { public class Form1 : System.Windows.Forms.Form { static void Main() { Application.Run(new Form1()); } } } } If you look at the resulting IL in the MSIL Disassembler window, it appears as follows. The window confirms that the Form1 class is defined in the namespace SimpleWindowsApplication.MyNamespace:
Designing and Implementing Namespaces
We can learn a lot about namespaces by looking at the .NET Framework. There are thousands of classes and other types in the .NET Framework class library, and Microsoft has organized these classes and types into a hierarchical namespace structure as follows:
-
Namespaces that start with the word System contain classes and types that are common to all .NET languages. For example: System.Data contains ADO.NET types; System.Drawing contains graphical types; System.Security contains security-related types; and so on.
-
Namespaces that start with the word Microsoft contain classes and types that are specific to Microsoft. These include namespaces for all of the .NET languages. For example, Microsoft.CSharp contains classes that support compilation and code generation for C#. Similarly, Microsoft.VisualBasic contains the Visual Basic .NET runtime, plus classes and other types that support compilation and code generation for Visual Basic .NET.
You should start thinking about namespaces during the design phase of any project, because they provide an excellent way of partitioning a large system into discrete sub-systems.
Many organizations use the Unified Modeling Language (UML) to model their object-oriented systems. For more information about UML, see Instant UML 1-86100-087-1 published by Wrox Press. UML includes graphical notation for packages, which contain groups of related classes and types in the system being modeled. During object-oriented design, we identify which classes are dependent on each other, and put these classes into the same package. Packages provide a way to compartmentalize dependent classes into a cohesive unit of logic and functionality, which provides an ancillary benefit of presenting a system which is easier to understand.
Example of Designing Namespaces
Imagine a system that allows people to borrow books from a library. The system might have classes such as Member, Book, and so on. The following diagram shows a simplified UML-like object model for this system:
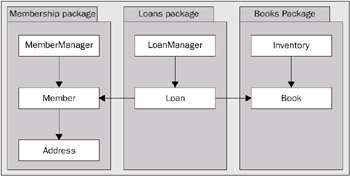
Figure 1
There are three packages in this model:
-
The Membership package contains all the classes and types to implement the membership rules for the library. The MemberManager object has a collection of Member objects, and each Member has an Address.
-
The Loans package contains all the classes and types to implement the rules for loaning and returning books. The LoanManager object has a collection of Loan objects. Each Loan object has a reference to a Member object and a Book object, to indicate which member has borrowed which book.
-
The Books package contains all the classes and types to implement the rules for maintaining the library's inventory. Each Book object holds information about a book, such as its title and author.
Clearly, this is a simplified object model, and we've ignored many details that would be present in a real library system. Nevertheless, we can already see how packages help us to view the system as a collection of loosely coupled sub-systems.
In object-oriented design, we aim to minimize the dependencies between the classes in different packages. This makes it easier to change the implementation details within a package, without adversely affecting the other packages in the system.
Example of Implementing Namespaces
When we start writing code for our system, following the most logical mapping from UML to code, each package should be represented with a separate namespace. The C# application for our library system will therefore consist of three namespaces:
| Namespace | Classes in this namespace |
|---|---|
| Membership | MemberManager, Member, and Address |
| Loans | LoanManager and Loan |
| Books | Inventory and Book |
By mapping UML packages to namespaces in our code, we achieve continuity between the design phase and the construction phase of the project. In addition, it will help maintenance programmers understand how the application is structured when they have to fix bugs, or add new features, in the future.
Namespaces define the logical grouping of types in our system. They do not specify where we should write these namespaces in C# source files. Here are some options:
-
Write all the types in all the namespaces in a single C# source file. This is only feasible if the namespaces are small and the types few in number. Otherwise, if the size of the source file grows unacceptably large, because there are so many classes and types in it, it will make the code difficult to navigate. This also more or less prevents a team collaborating on different parts of the code at the same time.
-
Write each type in a separate source file. This gives maximum flexibility for collaboration, but disconnects the development of related functionality in different types. When working on a type in this system, it is as easy to reference a type in a different namespace as it is to reference one in the same namespace, so we run the risk of crossing the boundaries between namespaces more often than we would like.
-
Put groups of related types in the same source file, ignoring namespace boundaries. We could, for instance, put all of our ‘entity’ classes – Member, Book, and Loan in our example – in one source file, because we may write them all at the same time. But this blurs the logical boundaries we set up in our UML analysis. Nonetheless, sometimes it makes sense to put two types from different namespaces in the same file, where they are very closely related, perhaps because they form the interface between the two subsystems in the two namespaces.
-
Put all of the types in a namespace into the same source file. This most closely follows the logical structure of the application. Again, it will only be practical if number of types in each namespace is small, and generally you will want to split the namespace into several groups of related types. Our example, however, has few types in each namespace, and they are closely related in every case. This pattern makes sense in this situation.
We'll take the last approach, and create a C# application that consists of four files:
| Filename | Description |
|---|---|
| membership.cs | Implements all the types in the Membership namespace |
| books.cs | Implements all the types in the Books namespace |
| loans.cs | Implements all the types in the Loans namespace |
| library_app.cs | Contains the Main method for our application |
Writing the Membership Namespace
Here is the full source code for the Membership namespace. The code is defined in membership.cs. We'll discuss the salient design issues after the code listing; one thing to notice at the outset, though, is that the Membership namespace has no dependencies on any of the other namespaces in our application – it only uses system namespaces.
using System; using System.Collections; namespace Membership { public class MemberManager { private static MemberManager mInstance; private Hashtable mLibraryMembers; private MemberManager() { mLibraryMembers = new Hashtable(); } public static MemberManager Instance { get { if (mInstance == null) mInstance = new MemberManager(); return mInstance; } } public Member CreateMember(string name, string street, string city) { Member newMem = new Member(name, street, city); mLibraryMembers[name] = newMem; return newMem; } public Member this [string name] { get { return (Member)mLibraryMembers[name]; } } } // ... more to follow } The MemberManager class is a singleton class, which means there will only ever be a single instance of this class. To achieve this effect, we define the constructor as private. We also provide a static property named Instance, which returns the single instance of MemberManager. This property uses lazy initialization; it only creates the MemberManager instance when it is first requested.
The MemberManager class uses a Hashtable to keep a collection of Member objects. Member objects are created and added to the collection using the CreateMember factory method. To allow us to retrieve Member objects from the collection, using the member name as a key, we have created a read-only indexer. Note that this simplified implementation assumes that member names will be unique.
The file membership.cs also contains the definition of the Member class:
public class Member { private string mName; private Address mAddress; public Member(string name, string street, string city) { mName = name; mAddress = new Address(street, city); } public override string ToString() { return mName + ", address: " + mAddress.ToString(); } } The Member class holds the name and address of a member. The address is encapsulated in the Address class. We have provided ToString methods in each class, to retrieve the information in text format. The Address class, which completes the Membership namespace, is shown below:
public class Address { private string mStreet; private string mCity; public Address(string street, string city) { mStreet = street; mCity = city; } public override string ToString() { return mStreet + ", " + mCity; } } } This source code illustrates several important issues that we have discussed in this chapter and in earlier chapters. Most importantly, it represents a generic membership framework that could be used in another member-based application.
Writing the Books Namespace
Now let's look at the source code for the Books namespace. The code is defined in books.cs:
using System; using System.Collections; namespace Books { public class Inventory { private static Inventory mInstance; private Hashtable mLibraryBooks; private Inventory() { mLibraryBooks = new Hashtable(); } public static Inventory Instance { get { if (mInstance == null) mInstance = new Inventory(); return mInstance; } } public Book CreateBook(string title, string author, string isbn) { Book newBook = new Book(title, author, isbn); mLibraryBooks[isbn] = newBook; return newBook; } public Book this [string ISBN] { get { return (Book)mLibraryBooks[ISBN]; } } } public class Book { private string mTitle; private string mAuthor; private string mISBN; public Book(string title, string author, string isbn) { mTitle = title; mAuthor = author; mISBN = isbn; } public override string ToString() { return mTitle + " (ISBN: " + mISBN + "), by: " + mAuthor; } } } There are many noticeable similarities between the Inventory class and the MemberManager class. Both classes are singleton classes, and both use a Hashtable to hold a collection of other objects (Inventory holds a list of Book objects, and MemberManager holds a collection of Member objects).
Another similarity is the way Inventory and MemberManager provide access to the objects in their collections. Both classes provide a factory method to create objects and add them to the collection, and an indexer to retrieve the items. In this simplified example, Books are indexed using a string representation of their ISBN. (Although the N in ISBN is for number, an ISBN doesn't just consist of numbers; it can also end with the character X).
Notice again that the Books namespace has no dependency whatsoever on any of the other namespaces in our application. This illustrates the design goal of loose coupling between namespaces.
Writing the Loans Namespace
The Loans namespace contains the LoanManager and Loan classes. Every time a member borrows a book, the LoanManager creates a new Loan object to identify the book and the borrower. The LoanManager also allows books to be returned, which is an important business rule for the library.
The code for the Loans namespace is defined in loans.cs. We'll discuss the design issues after the code listing:
using System; using System.Collections; using Membership; using Books; namespace Loans { public class LoanManager { private static LoanManager mInstance; private Hashtable mLoans; private LoanManager() { mLoans = new Hashtable(); } public static LoanManager Instance { get { if (mInstance == null) mInstance = new LoanManager(); return mInstance; } } public void BorrowBook(string isbn, string member) { Inventory inv = Inventory.Instance; MemberManager mem = MemberManager.Instance; Book theBook = inv[isbn]; Member theMember = mem[member]; if (theBook != null && theMember != null) { Loan theLoan = new Loan(theBook, theMember); mLoans[isbn] = theLoan; Console.WriteLine(theLoan.ToString()); } else Console.WriteLine("Cannot borrow book"); } public void ReturnBook(string isbn) { if (mLoans.ContainsKey(isbn)) { mLoans.Remove(isbn); Console.WriteLine("Book {0} has been returned", isbn); } else Console.WriteLine("Cannot return book"); } } public class Loan { private Book mTheBook; private Member mTheMember; public Loan(Book TheBook, Member TheMember) { mTheBook = TheBook; mTheMember = TheMember; } public override string ToString() { return "Book: " + mTheBook.ToString() + "\nBorrowed by: " + mTheMember.ToString() + "\n"; } } } Note the following points in this source file:
-
We import the Membership and Books namespaces. This enables us to access the classes defined in these namespaces, without needing to use fully qualified class names such as Membership.MemberManager.
This is the one occasion where dependencies with other namespaces cannot be avoided. Some degree of coupling is inevitable; the important thing is to identify where this coupling occurs, and to minimize it as much as possible.
-
LoanManager is a singleton class, because there is only one LoanManager in our library system.
-
The BorrowBook method enables books to be borrowed by members. The book and member are identified by unique identifiers. In this simple example, we use the book's ISBN as a lookup key in Inventory to get a reference to the Book object with this ISBN. Likewise, we use the member name as a lookup key in MemberManager to get a reference to the Member object with this name. Obviously, in a real-world application, we would need to be more careful in selecting unique identifiers as these would probably represent a primary key in a database table. While this example uses Hashtables internally, we could easily change the Inventory and/or MemberManager classes to use a different storage technique without needing to change any other classes.
If the Book and Member objects can be located, we create a new Loan object to remember which member has borrowed which book. We store the Loan object in a Hashtable, using the book's ISBN as the lookup key. In our simple example, this is a reasonable choice for a lookup key, because each book can only be on loan to one member at a time.
-
The ReturnBook method enables books to be returned to the library. The only information we need when a book is returned is the book's ISBN (it doesn't matter who returns the book – not in our model, anyway).
If the book's ISBN can be located in the loans Hashtable, it means the book is indeed on loan. In this case, we remove the Loan from the Hashtable to indicate that the book is no longer on loan.
-
The Loan class has a reference to a Book object, and a reference to a Member object. In UML terms, Loan is an association object; it defines an association between a Book and a Member.
Writing the Main() Method for the Application
Now that we've seen how to implement the core namespaces in our application, all that remains is to write a Main method to use these namespaces. The code for the Main method is shown below, and is located in the file library_app.cs:
using System; using Membership; using Books; using Loans; namespace LibraryApp { public class LibraryApp { public static void Main() { Inventory inv = Inventory.Instance; inv.CreateBook("Professional C#", "Robinson", "1-86100-704-3"); inv.CreateBook("Instant UML", "Muller", "1-86100-087-1"); MemberManager mem = MemberManager.Instance; mem.CreateMember("Georgia", "5th Avenue", "New York"); mem.CreateMember("William", "Park Lane", "London"); LoanManager loanmgr = LoanManager.Instance; loanmgr.BorrowBook("1-86100-704-3", "Georgia"); loanmgr.BorrowBook("1-86100-087-1", "William"); loanmgr.ReturnBook("1-86100-704-3"); loanmgr.ReturnBook("1-86100-087-1"); } } } Note the following, regarding this code:
-
We import the Membership, Books, and Loans namespaces. We use classes from all these namespaces in this application.
-
In Main, we get a reference to the Inventory object, and create two books in the inventory. We also get a reference to the MemberManager object, and create two members.
-
We get a reference to the LoanManager object, and call BorrowBook twice to borrow two books from the library. Then we call ReturnBook twice, to return these books to the library. In all these cases, we identify the books and members by their ISBNs and names respectively.
Building and Running the Application
One way to build this application is to open a .NET Framework Command Prompt window and type the following command:
C:\> csc library_app.cs membership.cs books.cs loans.cs
This command compiles the four C# source files in this application, and creates a single assembly named library_app.exe. The assembly is named after the first source file in the list of files to be compiled; to create a different name for the assembly, use the /out:filename compiler switch. Another option would be to compile each of the namespaces into a separate DLL. Then we could just use the /r switch as necessary to link to these DLLs. Visual Studio .NET can also provide a number of different options for compilation, and you can choose whichever method is most appropriate. We'll look at these physical options later on.
When we run the application, it displays the following output on the console window:
Book: Professional C# (ISBN: 1-86100-704-3), by: Robinson Borrowed by: Georgia, address: 5th Avenue, New York Book: Instant UML (ISBN: 1-86100-087-1), by: Muller Borrowed by: William, address: Park Lane, London Book 1-86100-704-3 has been returned Book 1-86100-087-1 has been returned
Nested Namespaces
Nested namespaces allow us to define a layered architecture, which offers different levels of abstraction in our application. This helps us grasp the overall shape of the system, while at the same time offering enough detail to model extremely large or complex systems in an organized and comprehensible manner.
The .NET Framework class library is a good example of a layered namespace design:
-
The top-level namespaces System and Microsoft differentiate systemwide classes (in the System namespace) from vendor-specific classes (in the Microsoft namespace).
-
Nested namespaces, such as System.Data and System.Drawing, partition the system-wide classes into logical groups. Each namespace exhibits the desirable characteristics of high cohesion (everything that belongs together, is together), and loose coupling (there are very few dependencies between classes in different namespaces).
-
A further level of nesting provides still more granularity. For example, the following table describes the nested namespaces beneath System.Data.
| Namespace | Description |
|---|---|
| System.Data.SqlClient | Contains ADO.NET classes and types for accessing SQL Server 7.0 (and later) databases. |
| System.Data.OleDb | Contains ADO.NET classes and types for accessing SQL Server 6.5 (and earlier) databases, and other databases such as Oracle and Microsoft Access. |
| System.Data.Common | Contains common ADO.NET classes and types that are used to access any kind of database. For example, this namespace includes the DataSet class, which represents an in-memory cache of data in a disconnected application. |
| System.Data.SqlTypes | Contains types to represent native SQL Server data types. |
Defining Nested Namespaces
There are two different ways to define nested namespaces in our code. The following example illustrates both techniques. The source code for this example is located in the download folder; the following file is named nested_namespaces.cs:
namespace MyNamespace1 { public class MyClassA { // members } namespace MyNestedNamespace1 { public class MyClassB { // members } } } namespace MyNamespace2.MyNestedNamespace2 { public class MyClassC { // members } } Note the following points:
-
MyNamespace1 is an outer namespace, and contains a class called MyClassA. The fully qualified name of this class is MyNamespace1.MyClassA.
-
MyNestedNamespace1 is defined inside MyNamespace1. This creates a nested namespace called MyNamespace1.MyNestedNamespace1. This namespace contains a class called MyClassB; the fully qualified name of this class is MyNamespace1.MyNestedNamespace1.MyClassB.
-
MyNamespace2.MyNestedNamespace2 is a nested namespace. This again illustrates how to use the ‘dot’ syntax in a Namespace statement, to create a nested namespace. This namespace contains a class called MyClassC; the fully qualified name of this class is MyNamespace2.MyNestedNamespace2.MyClassC.
Using Nested Namespaces
If we want to use the classes defined in nested namespaces, we can use fully qualified class names as follows. The source code below is located in the file named use_fully_qualified.cs.
public class UseFullyQualified { public static void Main() { MyNamespace1.MyClassA a = new MyNamespace1.MyClassA(); MyNamespace1.MyNestedNamespace1.MyClassB b = new MyNamespace1.MyNestedNamespace1.MyClassB(); MyNamespace2.MyNestedNamespace2.MyClassC c = new MyNamespace2.MyNestedNamespace2.MyClassC(); } } Compile these files into an assembly by opening a .NET Framework Command Prompt window and typing the command given below:
C:\> csc use_fully_qualified.cs nested_namespaces.cs
Then open this assembly in the MSIL Disassembler to see what the compiler has made of our namespaces and classes. The MSIL Disassembler window displays the following information:

The MSIL Disassembler shows there are three namespaces in our assembly.
Using fully qualified class names can be tiresome if we use the same classes several times in our code. To save some keystrokes, as you already know, we can import the required namespaces as follows. The source code opposite is located in the file named use_shortnames.cs:
using MyNamespace1; using MyNamespace1.MyNestedNamespace1; using MyNamespace2.MyNestedNamespace2; public class UseShortnames { public static void Main() { MyClassA a = new MyClassA(); MyClassB b = new MyClassB(); MyClassC c = new MyClassC(); } } Compile this code along with nested_namespaces.cs, and if you open this assembly in the MSIL Disassembler, you will we see the same classes and namespaces as in the previous example. Note that we need to specify each namespace separately in a using statement, even nested namespaces. The using statement will not search recursively through nested namespaces to resolve type names.
EAN: 2147483647
Pages: 90
- Structures, Processes and Relational Mechanisms for IT Governance
- Measuring and Managing E-Business Initiatives Through the Balanced Scorecard
- A View on Knowledge Management: Utilizing a Balanced Scorecard Methodology for Analyzing Knowledge Metrics
- Measuring ROI in E-Commerce Applications: Analysis to Action
- The Evolution of IT Governance at NB Power